Advanced Extended Texts (beginning/ending/line texts) for sales, purchase and service documents.
Current Version: 26.4.0.1as of Business Central 26. For older BC versions, downgrades are available. AppSource Name: NAVAX Document Text
Manual
Creation date: 2026/05/23 The current version of this manual can be found at:
☰ Contents
General
NAVAX Document Text NAVAX Document Text is an extension for Microsoft Dynamics 365 Business Central that allows you to centrally manage individual Extended Texts for sales, purchase, service, and job documents and automatically integrate them into your documents...
Setup
Document Text Setup Before you can use NAVAX Document Text, you must make the basic settings. On this page, you define the most important options...
Extended Texts An Extended Text is an individually defined text that is either automatically or manually inserted into a document - depending on the selected type and defined conditions. You create Extended Texts on the Standard Text Codes page, which you can find via search in Business Central...
Beginning and Ending Texts Beginning and ending texts are Extended Texts that are automatically inserted before or after the document lines. They appear in sales, purchase, service, or job documents. Use these texts for notes, legal information, or individual messages to your customers...
Personalized Texts Personalized texts are Extended Texts that are specifically created for a particular customer, vendor, or salesperson/purchaser. These texts are automatically used in documents when the corresponding business partner is selected...
Line Texts Line texts are Extended Texts that are directly linked to master data such as items, resources, G/L accounts, or service items. The text appears automatically as line text below the respective line when you use the corresponding master data record in a document...
Miscellaneous Texts Miscellaneous texts are Extended Texts that are linked to master data such as payment terms, shipment methods, or service configurations. These texts appear automatically in documents when the corresponding configuration is used in the document...
Working with the App
Using Beginning and Ending Texts This page describes how to use, edit, and manage beginning and ending texts in your daily documents...
Using Personalized Texts This page describes how to use, review, and manage personalized texts in your daily documents...
Using Line Texts This page describes how to use, edit, and manage line texts in your daily documents...
Using Miscellaneous Texts This page describes how to use Miscellaneous Texts in your daily documents...
Manually Inserting Texts This page allows you to manually select which texts should be inserted into the current document. This function is useful when you want to add texts to a document afterwards or in a targeted manner...
Sorting and Conditions With the advanced text conditions in NAVAX Document Text, you can flexibly control which texts are used and transferred to your documents. You can specify that certain texts are automatically inserted only for selected languages, within a specific time period, or for specific document types. This ensures that all relevant information always appears correctly and contextually in your sales, purchase, service, and job documents...
Example Scenarios This page provides practical examples for various use cases of NAVAX Document Text. Each scenario shows step-by-step how to set up and use specific features...
FAQ and Troubleshooting Here you will find answers to frequently asked questions about NAVAX Document Text as well as solutions to typical problems...
Advanced Features
Item Attributes NAVAX Document Text extends the Business Central standard functionality for item attributes by automatically transferring them as document text lines to your documents. This allows important product properties such as material, color, size, or technical specifications to appear directly on quotes, orders, and invoices...
Text Editor and Placeholders NAVAX Document Text provides a text editor that allows you to easily create and edit extended texts for documents. The editor supports placeholders to insert dynamic content from the respective tables. You can copy pre-formatted texts from other programs and paste them into the text editor...
Formatting With the formatting functions in NAVAX Document Text, you can design your extended texts professionally and in accordance with corporate identity guidelines. You can adjust font type, size, and color, as well as control paragraph alignment and indentation...
Copy Documents When you copy documents, a window may appear - depending on the setup - asking whether and which texts should be transferred with the document...
Report Layout Selection The Report Layout Selection window defines which layout should be used when printing a document. For document texts to be printed on A4 documents, the corresponding NAVAX Document Text report layouts must be set up...
Export/Import With the export and import function, you transfer configured Standard Text Codes between different Business Central installations. This enables efficient management of your extended texts and saves time during setup...
Field Descriptions
Standard Text Code Fields Using Standard Text Codes, you can manage Extended Texts for documents in Dynamics 365 Business Central. These codes allow you to store frequently used texts centrally and insert them on documents as needed...
Extended Texts Extended texts are individually defined texts that can be automatically inserted into documents. You create extended texts on the Standard Text Codes page, which you can easily find via search...
Document Header Fields With NAVAX Document Text, you can add beginning and ending texts to all documents in Dynamics 365 Business Central. These texts appear in the document header and are suitable, for example, for greetings, notes, legal information, or individual messages...
Personalized Texts The fields for personalized texts allow you to store Extended Texts specifically for a particular customer, vendor, or salesperson/purchaser...
Document Lines Fields In all documents in Dynamics 365 Business Central, you can add line texts. This lets you print additional information directly below the respective document line. Line texts are suitable, for example, for product information, notes, or legal information...
Line Positions on Master Data Cards NAVAX Document Text allows you to link Extended Texts directly to master data such as items, resources, G/L accounts, or service items. These texts appear automatically as line texts below the respective line when you use the corresponding item, resource, G/L account, or service item in a document...
Miscellaneous Texts Miscellaneous texts in NAVAX Document Text allow you to display additional information on documents that is not directly associated with the usual document types such as sales or purchase documents. These texts can be used for various purposes, e.g., for legal notices, special instructions, or individual messages that cannot be captured in the standard fields of the documents...
Document Text Line Fields Document text lines are created automatically as soon as you use texts via NAVAX Document Text in documents. These lines contain the actual content that is displayed on the respective documents. They allow flexible design of the document texts, e.g., through formatting such as bold, italic, colors, or individual fonts and sizes. The text lines can be used for different document types and customized individually...
Field List The field list provides you with an overview of all fields that can be selected from the chosen tables in document texts or extended texts to be used as placeholders...
Information for Developers
Extending Documents NAVAX Document Texts provides a set of standard documents that contain the Document Texts and can be used without customization. If this is not sufficient for your company or your documents need to be customized, you can also use NAVAX Document Texts on your own documents...
Extending NAVAX Document Text This page contains a list of all available events for the individual objects that can be used to extend the core functionality of NCDT Document Text...
Events
Appendix
NAVAX License Management The NAVAX License Management page (in older versions NAVAX License Overview or NCEX License Overview) displays the current license status of the NAVAX extensions...
Installation Notes This page contains important information about the installation and technical requirements of NAVAX Document Text. The information is primarily intended for administrators and IT managers...
Release Notes
Docs / App / NAVAX Document Text / General NAVAX Document Text
NAVAX Document Text is an extension for Microsoft Dynamics 365 Business Central that allows you to centrally manage individual Extended Texts for sales, purchase, service, and job documents and automatically integrate them into your documents.
The app helps you efficiently and consistently integrate important information such as legal notices, delivery terms, or customer-specific messages into your documents - without manual entry.
With this extension, you also receive a selection of extended standard documents for Dynamics 365 Business Central that already integrate the document texts. If these templates do not meet your requirements, you can easily customize your own documents with Microsoft Word.
NAVAX Document Text enables you to design your documents professionally and individually - for more efficient processes and optimal presentation to your business partners.
Brief Overview of Features
Beginning and Ending Texts: General texts, greeting texts before or after the document lines
For more information, see Setup, Beginning and Ending Texts.
Line Texts: Texts directly under individual document positions for items, G/L accounts, resources, service items
For more information, see Setup, Line Texts.
Miscellaneous Texts: Texts for shipment methods, payment terms, service order types, reminders, etc.
For more information, see Setup, Miscellaneous Texts.
Personalized Texts: Individual beginning and ending texts for specific customers, vendors, or salespeople/purchasers
For more information, see Setup, Personalized Texts.
Export/Import: Extended Texts can be easily backed up, transferred, and exchanged between companies
For more information, see Advanced Features, Export/Import.
Getting Started
To begin with NAVAX Document Text, we recommend the following steps:
Open Document Text Setup and configure basic settings
For more information, see Setup, Document Text Setup.
Create Extended Texts for beginning/ending texts, line texts, or miscellaneous texts
For more information, see Setup, Extended Texts.
NAVAX Document Text is seamlessly integrated into the existing sales, purchase, service, and job processes of Business Central.
Documents are created, posted, and printed as usual - the Extended Texts are automatically inserted.
Quick access via search:
The search terms "ncdt", "nvxdt", and "navax" are recognized by "Tell me what you want to do".
This allows you to quickly access the individual areas of NAVAX Document Text:
Document Text Setup - Basic settings and default values
Standard Text Codes - Manage and edit Extended Texts
Note
NAVAX Document Text was developed with the prefix NCDT or NVXDT.
NCDT or NVXDT stands for NAVAXConsulting Document Text.
Permission Sets
The following permission sets are available for NAVAX Document Text:
Docs / App / NAVAX Document Text / Setup Document Text Setup
Before you can use NAVAX Document Text, you must make the basic settings. On this page, you define the most important options.
Setup Steps
Open the NCDT Document Text Setup page via search.
Activate Document Texts Activated in the Document Text Setup.
Configure the options in General according to your requirements. This includes settings for activation, copying texts when transferring documents, and printing item attributes.
Define the Text Formatting. Specify font type, font size, font color, paragraph direction, and formatting such as bold or italic that should be used as default settings for new text lines. You can also specify spacing and indentation for new text lines. This ensures a consistent and CI-compliant appearance.
For more information, see Advanced Features, Formatting.
Create the Standard Text Codes using the action of the same name. These contain Extended Texts that can be automatically inserted into documents based on defined conditions.
For more information, see Setup, Extended Texts.
Define the Extended Texts for the following master data via the respective action:
Payment Terms
Shipment Methods
Reminder Terms
Finance Charge Terms
Service Order Types
Service Contract Groups
Standard Service Codes
These Extended Texts are called Miscellaneous Texts.
For more information, see Setup, Miscellaneous Texts.
General, Fields
Field
Description
Document Texts Activated
Specifies whether NAVAX Document Text is activated and automatically inserts configured document texts when creating a document.
Activated: NAVAX Document Text automatically inserts Extended Texts into documents based on defined conditions.
Deactivated: The standard feature for Extended Texts in Business Central is used.
Tip
Only activate this option after you have set up the basic Extended Texts.
Copy Documents with Texts
Specifies whether existing texts should be copied when copying documents.
Always: Beginning texts, line texts, and ending texts are automatically copied (e.g., when creating an invoice from an order).
Never: Only the document lines are copied, texts must be inserted again.
On Request: When copying, a dialog appears where you can select which texts should be copied to the new document.
For more information, see Advanced Features, Copy Documents.
Print Item Attributes
Specifies whether existing item attribute texts should also be printed on documents.
Activated: Item attributes (e.g., Color: Red, Size: L) are printed as additional texts below the item lines.
Deactivated: Item attributes do not appear on printed documents.
For more information, see Advanced Features, Item Attributes.
Formatting Defaults, Fields
Field
Description
Create Text Lines with Defaults
Specifies whether text lines should be created with the values of the last line or with the default values from the Document Text Setup, in the Formatting Defaults area.
From Last Line: New text lines inherit the formatting of the last entered line.
From Setup: New text lines inherit the formatting defaults from this setup (e.g., Arial, 10pt, black).
Tip
Activate this option for a consistent appearance of all texts.
Default Font Family
Specifies which font family should be used as default. Newly created lines will then have this value automatically configured.
Choose a font family that matches your corporate design (e.g., Segoe UI, Arial, Times New Roman).
Note
Note about pt (Point): The unit of measurement pt (point) is a typographic unit for specifying font sizes and spacing. 1 pt equals approximately 1/72 inch or 0.35 mm.
Common font sizes are: 8-10pt for body text, 12-14pt for headings.
Default Font Size (pt)
Specifies which font size in pt should be used as default. Newly created lines will then have this value automatically configured.
Typical values: 9pt for body text, 12pt for headings, 8pt for footnotes.
Default Font Color
Specifies which font color should be used as default. Newly created lines will then have this value automatically configured.
Choose a color that is easily readable on printed documents (e.g., Black for normal text, Red for warnings).
Default Paragraph
Specifies which paragraph direction should be used as default. Newly created lines will then have this value automatically configured.
Options: Left, Center or Right.
Bold by default
Specifies whether newly created lines should receive Bold as default value.
Tip
Activate this option if you want all new texts to be highlighted by default (e.g., for headings or important notes).
Italic by default
Specifies whether newly created lines should receive Italic as default value.
Tip
Use this option for texts that should be visually distinguished from the main text (e.g., remarks or notes).
Default Padding Top (pt)
Specifies which space above in pt should be used as default. Newly created lines will then have this value automatically configured.
Recommended: 0pt for normal body text, 6-12pt for headings or to structure text blocks.
Default Padding Bottom (pt)
Specifies which space below in pt should be used as default. Newly created lines will then have this value automatically configured.
Recommended: 0-3pt for normal body text, 6-12pt after paragraphs or headings.
Default Indentation (pt)
Specifies which indentation in pt should be used as default. Newly created lines will then have this value automatically configured.
Recommended: 0pt for normal text, 20-30pt for lists or subordinate text sections.
Actions
Standard Text Codes
Opens the Standard Text Codes page where you can define and set up general texts, these texts can be used in various areas.
Setup, Actions
Payment Terms
Sets up the Extended Texts for payment terms that are inserted on documents for your customers.
Shipment Methods
Sets up the Extended Texts for shipment methods that are inserted on shipments for your customers.
Reminder Terms
Set up Extended Texts for reminder terms that are inserted on reminders.
Finance Charge Terms
Set up Extended Texts for finance charge terms that are inserted on documents in case of late payment by the customer.
Service Order Types
Here the Extended Texts for service order types are set up, which can be inserted on service orders, service contracts, or contract quotes.
Service Contract Groups
Here the Extended Texts for service contract types are set up, which can be inserted on service orders, service contracts, or contract quotes.
Standard Service Codes
Here the Extended Texts for standard service codes are set up, which can be inserted on service orders, service contracts, or contract quotes.
System, Actions
NAVAX License Management
Opens the NAVAX License Management, which displays the current license status of the NAVAX extensions.
An Extended Text is an individually defined text that is either automatically or manually inserted into a document - depending on the selected type and defined conditions. You create Extended Texts on the Standard Text Codes page, which you can find via search in Business Central.
Extended Text Types
NAVAX Document Text supports various types of Extended Texts that appear at different locations in the document:
Beginning Texts
Appear at the beginning of the document, before all lines. Ideal for greetings, validity notes, or general information.
For more information, see Setup, Beginning and Ending Texts.
Ending Texts
Appear at the end of the document, after all lines. Suitable for legal notes, closing greetings, or contact information.
For more information, see Setup, Beginning and Ending Texts.
Line Texts
Appear directly below a document line and refer to a specific item, resource, G/L account, service item, or job planning line. Ideal for specific information about these lines, such as maintenance instructions, service terms, or account descriptions.
For more information, see Setup, Line Texts.
Miscellaneous Texts
Extended Texts that are linked to master data, e.g., payment terms, shipment methods, reminder terms, or finance charge terms.
For more information, see Setup, Miscellaneous Texts.
Basic Structure of an Extended Text
Each Extended Text consists of the following main elements:
Element
Description
Code
Unique identifier for the Extended Text (e.g., VALIDITY, TERMS, GREETING)
Description
Meaningful designation that explains the purpose of the text
Text Type
Beginning Text, Ending Text, or other available types
Text
The actual content with optional placeholders for dynamic fields
Conditions
Document types, languages, validity periods that determine when the text appears
Formatting
Font type, size, color, paragraph formatting
How to Create an Extended Text
The following guide shows the basic steps for creating an Extended Text. Details on specific text types can be found in the linked sections.
General Step-by-Step Guide
Open the Standard Text Codes page via search.
Click New to create a new Standard Text Code.
Enter a unique Code (e.g., GREETING, TERMS, NOTE). This code serves as an identifier for the Extended Text.
Enter a meaningful Description that explains the purpose of the text.
Select the desired Text Type:
Beginning Text - Text appears before the document lines
Ending Text - Text appears after the document lines
Other types depending on configuration
Click in the Extended Text Exists field or choose the Extended Texts action to go to the Extended Text overview.
Click New to create a new Extended Text.
On the Extended Text page, you can make all settings for the text.
Define additional conditions to control when the Extended Text is applied. Options include:
Language Code - Text appears only for a specific document language
Starting Date/Ending Date - Text is only valid during a specific period
Sorting Sequence No. - Determines the order when there are multiple Extended Texts
Optional: Use the formatting options to customize the appearance.
For more information, see Advanced Features, Formatting.
Define the document types for which the Extended Text should apply:
On the Sales FastTab: Sales Quote, Sales Order, Sales Invoice, etc.
On the Purchase FastTab: Purchase Order, Purchase Invoice, etc.
On the Service FastTab: Service Order, Service Quote, etc.
On the Job FastTab: Job Quote
Tip
When you select or deselect multiple documents, a query appears asking whether you want to select or deselect all documents. Using the actions Belegfolgefelder deaktivieren and Belegfolgefelder deaktivieren, you can select or deselect all values at once.
Save the Extended Text by closing the page. The changes are automatically applied.
Important Concepts
Placeholders
Placeholders enable the dynamic insertion of field contents from the document or master data. They are entered in the format ##Field Name## and are replaced with the actual value when printing.
For more information, see Advanced Features, Text Editor and Placeholders.
Conditions
Conditions control when an Extended Text is automatically inserted. You can filter Extended Texts by language, document type, period, and other criteria.
For more information, see Working with the App, Sorting and Conditions.
Formatting
Extended Texts can be formatted to visually highlight them or adapt them to your corporate design. Available are font type, size, color, bold, italic, and paragraph formatting.
For more information, see Advanced Features, Formatting.
Meaningful codes: Assign descriptive codes like GREETING, TERMS_EN, NOTE_QUOTE instead of cryptic abbreviations.
Use descriptions: A good description helps in quickly finding Extended Texts.
Create test documents: Always test new Extended Texts in a test document before using them productively.
Use formatting sparingly: Too much formatting can impair readability.
Plan for multilingual: Create Extended Texts in all required languages for international customers.
Use versioning: Use starting and ending dates to use different text versions at different times.
Docs / App / NAVAX Document Text / Setup Beginning and Ending Texts
Beginning and ending texts are Extended Texts that are automatically inserted before or after the document lines. They appear in sales, purchase, service, or job documents. Use these texts for notes, legal information, or individual messages to your customers.
Note
Basic information on creating extended texts and an overview of all extended text types can be found under Setup, Extended Texts.
Difference Between Beginning Texts and Ending Texts
Beginning texts appear at the beginning of the document, before all lines. They are suitable for:
Greetings and introductions
Validity notes for quotes
General notes about the order
Job descriptions
Ending texts appear at the end of the document, after all lines. They are suitable for:
Legal notes and terms and conditions references
Closing greetings and contact information
How to Set Up Automatic Beginning and Ending Texts
You set up automatic beginning and ending texts on the Standard Text Codes page. There you define which Extended Texts appear in which documents. The selection is based on conditions and document types.
Example 1: Beginning Text for Sales Quotes
In the following example, you create a beginning text for sales quotes. This text is automatically inserted when you use the Extended Text. The text contains, for example, a validity note for the quote.
Field
Value
Text Type
Beginning Text
Description
Validity Note
Document Type
Sales Quote
Text
This quote is valid until ##Quote Valid To Date##
Step-by-Step Guide: Creating the Beginning Text
Open the Standard Text Codes page via search.
Click New to create a new Extended Text.
Enter a Code, for example VALIDITY. This allows you to easily identify the Extended Text later.
Enter a Description, for example Validity Note. The description helps you recognize the purpose of the text.
Select the Beginning Text checkbox.
Click in the Extended Text Exists field or choose the Extended Texts action to go to the overview.
Click New to create a new Extended Text.
On the Extended Text page, you can make all settings for the text.
Enter the Text that should appear on the document. Example: This quote is valid until . Click in the Text field to open the text editor. There you can enter the text or paste it from other programs.
For more information, see Advanced Features, Text Editor and Placeholders.
Optional: In the text editor, you can use placeholders for table fields. This allows you to automatically insert, for example, the quote's valid-to date (##Quote Valid To Date##) or the customer name (##Bill-to Name##).
For more information, see Advanced Features, Text Editor and Placeholders.
On the Sales FastTab, activate the Sales Quote option. This makes the Extended Text available on sales quotes.
Tip
When you select or deselect multiple documents, a query appears asking whether you want to select or deselect all documents. Using the actions Belegfolgefelder deaktivieren and Belegfolgefelder deaktivieren, you can select or deselect all values at once.
Optional: Use the formatting options to customize the text (font type, size, color, paragraph alignment).
For more information, see Advanced Features, Formatting.
Optional: Define additional conditions, for example the language or a validity period. This controls when the Extended Text is automatically inserted.
Save the Extended Text by closing the page. The changes are automatically applied.
Example 2: Ending Text for Sales Documents
A frequently used ending text contains legal notes and a closing greeting. Here's how to create an ending text:
Field
Value
Text Type
Ending Text
Description
General Terms and Conditions
Document Type
Sales Invoice, Sales Order
Text
Our general terms and conditions apply. For more information, visit www.example.com/terms
Thank you for your trust!
Best regards,
Your ##CompanyName## Team
Tip
Teilen Sie die Zeilen auf um später gegebenenfalls die Formatierung pro Zeile anzupassen.
Follow the same steps as in Example 1, but in step 5 select Ending Text instead of Beginning Text and in step 11 activate the desired document types (e.g., Sales Invoice and Sales Order).
Best Practices
Maintain consistency: Use uniform wording for similar documents (e.g., all sales documents).
Keep beginning texts short: Long beginning texts can distract from the essentials. Focus on what's important.
Ending texts for legal notes: Place payment and delivery terms as well as terms and conditions references in ending texts.
Use placeholders: Use placeholders for dynamic content such as date, customer name, or amounts.
Consider multilingual: For international customers, create texts in different languages with corresponding language codes.
Version control: Use validity periods to control different text versions over time.
Frequently Asked Questions
Can I have multiple beginning texts or ending texts in one document?
Yes, you can create multiple Extended Texts of the same type. These are inserted in sequence. Use the sorting sequence to define the order.
How do I manually insert a beginning text or ending text into a document?
Open the document and choose the Beginning Texts or Ending Texts action in the ribbon. There you can select existing Extended Texts or enter new texts directly.
Why doesn't my Extended Text appear in the document?
Check the following points:
Is the correct document type activated?
Does the language code match the document?
Is the current date within the validity period?
Is NAVAX Document Text activated in the Document Text Setup?
Can beginning and ending texts be formatted?
Yes, you can use font type, size, color, and paragraph formatting. Use the formatting options in the Extended Text.
For more information, see Advanced Features, Formatting.
Can I transfer beginning and ending texts from previous documents?
Yes, in the Document Text Setup you can specify whether texts should be transferred when copying documents (options: Always, Never, On Request).
For more information, see Advanced Features, Copy Documents.
Personalized texts are Extended Texts that are specifically created for a particular customer, vendor, or salesperson/purchaser. These texts are automatically used in documents when the corresponding business partner is selected.
Note
Basic information about creating Extended Texts can be found under Setup, Extended Texts.
Purpose of Personalized Texts
Personalized texts are suitable for:
Individual greetings - e.g., personal salutation for important customers
Customer-specific notes - e.g., special delivery terms or agreements
Contractual specifics - e.g., discount agreements, special conditions
Legal information - e.g., specific terms and conditions for certain business partners
Multilingual communication - e.g., texts in the customer's preferred language
Where Are Personalized Texts Set Up?
Card
Fields
Usage
Customer Card
Beginning Text, Ending Text
Texts appear on sales documents for this customer
Vendor Card
Beginning Text, Ending Text
Texts appear on purchase documents for this vendor
Salesperson/Purchaser Card
Beginning Text, Ending Text
Texts appear on documents assigned to this salesperson/purchaser
Example: Personalized Beginning Text for a Customer
Field
Value
Customer
10000
Beginning Text
Dear Mr. Robert Townes,
Step-by-Step Guide
This guide shows the creation of a personalized beginning text for a customer. The procedure applies analogously to vendors, ending texts, and salespeople/purchasers.
Open the card of the vendor, customer, or salesperson/purchaser for whom you want to set up a personalized text.
For example: Customer 10000.
Click Beginning Text to open the Extended Text overview.
Click New to create a new Extended Text.
Enter the desired Code and a Description for the Extended Text.
For example: Code: CUSTB10000, Description: Personalized text for Customer 10000
When you click on Ext. Text Exists, a list of available Extended Texts is displayed.
Optional: In the text editor, you can use placeholders for table fields. This allows you to automatically insert, for example, the customer's address (##Bill-to Address##) or customer name (##Bill-to Name##).
For more information, see Advanced Features, Text Editor and Placeholders.
On the Sales FastTab, activate the Sales Quote option. This makes the Extended Text available on sales quotes.
Tip
When you select or deselect multiple documents, a query appears asking whether you want to select or deselect all documents. Using the actions Belegfolgefelder deaktivieren and Belegfolgefelder deaktivieren, you can select or deselect all values at once.
Optional: Define conditions, for example the language, validity period, or document types for which the Extended Text should apply.
For more information, see Working with the App, Sorting and Conditions.
Optional: Use the formatting options to customize the text (font type, size, color, paragraph alignment).
For more information, see Advanced Features, Formatting.
Save the Extended Text by closing the page. The changes are automatically applied.
Important
To insert personalized texts correctly, the Standard Text Code used must not also be configured as a general Beginning Text or Ending Text. For this text block, turn off the Beginning Text and Ending Text options. Otherwise, the text might be inserted twice, in the wrong position, or not at all. If needed, create a separate copy of the text block solely for personalization.
For more information, see Setup, Beginning and Ending Texts.
Additional Examples
Personalized Ending Text for a Customer
Scenario: Individual closing greeting for a VIP customer
Customer: 20000 - Contoso Ltd.
Ending Text: GREETING_CONTOSO
Text Content: "Thank you for your long-standing loyalty! If you have any questions, your personal contact Mr. Mueller is available at mueller@example.com."
Personalized Beginning Text for a Vendor
Scenario: Special ordering instructions
Vendor: 30000 - Supplier Ltd.
Beginning Text: ORDER_SUPPLIER
Text Content: "Please use our item numbers and descriptions in your order confirmation."
Personalized Text for a Salesperson
Scenario: Salesperson-specific contact information
Salesperson: BC - Benjamin Chiu
Ending Text: CONTACT_BC
Text Content: "Your contact: Benjamin Chiu, Phone: +43 123 456789, Email: b.chiu@example.com"
Best Practices
Consider data privacy: Make sure that personalized texts do not contain sensitive information that should not appear on all documents.
Use placeholders: Use placeholders for names and addresses to keep texts dynamic.
Regular maintenance: Check personalized texts regularly, especially when contacts or conditions change.
Unique codes: Use meaningful codes like CUST10000 instead of generic designations.
Multilingual: Create texts in the language of international business partners with the appropriate language code.
Test documents: Test personalized texts in test documents before using them productively.
Frequently Asked Questions
May the "Beginning Text" or "Ending Text" fields be activated in the text block?
No, under no circumstances! For personalized texts, the Beginning Text and Ending Text fields must NOT be activated in the Standard Text Code. These fields are intended only for general beginning/ending texts.
Personalized texts are controlled exclusively via the Beginning Text and Ending Text fields on the master data cards (Customer, Vendor, Salesperson/Purchaser). If you activate the beginning/ending text fields, the text will appear on all documents, not just for the intended business partner.
What is the difference between personalized texts and general beginning/ending texts?
Personalized texts are specific to a single customer, vendor, or salesperson/purchaser. General beginning/ending texts apply to all documents or can be controlled via conditions.
For more information, see Setup, Beginning and Ending Texts.
Can personalized texts be combined with general texts?
Yes, you can use both personalized and general texts. The sorting sequence determines the order in which they appear in the document.
How can I use the same text for multiple customers?
Create a common Standard Text Code and reference it in the Beginning Text/Ending Text fields of the respective customer cards.
What happens when I change the customer in the document?
The personalized texts are automatically adapted to the new customer, provided that personalized texts are also stored for that customer.
Can I also manually change personalized texts in the document?
Yes, you can manually edit or delete the automatically inserted texts in the document at any time. Changes do not affect the master data.
Docs / App / NAVAX Document Text / Setup Line Texts
Line texts are Extended Texts that are directly linked to master data such as items, resources, G/L accounts, or service items. The text appears automatically as line text below the respective line when you use the corresponding master data record in a document.
Note
Basic information about creating Extended Texts and an overview of all Extended Text types can be found under Setup, Extended Texts.
The following example shows how to create a line text for item 1896-S. The text is automatically inserted when this item is used in a document.
Note
This procedure applies analogously to resources, G/L accounts, and service items.
Field
Value
Item
1896-S
Extended Text
1896-S
Automatic Ext. Texts
Yes
Text
Please note the care instructions on the packaging.
Step-by-Step Guide: Creating Line Texts
Open the Item Card for the desired item, for example 1896-S.
Click Extended Texts or in the Ext. Text Exists field to store an Extended Text.
Click New to create a new Extended Text.
The value in the No. field for the Extended Text is automatically taken from the item. This uniquely assigns the Extended Text to the item.
Enter a Description, for example Item text for 1896-S.
Enter the Text that should appear on the document.
For example: Please note the care instructions on the packaging. Click in the Text field to open the text editor. There you can enter the text or paste it from other programs.
For more information, see Advanced Features, Text Editor and Placeholders.
Optional: In the text editor, you can use placeholders for table fields. This allows you to automatically insert, for example, the quote date or customer name.
For more information, see Advanced Features, Text Editor and Placeholders.
On the Sales FastTab, activate the Sales Quote option. This makes the Extended Text available on sales quotes.
Tip
When you select or deselect multiple documents, a query appears asking whether you want to select or deselect all documents. Using the actions Belegfolgefelder deaktivieren and Belegfolgefelder deaktivieren, you can select or deselect all values at once.
Optional: Define conditions, for example the language, validity period, or document types for which the Extended Text should apply.
Optional: Use the formatting options to customize the text (font type, size, color, paragraph alignment).
For more information, see Advanced Features, Formatting.
Save the Extended Text by closing the page.
Back on the Item Card, you will see that the Ext. Text Exists field is set to Yes. For the text to be automatically inserted in new document lines, activate the Automatic Ext. Texts field.
Additional Examples
Line Text for a Resource
Scenario: Standard notes for a technician
Resource: Technician - Electrical
Ext. Text Exists: Yes
Automatic Ext. Texts: Activated
Text Content: "Minimum booking duration: 2 hours. Travel costs are charged separately."
Line Text for a G/L Account
Scenario: Explanation for shipping costs
G/L Account: 8900 - Shipping Costs
Ext. Text Exists: Yes
Automatic Ext. Texts: Activated
Text Content: "Shipping via freight forwarder, insured up to 10,000 EUR. Delivery time: 3-5 business days."
Line Text for a Service Item
Scenario: Maintenance notes
Service Item: Annual Maintenance - Heating System
Ext. Text Exists: Yes
Automatic Ext. Texts: Activated
Text Content: "Includes inspection, cleaning, and adjustment of the system. Duration approx. 2-3 hours."
Selective activation: Only activate Automatic Ext. Texts for master data where the texts should really appear in every document.
Use conditions: Use language codes and document type filters to display texts only for relevant documents.
Brief and concise: Keep line texts short, as they appear directly below the lines and should not overload the document.
Multilingual: Create Extended Texts in all required languages for international customers.
Regular maintenance: Check the Extended Texts regularly for currentness, especially with product changes.
Manual alternative: If Automatic Ext. Texts is not activated, users can manually insert the texts as needed via the Extended Texts action in the document line.
Item attributes: For item-specific attributes, you can define additional Extended Texts.
For more information, see Advanced Features, Item Attributes.
Use the print preview of the document to test the positioning and appearance.
Frequently Asked Questions
What happens when I add an item with automatic Extended Texts to a document?
The stored Extended Texts are immediately inserted as line texts below the item line, provided they meet the defined conditions.
Can I still change the automatically inserted texts in the document?
Yes, you can manually edit or delete the texts in the document at any time. Changes do not affect the master data.
What if I don't activate "Automatic Ext. Texts"?
The Extended Texts are still available, but are not automatically inserted. Users can add them manually via the Extended Texts action in the document line.
Can I have multiple Extended Texts for the same item?
Yes, you can create any number of Extended Texts with different conditions (language, document type, period).
Miscellaneous texts are Extended Texts that are linked to master data such as payment terms, shipment methods, or service configurations. These texts appear automatically in documents when the corresponding configuration is used in the document.
Note
Basic information about creating Extended Texts and an overview of all Extended Text types can be found under Setup, Extended Texts.
Purpose of Miscellaneous Texts
Miscellaneous texts are suitable for the following master data:
General Business Terms
Payment Terms - e.g., discount notes, payment deadlines, bank details
Service Order Types - e.g., standard notes for different service types
Service Contract Groups - e.g., contract conditions, scope of services
Standard Service Codes - e.g., descriptions for standard services
How to Create Miscellaneous Texts
Example: Extended Text for Payment Terms
This example shows how to create an Extended Text for payment terms. The text is automatically inserted in documents that use these payment terms.
Note
This procedure applies analogously to all other master data that support miscellaneous texts.
Field
Value
Text Type
Payment Terms Text
Payment Terms
1M(8D)
Description
1M(8D)
Text
Payment is due within one month with 8 days discount.
Step-by-Step Guide: Creating Miscellaneous Texts
Open the Payment Terms page via search. Alternatively, you can access it from the Document Text Setup via the action.
Search for the desired term in the list of payment terms and click on it.
In the example: 1M(8D) - 1 Month/2% Discount within 8 Days.
Click in the Standard Text Code field to create a new Extended Text.
The value in the No. field for the Extended Text is automatically taken from the payment terms. This uniquely assigns the Extended Text.
Enter a Description that describes the purpose of the text, for example 1M(8D).
Enter the Text that should appear on the document.
Example: Payment is due within one month with 8 days discount. Click in the Text field to open the text editor. There you can enter the desired text or paste longer texts from other programs.
For more information, see Advanced Features, Text Editor and Placeholders.
Optional: In the text editor, you can use placeholders for table fields. This allows you to automatically insert, for example, the quote date or customer name.
For more information, see Advanced Features, Text Editor and Placeholders.
On the Sales FastTab, activate the Sales Quote option. This makes the Extended Text available on sales quotes.
Tip
When you select or deselect multiple documents, a query appears asking whether you want to select or deselect all documents. Using the actions Disable Sequel Fields and Activate Sequel Fields, you can deselect or select all values at once.
Optional: Define conditions, for example the language, validity period, or document types for which the Extended Text should apply.
Optional: Use the formatting options to customize the text (font type, size, color, paragraph alignment).
For more information, see Advanced Features, Formatting.
Save the Extended Text by closing the page. The changes are automatically applied.
Additional Examples
Extended Text for Shipment Methods
Scenario: Standard shipping via freight forwarder
Shipment Method: FREIGHT
Description: Shipping via Freight Forwarder
Text Content: "Delivery is made to the curb via freight forwarder. Delivery time: 5-7 business days after order confirmation."
Extended Text for Reminder Terms
Scenario: First reminder
Reminder Terms: REMINDER1
Description: First Reminder
Text Content: "Please settle the outstanding amount within 10 days. If you have questions about the invoice, contact us at accounting@example.com."
Extended Text for Service Order Types
Scenario: Maintenance order
Service Order Type: MAINTENANCE
Description: Maintenance Order
Text Content: "Regular maintenance according to maintenance contract. Includes inspection, cleaning, and functional testing."
Accessing Miscellaneous Texts
You can set up miscellaneous texts in two ways:
Via Document Text Setup
Open the Document Text Setup via search in Business Central.
Choose the corresponding action in the Setup area:
Payment Terms
Shipment Methods
Reminder Terms
Finance Charge Terms
Service Order Types
Service Contract Groups
Standard Service Codes
Directly via the Respective Page
Open the respective page via search (e.g., Payment Terms).
Select the desired record.
Click in the Standard Text Code field or use the AssistEdit button.
Best Practices
Consistent wording: Use uniform wording for similar Extended Texts.
Legal review: Have texts with legal relevance (e.g., reminders, finance charge terms) reviewed by your legal department.
Multilingual: Create Extended Texts in all required languages with corresponding language codes.
Currentness: Check regularly whether payment and shipment terms are still current.
Use placeholders: Use placeholders for dynamic content such as amounts or dates.
Create test documents: Test new Extended Texts in test documents before using them productively.
Frequently Asked Questions
How can I use the same text for multiple payment terms?
Create a common Extended Text and use conditions to assign it to multiple payment terms. Alternatively, you can manually store the same text for multiple payment terms.
Where do miscellaneous texts appear in the document?
Miscellaneous texts appear in the document header directly below the respective information. Example: Payment terms texts appear below the Payment Terms field, shipment method texts below Shipment Method, etc. The position is fixed and cannot be changed.
Can I also manually add or remove miscellaneous texts in the document?
Yes, you can manually edit or delete the automatically inserted texts in the document. Changes do not affect the master data.
What happens when I change the payment terms in the document?
When you change the payment terms, the associated Extended Texts are automatically updated, provided the conditions are met.
Beginning and ending texts are inserted into documents in the following situations:
Automatic Insertion
Texts are automatically inserted when:
Corresponding Standard Text Codes are configured as beginning text or ending text
The conditions are met (document type, language, period)
You select a customer/vendor or change a document field
Manual Insertion
You can add or change texts manually:
Via the Beginning Text - current/following documents or Ending Text - current/following documents fields in the document header
Via the Beginning Text or Ending Text actions in the ribbon
Via the Insert/Update Document Texts action in the ribbon under Functions
Directly on the Document Text Lines page
Example: Beginning Text on a Sales Quote
Document Type
Sales Quote
Text Type
Beginning Text
Standard Text Code
VALIDITY
Text
This quote is valid until ##Quote Valid Until Date##
Step-by-Step Guide: Automatic Insertion of Beginning and Ending Texts
The beginning and ending texts stored in the Standard Text Codes are automatically inserted into sales, purchase, service, or job documents. You determine the document type on the respective FastTab (Sales, Purchase, Service, or Job).
Before the texts are automatically inserted, you must create and configure the Standard Text Codes. These codes determine which texts appear on which documents.
For more information, see Setup, Beginning and Ending Texts.
Open the Sales Quotes page. You can find this via Tell me what you want to do or directly on the home page if you have the role Sales Order Processor.
Click on the desired sales Quote in the list. The detail view of the document opens.
Fill in the fields in the sales Quote header as usual, e.g., Customer Name, Address, Posting Date, and other relevant information. This information will later also be used for the automatic filling of beginning and ending texts. The assigned texts are automatically inserted as soon as you leave the Customer Name field or save the document header.
In the Beginning Text - current/following documents field, the value changes to Yes | Yes or Yes | No.
Using the AssistEdit function, you can open the Document Text Lines page. There you can see all automatically inserted text lines and adjust them if necessary.
Optional: You can further edit the automatically inserted texts in the Text Editor, e.g., supplement or format them.
For more information, see Advanced Features, Text Editor and Placeholders.
Note
Changes to the text in the document only affect this document, not the master data or other documents.
Optional: In the text editor, you can use placeholders for table fields. This allows you to automatically insert, for example, the quote date or customer name. In this example, a placeholder (##Quote Valid Until Date##) was used. The placeholder is automatically replaced with the actual value from the document.
For more information, see Advanced Features, Text Editor and Placeholders.
Optional: Use the formatting options to design the text according to your preferences (font type, size, color, paragraph alignment).
For more information, see Advanced Features, Formatting.
With the fields Sales Quote, Sales Order, Sales Shipment, Sales Invoice, Sales Proforma Invoice, and Sales Draft Invoice, you control on which documents the text should appear. Example: If you select Sales Invoice and post the document, the text appears on the posted invoice.
When you print the document as a preview, the document header displays, for example, This quote is valid until 01.01.2001. The date is automatically filled from the Quote Valid Until Date field.
Step-by-Step Guide: Changing or Manually Inserting Beginning and Ending Texts
On the Document Text Lines page, you can see all text lines of the selected document. You can edit these lines, add new ones, or delete them.
Open the Sales Quotes page. You can find this via Tell me what you want to do or directly on the home page if you have the role Sales Order Processor.
Click on the desired sales Quote in the list. The detail view of the document opens.
Click on the Beginning Text - current/following documents field or select the Beginning Text action. You will go to the Document Text Lines page.
To create a new text line, choose the Add action (Alt+N). The text editor opens automatically so you can start typing right away.
If no lines exist yet, the first line is created. If you place the cursor on an existing line and choose Add, the new line is inserted directly below that line. To add a line at the end, place the cursor on the last line and choose Add.
Enter the desired text, e.g., This quote is valid until . You can also paste longer texts from other programs.
To change an existing text, click in the Text field to open the text editor, or use the Edit action (Alt+E).
Note
If the page from which the text editor is called is not editable or is not in edit mode, the text in the editor is also not editable.
To insert a blank line as visual spacing between text sections, use the Insert Blank Line action (Alt+L). The text editor is not opened – the line remains empty. This is simpler than the previous workaround of using Add, entering some text, and then deleting it again.
Optional: In the text editor, you can use placeholders for table fields. This allows you to automatically insert, for example, the quote date or customer name.
For more information, see Advanced Features, Text Editor and Placeholders.
Optional: Use the formatting options to customize the text (font type, size, color, alignment).
For more information, see Advanced Features, Formatting.
Select the appropriate sequel document fields (Sales Quote, Sales Order, Sales Shipment, Sales Invoice, Proforma Invoice, Draft Invoice). This determines on which documents the text appears. Example: If you select Sales Invoice and post the document, the text appears on the posted invoice.
When you print the document as a preview, the document header displays, for example, This quote is valid until 01.01.2001. The date is automatically filled from the Quote Valid Until Date field.
Step-by-Step Guide: Inserting Document Texts via the "Insert/Update Document Texts" Action
With the Insert/Update Document Texts action, you can insert all document texts (beginning texts, ending texts, payment terms texts, shipment method texts, etc.) into the document at once.
This function is particularly helpful when:
The automatic text insertion did not work as expected, e.g., because conditions (language, period, document type) were not met
You have created or changed text blocks afterwards and now want to apply them to existing documents
You have changed the payment terms, shipment method, or other fields in the document and want to update the associated texts
You want to replace existing texts with the currently configured text blocks
Open the desired document, e.g., a Sales Order.
In the ribbon under Functions, select the Insert/Update Document Texts action.
The Insert Texts - Selection page opens. Here you can select which text types should be inserted:
Beginning Texts
Ending Texts
Payment Terms Texts
Shipment Method Texts
Additional text types depending on the document type (e.g., Service Order Type Texts, Service Contract Group Texts)
Confirm with Yes. The selected texts are determined from the configured text blocks and inserted into the document. Existing texts of the selected text types will be overwritten.
The Beginning Text - current/following documents and Ending Text - current/following documents fields in the document header are automatically updated.
Note
This action overwrites existing texts of the selected text types. Individual customizations to existing texts will be lost.
Meaning of "Yes | No" in Text Fields
The Beginning Text - current/following documents or Ending Text - current/following documents field indicates whether a beginning or ending text has been selected for the document or sequel documents (e.g., after posting on a sales invoice).
The value is composed as follows, shown here using the beginning text
Yes | Yes
A beginning text is set up for this document and for one, several, or all follow-up documents.
Yes | No
A beginning text is set up only for this document. No follow-up document
No | Yes
A beginning text was defined only for one or more follow-up documents.
No | No
No beginning texts are defined for either this document or the follow-up documents.
Practical Scenarios
Scenario 1: Automatic Texts for All Quotes
Situation: You want to display a validity notice on all sales quotes.
Solution: Set up a Standard Text Code with Document Beginning Text enabled and select Sales Quote as the document type.
Result: The text appears automatically on every new sales quote.
Scenario 2: Customer-Specific Greeting
Situation: A VIP customer should receive a personal greeting on all documents.
Solution: Store a personalized Standard Text Code in the Ending Text field on the customer card.
Result: When this customer is selected, the personalized ending text is automatically inserted.
For more information, see Setup, Personalized Texts.
Scenario 3: One-Time Notice for a Document
Situation: You want to insert a special notice only on a specific order.
Solution: Open the Document Text Lines from within the document and insert the text manually. Deactivate all sequel documents.
Result: The text appears only on this document, not on posted follow-up documents.
Use fields in the document header: The Beginning Text - current/following documents fields quickly show whether texts are present without having to open the document.
Check texts before posting: Use the print preview to see how beginning and ending texts appear on the document.
Disable automatic insertion: If you do not want texts to be automatically inserted, you can deactivate the Sales Quote, Sales Order, etc. fields in the document text lines.
Control follow-up documents: Decide individually for each text whether it should also appear on follow-up documents (e.g., posted invoice).
Copy texts: In the document text setup, you can specify whether texts should be copied when copying documents.
For more information, see Advanced Features, Copy Documents.
Frequently Asked Questions
Why are my beginning or ending texts not automatically inserted?
Check the following points:
Is NAVAX Document Text activated in the document text setup?
Is the Standard Text Code marked as Document Beginning Text or Document Ending Text?
Are the Extended Texts activated for the correct document type (e.g., Sales Order)?
Do the conditions (language, period) match the document?
Can I change automatically inserted texts in the document?
Yes, you can manually edit or delete any automatically inserted text in the document. Changes do not affect the Standard Text Codes.
What does "Yes | No" mean in the Beginning Text - current/following documents field?
The first value (Yes) means that a beginning text exists for the current document. The second value (No) means that no beginning texts are defined for follow-up documents. See the table above for all combinations.
Can there be multiple beginning texts or ending texts in a document at the same time?
Yes, you can have multiple beginning or ending texts. The sorting sequence in the Extended Texts determines the order in which they appear.
For more information, see Working with the App, Sorting and Conditions.
How do I remove an automatically inserted text from a document?
Open the Document Text Lines via the Beginning Text - current/following documents field and delete the corresponding line. The text is removed only from this document, not from the Standard Text Codes.
Are texts transferred to posted documents?
Yes, if the corresponding follow-up documents are activated in the document text lines (e.g., Sales Invoice). The texts are transferred to the posted documents when posting.
Troubleshooting
Problem: Texts appear twice
Cause: Both a general Standard Text Code and a personalized text (on the customer card) may be active.
Solution: Check the sorting sequence or remove one of the texts.
Problem: Texts appear on wrong documents
Cause: The document types in the Extended Texts are not configured correctly.
Solution: Open the Extended Text and check the fields Sales Quote, Sales Order, etc. Activate only the desired document types.
Problem: Placeholders are not replaced
Cause: The placeholder is misspelled or the field does not exist.
Solution: Check the exact spelling of the placeholder (format: ##FieldName##). Use the placeholder function in the text editor.
For more information, see Advanced Features, Text Editor and Placeholders.
Best Practices
Text Organization
Beginning texts for greetings, introductions, general notes
Ending texts for payment information, terms and conditions, closing phrases, legal notices
Use several short text blocks instead of one very long text — better maintainability
Personalized texts are automatically inserted when you select a customer, vendor, or salesperson/purchaser in a document for which a beginning text or ending text is stored on the master data card.
Automatic Insertion
Texts are automatically inserted when:
A Standard Text Code is stored as beginning text or ending text on the Customer Card, Vendor Card, or Salesperson/Purchaser Card
You select the corresponding business partner in a document
The defined conditions (document type, language, period) are met
Example: Personalized Beginning Text for VIP Customers
Customer
10000 - Adatum Corporation
Standard Text Code
VIP_GREETING
Text Type
Beginning Text
Text
Dear Mr. Smith, as a valued VIP customer, you benefit from our premium conditions.
Step-by-Step Guide: Working with Personalized Texts
This guide shows how personalized texts are automatically inserted in daily work and how you can adjust them if needed.
Open a document, e.g., a Sales Order. You can find this via Tell me what you want to do or directly on the home page.
In the Customer Name field, select a customer for whom a personalized text is set up (e.g., Customer 10000).
The personalized texts are automatically inserted as soon as you leave the field or save the document header.
In the field Beginning Text - current/following documents or Ending Text - current/following documents, the value changes to Yes | Yes or Yes | No.
To see the inserted texts, click on the field Beginning Text - current/following documents or select the action Beginning Text. The Document Text Lines page opens and shows all text lines for this document.
In the Standard Text Code column, you can see the code of the personalized text (e.g., VIP_GREETING).
What happens if I change the customer in the document?
The personalized texts of the previous customer are replaced by the texts of the new customer (if available). If the new customer has no personalized texts, the old texts are removed.
Can general and personalized texts be in the document at the same time?
Yes, you can use both general beginning/ending texts and personalized texts. The Sorting Order in the extended texts determines the order in which they appear.
For more information, see Working with the App, Sorting and Conditions.
Can I use the same personalized text for multiple customers?
Yes, create a Standard Text Code and reference it in the Beginning Text or Ending Text fields on multiple customer cards. This way, multiple customers share the same text.
Troubleshooting
Why does my personalized text appear on all documents?
Most common mistake: In the Standard Text Code, the fields Document Beginning Text or Document Ending Text were enabled. These must NOT be enabled for personalized texts!
Personalized texts are controlled exclusively via the Beginning Text and Ending Text fields on the master data cards (Customer, Vendor, Salesperson/Purchaser). The Document Beginning/Ending Text fields would display the text on all documents.
For more information, see Setup, Personalized Texts.
Problem: Personalized Texts Appear Twice
Cause: Both a personalized text (on the customer card) and a general Standard Text Code with similar content may be active.
Solution: Check the document text lines and remove one of the texts. Alternatively, you can adjust the sorting order.
Problem: Text Appears in Wrong Language
Cause: The language code in the extended text does not match the document language, or a language-specific version is missing.
Solution: Create an extended text for each required language with the corresponding language code on the master data card.
Best Practices
Organizing Personalized Texts
Use consistent naming conventions for Standard Text Codes (e.g., CUST_[Number], SALES_[Abbreviation])
Document in the Description of the Standard Text Code which business partner the text is intended for
Use shared extended texts for multiple business partners with similar requirements
Docs / App / NAVAX Document Text / Working with the App Using Line Texts
This page describes how to use, edit, and manage line texts in your daily documents.
Note
Information about setting up line texts can be found under Setup, Line Texts.
What Are Line Texts?
Line texts are Extended Texts that appear directly below a document line and refer to a specific item, resource, G/L account, or service item. They are suitable for:
Product descriptions - e.g., technical specifications, care instructions
Delivery information - e.g., delivery time, availability
Line texts are inserted into documents in the following situations:
Automatic Insertion
Texts are automatically inserted when:
On the master data card (item card, resource card, etc.) the Automat. Ext. Texts field is enabled
Corresponding Extended Texts are set up
The conditions are met (document type, language, period)
You add an item, resource, G/L account, or service item to the document line
Manual Insertion
You can add or change texts manually:
Via the Line Text field in the document line
Via the Line action > Line Texts in the ribbon
Via the Line action > Insert Line Texts in the ribbon
Directly on the Document Text Lines page
Example: Line Text on a Sales Order
Document Type
Sales Order
Item
1896-S
Standard Text Code
1896-S
Line Text
Please note the care instructions on the packaging.
Step-by-Step Guide: Automatic Insertion of Line Texts
This example shows how line texts are automatically inserted when adding an item to a sales order.
Open the Sales Orders page. You can find this via Tell me what you want to do? or directly on the home page if you have the role Sales Order Processor.
Click on the desired sales order in the list. The detail view of the document opens.
Fill in the fields in the sales order header as usual
Create a line with Type Item, select the desired item and add it, e.g., Item 1896-S.
As soon as you leave the No. or Description field, the line texts are inserted
Using the AssistEdit function of the Line Text field, you can open the Document Text Lines page. There you can see all automatically inserted line texts and adjust them if necessary.
Optional: You can further edit the automatically inserted texts in the Text Editor, e.g., supplement or format them.
For more information, see Advanced Features, Text Editor and Placeholders.
Optional: In the text editor, you can use placeholders for table fields of the document line. This allows you to automatically insert, for example, the Description or the GTIN.
For more information, see Advanced Features, Text Editor and Placeholders.
Optional: Use the formatting options to design the text according to your preferences (font type, size, color, paragraph alignment).
For more information, see Advanced Features, Formatting.
With the fields Sales Quote, Sales Order, Sales Shipment, Sales Invoice, Sales Proforma Invoice, and Sales Draft Invoice, you control on which documents the text should appear. Example: If you select Sales Invoice and post the document, the text appears on the posted invoice.
When you print the document as a preview, below the item line, for example, Please note the care instructions on the packaging. is displayed. The date is automatically filled from the Quote Valid Until Date field.
Step-by-Step Guide: Inserting Line Texts via the "Insert Line Texts" Action
With the Insert Line Texts action, you can insert or update line texts for a specific document line.
This function is particularly helpful when:
The automatic text insertion did not work as expected, e.g., because Automatic Ext. Texts was not enabled when the line was created
You have created or changed text blocks afterwards and now want to apply them to existing document lines
You have assigned item attributes afterwards and want to insert the resulting line texts into the document
You want to reset the line texts to the current state of the configured text blocks
Open the desired document, e.g., a Sales Order.
Navigate to the document line for which you want to insert line texts.
In the ribbon under Line, select the Insert Line Texts action.
The line texts are determined from the configured text blocks (item text blocks, item attributes, standard text blocks) and inserted into the line. Existing line texts will be overwritten.
The Line Text field is automatically updated and indicates that line texts are available.
Note
This action overwrites existing line texts. Individual customizations to existing texts will be lost.
Step-by-Step Guide: Changing or Manually Adding Line Texts
On the Document Text Lines page, you can see all text lines of the selected document. You can edit these lines, add new ones, or delete them.
Open the Sales Orders page. You can find this via Tell me what you want to do or directly on the home page if you have the role Sales Order Processor.
Click on the desired sales order in the list. The detail view of the document opens.
Click on the Line Text field or select the Line action, Line Texts. You will go to the Document Text Lines page.
To create a new text line, choose the Add action (Alt+N). The text editor opens automatically so you can start typing right away.
If no lines exist yet, the first line is created. If you place the cursor on an existing line and choose Add, the new line is inserted directly below that line. To add a line at the end, place the cursor on the last line and choose Add.
Enter the desired text, e.g., Please note the care instructions on the packaging. You can also paste longer texts from other programs.
To change an existing text, click in the Text field to open the text editor, or use the Edit action (Alt+E).
For more information, see Advanced Features, Text Editor and Placeholders.
Note
If the page from which the text editor is called is not editable or is not in edit mode, the text in the editor is also not editable.
To insert a blank line as visual spacing between text sections, use the Insert Blank Line action (Alt+L). The text editor is not opened – the line remains empty. This is simpler than the previous workaround of using Add, entering some text, and then deleting it again.
Optional: In the text editor, you can use placeholders for table fields. This allows you to automatically insert, for example, the Description or the GTIN.
For more information, see Advanced Features, Text Editor and Placeholders.
Optional: Use the formatting options to customize the text (font type, size, color, alignment).
For more information, see Advanced Features, Formatting.
Select the appropriate fields (Sales Quote, Sales Order, Sales Shipment, Sales Invoice, Proforma Invoice, Draft Invoice). This determines on which documents the text appears. Example: If you select Sales Invoice and post the document, the text appears on the posted invoice.
When you print the document as a preview, below the item line, for example, Please note the care instructions on the packaging. is displayed. The date is automatically filled from the Quote Valid Until Date field.
Practical Scenarios
Scenario 1: Automatic Care Instructions for Textiles
Situation: All textile products should automatically display care instructions on documents.
Solution: Set up an Extended Text with care instructions for each item and enable Automatic Ext. Texts on the item card.
Result: When adding the item, the text appears automatically below the item line.
Scenario 2: Resource-Specific Notes
Situation: A technician has special qualifications that should be mentioned on service orders.
Solution: Store an Extended Text with the qualifications on the resource card.
Result: When this resource is selected, the text is automatically inserted below the resource line.
Scenario 3: One-Time Note for an Item Line
Situation: You want to add a special note about the delivery address only for a specific order.
Solution: Open the Document Text Lines via the Line Text field and insert the text manually.
Result: The text appears only below this specific item line in this document.
Scenario 4: G/L Account Explanations
Situation: Shipping costs should be provided with an explanation.
Solution: Set up an Extended Text on the G/L account card for shipping costs.
Result: When using the G/L account, the explanation appears automatically.
Check Line Text field: A symbol or value in the Line Text field shows whether texts exist for this line.
Check texts before posting: Use the print preview to see how line texts appear on the document.
Use automatic insertion selectively: Enable Automatic Ext. Texts only for items/resources where the text should really appear in every document.
Manual alternative: If Automatic Ext. Texts is not enabled, you can insert texts manually as needed via the Line Texts action.
Control follow-up documents: Decide individually for each text whether it should also appear on follow-up documents (e.g., posted invoice).
Multiple Extended Texts: You can create multiple Extended Texts for the same item with different conditions (e.g., different languages).
For more information, see Working with the App, Sorting and Conditions.
Item attributes: NAVAX Document Text offers the ability to use line texts for item attributes.
For more information, see Advanced Features, Item Attributes.
Frequently Asked Questions
Why are my line texts not automatically inserted?
Check the following points:
Is NAVAX Document Text activated in the document text setup?
Is the Automatic Ext. Texts field enabled on the master data card?
Are the Extended Texts activated for the correct document type (e.g., Sales Order)?
Do the conditions (language, period) match the document?
Can I change automatically inserted line texts in the document?
Yes, you can manually edit or delete any automatically inserted text in the document. Changes do not affect the master data.
Where exactly do line texts appear in the document?
Line texts appear directly below the document line to which they refer (e.g., below the item line). They are visually separated from the main line.
Can there be multiple line texts below an item line?
Yes, you can have multiple line texts below the same item line. The sorting sequence in the Extended Texts determines the order in which they appear.
How do I remove an automatically inserted line text?
Open the Document Text Lines via the Line Text field and delete the corresponding line. The text is removed only from this document, not from the master data.
Are line texts transferred to posted documents?
Yes, if the corresponding follow-up documents are activated in the document text lines (e.g., Sales Invoice). The texts are transferred to the posted documents when posting.
What is the difference between line texts and beginning/ending texts?
Line texts appear directly below a specific document line and refer to an item/resource/G/L account. Beginning and ending texts appear at the beginning or end of the entire document.
For more information, see Working with the App, Using Beginning and Ending Texts.
Troubleshooting
Problem: Line texts appear for all items, although configured for only one
Cause: The Extended Text may be configured as a general beginning or ending text instead of a line text.
Solution: Check whether the Extended Text is really stored on the item card and not on the Standard Text Codes as document beginning/ending text.
Problem: Texts for different items are identical
Cause: The same Standard Text Code may have been used for multiple items.
Solution: Create separate Extended Texts for each item that requires different texts.
Problem: Line texts do not appear in the correct language
Cause: The language code in the Extended Texts does not match the document language.
Solution: Create Extended Texts for each required language and ensure that the language code is set correctly.
Problem: Placeholders in line texts are not replaced
Cause: The placeholder is misspelled or the field does not exist in the document line table.
Solution: Check the exact spelling of the placeholder (format: ##FieldName##). Available fields can be found under:
For more information, see Field Descriptions, Document Lines Fields.
Best Practices
Text Organization
Create separate text modules for different items or item groups to ensure flexibility.
Use meaningful names for standard text codes so you can see at a glance what the text is used for.
Use sorting in text modules to control the order of multiple line texts.
Service Contract Groups (e.g., contract conditions)
When Are Miscellaneous Texts Used?
Automatic Insertion: As soon as you select a payment term, shipment method, or other linked setting in a document, the associated texts are automatically inserted.
Manual Adjustment: You can open, edit, or add automatically inserted texts at any time using the AssistEdit function of the respective text field (e.g., Payment Terms Text).
How to Use Miscellaneous Texts in Documents
The configured miscellaneous texts are automatically inserted depending on which documents you have selected in the Sales, Purchase, Service, or Project FastTabs. The following section explains the necessary steps using a sales order as an example.
Example: Payment Terms Text on a Sales Order
Document Type
Sales Order
Payment Terms
1M(8D)
Standard Text Code
1M(8D)
Payment Terms Text
Payment is due within one month with 8 days discount.
Step-by-Step: Automatic Insertion of Miscellaneous Texts
The texts stored in the Standard Text Codes are automatically inserted into documents as soon as you select a linked setting (e.g., payment terms). You determine the document type in the respective FastTab (Sales, Purchase, Service, or Project) of the extended text.
Open the Sales Orders page. You can find it via Tell me what you want to do or directly on the home page if you have the Sales Order Processor role.
Click on the desired sales order in the list. The detail view of the document opens.
Fill in the fields in the sales order header as usual
Select the desired payment terms, e.g.: 1M(8D).
As soon as you leave the Payment Terms Code field, the payment terms texts are inserted
Using the AssistEdit function of the Payment Terms Text field, you can open the Document Text Lines page. There you can see all automatically inserted payment terms texts and adjust them if necessary.
Optional: In the text editor, you can use placeholders for table fields of the document header. This allows you to automatically insert, for example, the Posting Date or the Order Date.
For more information, see Advanced Features, Text Editor and Placeholders.
Optional: Use the formatting options to design the text according to your preferences (font type, size, color, paragraph alignment).
For more information, see Advanced Features, Formatting.
With the fields Sales Quote, Sales Order, Sales Shipment, Sales Invoice, Sales Proforma Invoice, and Sales Draft Invoice, you control on which documents the text should appear. Example: If you select Sales Invoice and post the document, the text appears on the posted invoice.
When you print the document as preview, the document header displays, for example, Payment is due within one month with 8 days discount. below the payment terms.
Step-by-Step: Changing or Manually Inserting Miscellaneous Texts
On the Document Text Lines page, you can see all text lines of the selected document. You can edit these lines, add new ones, or delete them.
Open the Sales Orders page. You can find it via Tell me what you want to do or directly on the home page if you have the Sales Order Processor role.
Click on the desired sales order in the list. The detail view of the document opens.
Click on the Payment Terms Text field, you will go to the Document Text Lines page.
To create a new text line, choose the Add action (Alt+N). The text editor opens automatically so you can start typing right away.
If no lines exist yet, the first line is created. If you place the cursor on an existing line and choose Add, the new line is inserted directly below that line. To add a line at the end, place the cursor on the last line and choose Add.
Enter the desired text, e.g., Payment is due within one month with 8 days discount. You can also paste longer texts from other programs.
To change an existing text, click in the Text field to open the text editor.
For more information, see Advanced Features, Text Editor and Placeholders.
Note
If the page from which the text editor is called is not editable or is not in edit mode, the text in the editor is also not editable.
Optional: In the text editor, you can use placeholders for table fields. This allows you to automatically insert, for example, the Posting Date or the Order Date.
For more information, see Advanced Features, Text Editor and Placeholders.
Optional: Use the formatting options to customize the text (font type, size, color, alignment).
For more information, see Advanced Features, Formatting.
Select the appropriate fields (Sales Quote, Sales Order, Sales Shipment, Sales Invoice, Proforma Invoice, Draft Invoice). This determines on which documents the text appears. Example: If you select Sales Invoice and post the document, the text appears on the posted invoice.
When you print the document as preview, the document header displays, for example, Payment is due within one month with 8 days discount.
Practical Scenarios
Scenario 1: Payment Terms with Discount Note
Situation: All sales invoices with payment terms "1M(8D)" should contain a note about the discount deduction.
Solution: Set up an extended text for payment terms "1M(8D)" with text such as "We grant 2% discount if paid within 8 days."
Result: As soon as you select payment terms "1M(8D)" in the sales order, the text is automatically inserted.
Scenario 2: Shipment Methods for Export
Situation: Legal notes about Incoterms should appear for shipment method "EXW".
Solution: Create an extended text for shipment method "EXW" with an explanation of the delivery conditions.
Result: The text appears automatically in the document when the shipment method is selected.
Scenario 3: Reminder Notes by Reminder Level
Situation: The first reminder should display a friendly note, the third reminder a legal notice.
Solution: Set up separate extended texts for each reminder level with adjusted wording.
Result: Depending on the reminder level, the appropriate text appears automatically on the reminder.
Scenario 4: Service Order Types with Maintenance Notes
Situation: Service orders of type "Maintenance" should display maintenance notes by default.
Solution: Create an extended text for service order type "Maintenance" with the maintenance notes.
Result: When the service order type is selected, the notes are automatically inserted.
Check texts before posting: Use the print preview to see how the texts appear on the document.
Customer-specific adjustments: You can manually adjust automatically inserted texts for individual documents without changing the master data.
Use multilingualism: Set up extended texts for different languages that are automatically inserted depending on the document language.
For more information, see Working with the App, Sorting and Conditions.
Control follow-up documents: Decide for each text on which follow-up documents it should appear (e.g., only on invoice, not on shipment).
Why are my miscellaneous texts not automatically inserted?
Check the following points:
Is NAVAX Document Text activated in the document text setup?
Is the extended text activated for the correct document type (e.g., Sales Order, Sales Invoice)?
Is the payment term/shipment method etc. correctly linked to the Standard Text Code?
Do the conditions (language, period) match the document?
Can I change automatically inserted miscellaneous texts in the document?
Yes, you can open and edit any automatically inserted text using the AssistEdit function of the text field. Changes only affect this document, not the master data.
Where do miscellaneous texts appear in the document?
Miscellaneous texts appear in the document header, not in the document lines. They are typically placed after the address and before the document lines.
Can multiple miscellaneous texts be in a document at the same time?
Yes, you can have, for example, payment terms texts and shipment method texts in the same document simultaneously. Each text appears in its associated text field.
How do I remove an automatically inserted miscellaneous text?
Open the Document Text Lines via the AssistEdit function of the respective text field and delete the corresponding line. The text is only removed from this document.
Are miscellaneous texts transferred to posted documents?
Yes, if the corresponding follow-up documents are activated in the document text lines (e.g., Sales Invoice). The texts are transferred when posting.
What is the difference between miscellaneous texts and beginning/ending texts?
Miscellaneous texts are linked to specific terms/methods (payment terms, shipment methods, etc.) and are automatically inserted when these are selected. Beginning/ending texts are linked to customers/vendors and appear at the beginning/end of the document.
For more information, see Working with the App, Using Beginning and Ending Texts.
Troubleshooting
Problem: Text appears on wrong document type
Cause: The document types are incorrectly configured in the extended text.
Solution: Open the Standard Text Code and check in the respective FastTab (Sales, Purchase, Service) which document types are activated. Deactivate the unwanted document types.
Problem: Text is empty even though extended text exists
Cause: The text content in the Standard Text Code may be empty or the conditions (language, date) do not match.
Solution: Open the Standard Text Code and check whether text is actually stored. Also check the language setting and validity periods.
Problem: Placeholders are not replaced
Cause: The placeholder is misspelled or the field does not exist in the document header table.
Solution: Check the exact spelling of the placeholder (format: ##FieldName##). Available fields can be found at:
For more information, see Advanced Features, Text Editor and Placeholders.
Problem: Texts appear in wrong language
Cause: The language code in the extended text does not match the document language.
Solution: Create extended texts for each required language and ensure that the language code is set correctly. The document language is taken from the customer/vendor language code.
Best Practices
When to Use Miscellaneous Texts
Use miscellaneous texts for context-dependent information that relates to payment terms/shipment methods, shipping agents, etc.
Use this text type for standardized notes that should be automatically inserted depending on the selected method.
Combine miscellaneous texts with beginning/ending texts and line texts for comprehensive document texts.
Master Data Configuration
Maintain extended texts centrally on the master data cards (payment terms, shipment methods, etc.).
Create language-specific variants for international business partners.
Use meaningful names for Standard Text Codes so that the assignment is clearly recognizable.
Docs / App / NAVAX Document Text / Working with the App Manually Inserting Texts
This page allows you to manually select which texts should be inserted into the current document. This function is useful when you want to add texts to a document afterwards or in a targeted manner.
When is this page used?
This selection appears when you execute the Insert/Update Texts action in a document. Depending on the document type, different text types are offered for selection:
Open the desired document (e.g., Sales Order, Purchase Invoice, Service Order, or Job).
Select the Insert/Update Texts - Selection action from the ribbon.
The Insert/Update Texts - Selection page opens.
Enable the checkboxes for the text types you want to insert or update.
Click Yes to insert or update the selected texts, or No to cancel.
Note
Not all text types are available in every document. The options are automatically shown or hidden based on the document type.
Options
The following options are available:
Beginning Texts
Specifies whether beginning texts should be inserted into the document. Beginning texts are displayed at the start of the document.
Ending Texts
Specifies whether ending texts should be inserted into the document. Ending texts are displayed at the end of the document.
Payment Terms Texts
Specifies whether payment terms texts should be inserted into the document. These texts are derived from the payment terms specified in the document.
Shipment Method Texts
Specifies whether shipment method texts should be inserted into the document. These texts are derived from the shipment method specified in the document. This option is only available in sales, purchase, and service documents.
Service Order Type Texts
Specifies whether service order type texts should be inserted into the document. These texts are derived from the service order type. This option is only available in service documents.
Service Contract Group Texts
Specifies whether service contract group texts should be inserted into the document. These texts are derived from the service contract group. This option is only available in service contracts.
Frequently Asked Questions
Why are not all text types displayed?
The available text types depend on the document type. For example, service order type texts are only available in service documents, while service contract group texts are only displayed in service contracts.
What happens if texts already exist in the document?
The new texts are inserted additionally. Existing texts are not deleted or overwritten.
Can I edit the texts after inserting them?
Yes, after inserting, you can edit the texts via the Document Text Lines page or directly via the Beginning Text - Doc./Sequel and Ending Text - Doc./Sequel fields.
For more information, see Working with the App, Using Beginning and Ending Texts.
Tip
For information on setting up the different text types, see:
Docs / App / NAVAX Document Text / Working with the App Sorting and Conditions
With the advanced text conditions in NAVAX Document Text, you can flexibly control which texts are used and transferred to your documents. You can specify that certain texts are automatically inserted only for selected languages, within a specific time period, or for specific document types. This ensures that all relevant information always appears correctly and contextually in your sales, purchase, service, and job documents.
The various conditions are explained in detail below using application examples.
Language Conditions
Control with these conditions whether a text is inserted independently of the document language or only for specific languages.
Text search: Configured texts are searched based on the document type and text type (beginning text/ending text). If matching texts are found, further restriction is made based on the Language Code.
Language-independent: A text is always inserted regardless of the document language - All Languages (e.g., general delivery terms).
Specific language: A text appears only for documents in a specific language - Language Code (e.g., English export notice only for language code ENU).
Multiple language variants: Different texts are stored for the same purpose, which are inserted independently of the document language - Language Code and All Languages remain empty (e.g., warranty text in German and English).
Example:
A beginning text "Dear Customer, thank you for your Order." is created with the option All Languages = yes. This ensures that documents without a stored language code receive this beginning text.
Additionally, the text "Sehr geehrter Kunde, danke für Ihre Bestellung." is created with the Language Code DEA, which is automatically added to documents with this language code.
If you create a document for a French customer or a customer without a language code, the beginning text with the option All Languages = yes is added (English).
If you create a document for a customer from Austria, the beginning text with the Language Code DEA is added (German).
Validity Conditions
Control with these conditions whether a text is inserted within a specific time period.
Text search: After restriction by document type, text type, and language code, the texts are additionally filtered based on the Document Text Date and the Starting Date and Ending Date fields.
Valid from Starting Date: A text is inserted if the Document Text Date is after a specific date - Starting Date (e.g., new regulations from 01/01/2026).
Limited until Ending Date: An extended text is only inserted if the Document Text Date is before a specific date - Ending Date (e.g., only valid until 12/31/2025).
Campaign period: A notice text appears only for documents within a defined time period - Starting Date and Ending Date (e.g., Christmas campaign from 12/01/2025 to 12/31/2025).
Example:
An extended text for the Christmas campaign should only be valid from 12/01 to 12/24. For this, the Starting Date is set to 12/01 and the Ending Date to 12/24.
Document Conditions
Control with these conditions for which document types a text is inserted or whether it is automatically transferred to subsequent documents.
Text search: Texts are filtered based on the settings in the FastTabs Sales, Purchase, Service, or Job for the respective document type. You can specify whether a text should appear only on specific document types or automatically on all subsequent documents.
Only for specific document type: A text is only inserted for sales invoices, not for quotes or orders (e.g., payment notice only on invoices).
Automatically on subsequent documents: A text is automatically transferred from quote to order, invoice, and credit memo (e.g., project notice consistently on all documents).
Sorting Order
Control with this value the order in which texts from different sources are inserted into the document.
Text search: If multiple texts meet the same conditions (e.g., beginning texts from item, customer, and salesperson), the Sorting Order determines the priority when merging. Texts with lower values are inserted first.
Beginning texts: With Sorting Order 10 are inserted first.
Customer-specific texts: With Sorting Order 20 appear afterwards.
Processor texts: With Sorting Order 30 are added last (e.g., salesperson-specific notes).
This allows you to precisely define the order in which texts from different master data (item, customer, salesperson, etc.) are merged in the document.
Example:
Customer 10000 Adatum Corporation has the beginning text "Dear ##Bill-to Name##," (here a placeholder is used) with Sorting Order 1 stored.
Additionally, a beginning text was created for all sales orders with the text "Thank you for your trust, we confirm the order as follows." with Sorting Order 10.
If an extended text with Sorting Order 5 is now created for all customers, it appears between the other two texts.
In the document header then appears:
Dear Adatum Corporation,
this text has sorting order 5.
Thank you for your trust, we confirm the order as follows.
Setting Up Conditions
The advanced text conditions are set up directly in the Extended Texts page in Business Central. Proceed as follows:
Open the Standard Text Codes page via the search in Business Central.
Select the desired Standard Text Code and open the associated texts via the Extended Texts action.
Select the desired extended text or create a new one.
In the General FastTab, you will find the following fields:
Language Code: Specify for which language the text applies (empty = language-independent).
Starting Date: The text is only inserted from this date (empty = no starting date).
Ending Date: The text is only inserted until this date (empty = no ending date).
Sorting Order: Specify the order in which multiple extended texts appear (see Sorting Order).
Select the document type - restrict usage to specific document types (e.g., only invoice).
Save the settings. The extended text will now be automatically inserted only when all defined conditions are met.
Tip: You can create multiple variants of the same extended text with different conditions. Business Central then automatically selects the appropriate variant.
Best Practices
Use Language Variants Wisely
Create corresponding text variants for all important business languages
Use All Languages = yes for a fallback variant (e.g., English)
Test your language variants with documents in different languages
Maintain language variants centrally to ensure consistency
Use Time Periods Effectively
Plan seasonal texts (e.g., Christmas, summer break) in advance
Use Starting Date for new legal regulations
Set Ending Date for limited campaigns or expiring regulations
Regularly review expiring texts and update them
Assign Sorting Order Systematically
Assign sorting orders in steps of 10 (10, 20, 30...) to be able to insert texts in between later
Define a fixed strategy: e.g., General (10), Customer (20), Salesperson (30)
Document your sorting logic for the team
Lower values = higher priority (appear first)
Select Document Types Strategically
Payment notices only on invoices, not on quotes
General terms and conditions consistently on all documents
Job-specific notes on all job-related subsequent documents
Enable only the document types that are really needed
Frequently Asked Questions
What happens if multiple extended texts meet the same conditions?
All matching extended texts are inserted. The order is determined by the Sorting Order field. Texts with lower values appear first.
How does the language selection work with "All Languages"?
If All Languages = yes is set, this text is used for all documents for which no language-specific variant exists. Language-specific texts take precedence.
Can I combine conditions?
Yes, all conditions can be combined. A text is only inserted if all defined conditions are met (e.g., Language Code ENU AND period 12/01-12/31 AND document type Invoice).
Common Problems
Problem: Text does not appear, although all conditions seem to be met
Cause: A hidden condition may not be met or the document type is not enabled.
Solution:
Check all fields in the General FastTab: Language Code, Starting Date, Ending Date, All Languages
Check in the FastTabs (Sales, Purchase, Service, Job) whether the desired document type is enabled
Verify that the Document Text Date is within the defined time period
Problem: Texts appear in wrong order
Cause: The sorting order is not correctly assigned.
Solution:
Open the Extended Texts and check the Sorting Order field
Lower values appear first - adjust the values accordingly
Docs / App / NAVAX Document Text / Working with the App Example Scenarios
This page provides practical examples for various use cases of NAVAX Document Text. Each scenario shows step-by-step how to set up and use specific features.
Structure of Examples
The examples are divided into the following categories:
Basic Functions: Line texts for G/L accounts, resources, and personalized texts
Advanced Functions: Item attributes, multilingual texts, time period conditions
Complex Scenarios: Combination of multiple features for special requirements
Tip
Use these examples as a starting point for your own configurations. Adapt the texts and settings to your specific requirements.
Basic Functions
Example 1: Line Text for a G/L Account
Open the Chart of Accounts page and select the desired G/L account.
Click Extended Texts or in the Ext. Text Exists field and select an extended text. Alternatively, you can create a new extended text with the New action.
Enter the desired text, e.g., "This G/L account is reserved for internal postings."
Activate Automatic Ext. Texts so that it is automatically inserted in new document lines.
Create a document line of type G/L Account in, e.g., a sales invoice, the line text appears automatically in the document line.
Open the Resources page and select the desired resource.
Click Extended Texts or in the Ext. Text Exists field and select an extended text. Alternatively, you can create a new extended text with the New action.
Enter a notice text, e.g., "This resource is certified for system maintenance with ISO-XYZ."
Activate Automatic Ext. Texts so that it is automatically inserted in new document lines.
Create a service order line of type Resource, the line text appears automatically in the document line.
Example 4: Miscellaneous Text for a Service Contract Group
Open the Service Contract Groups page and select the desired type.
Click Extended Texts or in the Ext. Text Exists field and select an extended text. Alternatively, you can create a new extended text with the New action.
Add a notice text, e.g., "For Vaillant customers in this service contract group, extended maintenance intervals and special service benefits apply according to manufacturer agreement."
Save the extended text.
Create a service contract quote with this type. The extended text appears in the order in the document header.
Scenario: You want to automatically display care instructions on documents for all items with the attribute "Material: Leather".
Open the Item Attributes page and select the attribute "Material"
Click Attribute Values and select the value "Leather"
Click Extended Texts and create a new extended text with the care instructions:
"Care instructions for leather products: Please treat only with special leather care products. Do not wash."
Activate the desired document types (e.g., Sales Invoice, Sales Shipment)
When you now insert an item with Material="Leather" into a document, the care instructions appear automatically below the item line
Scenario: You want a personalized beginning text with the customer name and order date.
Open the Customer Card
Create a Beginning Text and open the Text Editor
In the text editor, click the action Insert Placeholder
A list opens with all available fields of the respective document
Select the desired fields (e.g., Bill-to Name and Order Date) - they are automatically inserted into the text enclosed in ##
Your text might then look like this:
"Dear ##Bill-to Name##,
Thank you for your order dated ##Order Date##. We confirm receipt as follows."
The placeholders are automatically replaced with the actual values when inserted into the document
Important
Placeholders always use the English field names, regardless of the language setting in Business Central. If you do not know a field’s English name, you can find an overview on the Field Descriptions, Field ListField Overview page.
Scenario: You want to display a special export notice only on English sales invoices from a specific date onwards.
Open the Standard Text Codes page and create a new code "EXPORT-INFO"
Create an extended text with the export notice:
"Export Notice: This shipment is subject to customs regulations. Please ensure all documentation is complete."
Configure the conditions:
Language Code: ENU (English)
Starting Date: 01.01.2026 (new export regulations)
Ending Date: blank (valid indefinitely)
Activate only the document type Sales Invoice in the Sales FastTab
Link this text to customers who are export customers
The notice appears only when all conditions are met:
Test first: Create test documents to verify results before using texts in production
Use placeholders: Dynamic content makes your texts more flexible and personal
Plan multilingually: Create text variants for all relevant languages from the start
Check time periods: Regularly review expiring texts and update them in time
Plan sorting: Define clear sorting logic and document it for your team
Use item attributes: Instead of maintaining texts for each item individually, use attributes for groups
Test combinations: For complex conditions, test all possible cases
Documentation: Document complex configurations for maintenance
Docs / App / NAVAX Document Text / Working with the App FAQ and Troubleshooting
Here you will find answers to frequently asked questions about NAVAX Document Text as well as solutions to typical problems.
Why don't my texts appear on the document?
If your texts do not appear as expected on the document, check the following points:
Text type correctly assigned: Ensure that the text is correctly classified as beginning text, ending text, or line text.
Check document type: Check in the FastTabs Sales, Purchase, Service, or Job whether the corresponding document type is enabled.
Check language code: If a Language Code is stored, the text is only displayed for documents with this language code. Use All Languages = yes for language-independent texts.
Check validity period: Check the Starting Date and Ending Date fields. The text only appears if the Document Text Date is within this period.
Automatic insertion enabled: Check whether the option for automatic insertion is enabled in the setup.
You can edit texts on already created documents as follows:
Before posting: Open the document and navigate to the document text lines. There you can directly edit, delete, or add new texts.
After posting: For posted documents, you can edit texts as long as the document has not yet been printed. The preview function does not lock editing. After the first actual print, no more changes are possible.
Change master data: To permanently change texts, open the Standard Text Codes page via the search in Business Central. Select the desired code and open the associated texts via the Extended Texts action. The change then applies to all future documents.
Note
Changes to master data do not affect already created documents.
How can I prepare texts for future documents?
To prepare texts for future documents:
Open the Standard Text Codes page via the search in Business Central. Select the desired code and open the associated texts via the Extended Texts action. Create a new extended text.
Set a Starting Date in the future (e.g., for a campaign from 01/01/2026).
Optional: Also set an Ending Date if the text should only be valid for a limited time.
Define all other conditions (language code, document type, sorting order).
Save the extended text. It will automatically appear on new documents from the starting date.
Use case:
Ideal for seasonal campaigns, price changes, or time-limited notices.
For more information, see Setup, Extended Texts.
What to do with text display or formatting problems?
For text display problems:
Line breaks: Use multiple text lines instead of very long lines for better readability.
Formatting: Use the available formatting options (bold, italic, color) sparingly.
Check placeholders: Verify that placeholders are correctly written (e.g., ##Bill-to Name##).
Text length: Pay attention to the maximum character count per line (standard: 1024 characters).
Print preview: Use the print preview to check the display before sending the document.
Open the Standard Text Codes page via the search in Business Central. Select the desired code and open the associated texts via the Extended Texts action. Create multiple extended texts for the same Standard Text Code.
Assign each extended text the corresponding Language Code (e.g., DEU, ENU, FRA).
Optional: Create an additional extended text with All Languages = yes as a fallback for undefined languages.
The system automatically selects the appropriate text based on the language code of the customer/vendor.
Example:
Extended text "Delivery Terms" with three variants (DEU, ENU, All Languages) ensures that each customer receives the information in their language.
How do I copy documents with texts?
To copy documents including NAVAX Document Texts:
Use the standard Copy Document function in Business Central
If the Copy Documents with Texts option in the Document Text Setup is set to On Request, a query appears
Select which texts should be copied:
Beginning/Ending Texts: Copies header and footer texts
Yes, in the Document Text Setup you can adjust the setting for Copy Documents with Texts at any time:
Always: All texts are automatically copied without prompt
On Request: You decide for each copy operation (recommended)
Never: Texts are never copied
The change takes effect immediately for all subsequent copy operations.
Are texts from archived documents also copied?
Yes, if you select an archived document as the source, the texts stored there are also transferred, provided you enable the text options. Alternatively, the archived document can be restored.
Does copying differ between sales and purchase documents?
No, the functionality is identical. The same options are available for purchase documents (orders, invoices, credit memos).
Troubleshooting
This section provides solutions to common problems, categorized by topic.
Setup and Installation
Problem: Document Text Setup is not visible
Cause: NAVAX Document Text is not installed or permissions are missing.
Solution:
Check in the Extension Management whether NAVAX Document Text is installed
Contact support: Contact NAVAX support at www.navax.com
Docs / App / NAVAX Document Text / Advanced Features Item Attributes
NAVAX Document Text extends the Business Central standard functionality for item attributes by automatically transferring them as document text lines to your documents. This allows important product properties such as material, color, size, or technical specifications to appear directly on quotes, orders, and invoices.
What are Item Attributes?
Item attributes are additional properties in Business Central that you can assign to items to describe them in more detail. Typical examples:
Material: Wood, Metal, Plastic
Color: Red, Blue, Green
Size: S, M, L, XL
Technical data: Power, Voltage, Capacity
Certifications: CE, ISO, TUV
How Does the Integration Work?
NAVAX Document Text reads the item attributes from Business Central and automatically creates document text lines when an item with attributes is added to a document. The attribute values appear as line texts under the respective item position.
Example:
An item "Designer Chair" has the following attributes:
Material: Solid oak
Color: Natural oiled
Seat height: 46 cm
On the document, the following appears under the item line:
Material: Solid oak
Color: Natural oiled
Seat height: 46 cm
Setting Up Item Attributes for Printing
For item attributes to appear on documents, you must make two settings:
Step 1: Activate Document Text Setup
Open the Document Text Setup page via the search in Business Central.
Enable the Print Item Attributes field.
Save the setting.
Step 2: Enable Item Attributes for Printing
Open the Item Attributes page via the search in Business Central.
Select the desired item attribute from the list (e.g., "Material" or "Color").
Enable editing and place a checkmark in the Print column.
Repeat this for all attributes that should appear on documents.
Important
Both settings must be enabled: Print Item Attributes in the Document Text Setup AND Print for the respective item attributes. Only then will item attributes be transferred as document text lines.
Multilingual Item Attributes
For international customers, you can store both item attributes and their values in different languages. The system automatically selects the appropriate translation based on the language code of the document.
Translations for Item Attributes (Names)
Open the Item Attributes page and select the desired attribute (e.g., "Material").
Click the Translations action.
Add translations for the required languages (e.g., DEU: Material, ENU: Material, FRA: Matériau).
Also enable the Print field here for each language variant.
Translations for Item Attribute Values
Open the Item Attribute Values page and select the desired attribute value (e.g., "Solid oak").
Click the Translations action.
Add translations for the required languages (e.g., DEU: Eiche massiv, ENU: Solid oak, FRA: Chêne massif).
Using on Documents
After you have configured the item attributes with the Print option and activated the Document Text Setup, they are transferred to documents:
Create a new document (e.g., sales order).
Add an item that has item attributes.
NAVAX Document Text checks which item attributes have the Print field enabled.
The system automatically creates document text lines only for these attributes.
The texts appear as line texts under the item position.
You can manually edit or delete the automatically created text lines if needed.
Important
Item attributes are only transferred as document text lines if both settings are enabled: Print Item Attributes in the Document Text Setup and Print for the respective item attribute. Without both settings, no automatic transfer occurs.
Formatting and Customization
You can format the automatically created document text lines as usual:
Change font, size, or color
Adjust spacing and indentation
Manually edit the text
Delete individual attribute lines if they are not needed
Selective activation: Enable only relevant attributes for printing. Too much information can make the document confusing.
Consistent naming: Use uniform names for attributes (e.g., always "Color" instead of sometimes "Shade").
Order: Item attributes are displayed in the order in which they are created in Business Central.
Default values: Set default values for frequently used attributes to simplify data maintenance.
Multilingual: Maintain translations for all languages in which you create documents.
Maintenance: Regularly check whether all item attributes are current and complete.
Frequently Asked Questions
What happens if an item has no attributes?
No additional document text lines are created. The document remains as usual.
Can item attributes be combined with other text types?
Yes, item attributes are inserted as line texts and can be combined with other text types. Line texts from the item are displayed together with the item attributes under the item line, while beginning and ending texts appear in the document header.
For more information, see Setup, Line Texts.
Common Problems
Problem: Item attributes do not appear on the document
Cause: The Print field is not enabled, the Document Text Setup is not configured, or the item has no attributes.
Solution:
Open the Document Text Setup and check whether Print Item Attributes is enabled
Open the Item Attributes page and check whether the Print field is enabled
Check on the Item Card whether attributes are assigned to the item
Verify that the attributes have values (empty attributes are not displayed)
Problem: Item attributes appear in the wrong language
Cause: Translations are missing or the language code is not correct.
Solution:
Open Item Attributes > Translations and check whether translations exist for the desired language
Also check the Item Attribute Values > Translations
Ensure that the Print field is also enabled in the translations
Check the customer's language code - this determines the language used
Docs / App / NAVAX Document Text / Advanced Features Text Editor and Placeholders
NAVAX Document Text provides a text editor that allows you to easily create and edit extended texts for documents. The editor supports placeholders to insert dynamic content from the respective tables. You can copy pre-formatted texts from other programs and paste them into the text editor.
Using the NAVAX Document Text Editor
The text editor is the central tool for creating and editing texts in NAVAX Document Text. It offers various functions for text formatting and inserting dynamic content.
Opening the Text Editor
You can open the text editor in two ways:
From a document: Open a document and navigate to the desired text type (Beginning Text, Ending Text, Line Text, or Miscellaneous Texts). Click the Edit Text Line action to open the editor.
From Standard Text Codes: Open the Standard Text Codes page via the search in Business Central. Select the desired code and open the associated texts via the Extended Texts action. Open a text line to start the editor.
Basic Functions of the Text Editor
The text editor offers the following functions:
Text input: Enter your text directly into the input field. Use the Enter key for line breaks.
Copy and paste: You can copy texts from other programs (e.g., Word, Excel) and paste them directly into the editor.
Insert placeholders: Use the Insert Placeholder function to insert dynamic content from Business Central tables (see section below).
Multiple lines: For longer texts, you can create multiple text lines. Each line is edited separately in the editor.
Tips for Text Design
Clarity: Distribute longer texts across multiple lines for better readability.
Use formatting sparingly: Too much formatting can impair readability.
Use preview: Check your texts in the print preview before sending documents.
Test placeholders: Create a test document to verify that placeholders are replaced correctly.
Working with Placeholders
Example: Extended Text for a Beginning Text with Document Validity
Field
Value
Document Type
Sales Header
Standard Text Code
VALIDITY
Field Name
Quote Valid Until Date
Step-by-Step Guide: Inserting Placeholders
Open the text editor for the desired document text:
Directly in a document by opening it and calling the editor via the desired text type (Beginning Text, Ending Text, Line Text, or Miscellaneous Texts).
For more information, see the respective chapters under Working with the App.
When setting up an extended text that will later be automatically inserted into the selected documents.
To do this, open the Standard Text Codes and select the desired extended text.
For more information, see Setup, Extended Texts.
Enter the text "This quote is valid until " (note the space at the end).
Click Insert Placeholder.
Select the table from which you want to insert the placeholder.
Note
This selection only appears when you open the editor from an extended text. If you open the text editor from a document text line, the table is automatically selected.
Select the desired field from the list and click OK.
The selected field placeholder is inserted at the current cursor position in the editor. You can continue typing, insert additional placeholders, or adjust spacing and punctuation as needed.
When printing or in the preview, you will see in the beginning text: "This quote is valid until ##Quote Valid Until Date##".
Tip
If you do not see the beginning text in the test print, check whether the correct report and layout are selected in the Report Selection - Sales.
For more information, see Advanced Features, Report Layout Selection.
Available Placeholders
Placeholders can be inserted from various tables, depending on where the text is used:
Document Header Placeholders
For beginning and ending texts as well as miscellaneous texts, you can use fields from the document header:
Other fields: ##Variant Code##, ##Location Code##, ##Shipment Date##
The available placeholders depend on the table or document in which you use the text. You can open the list of available placeholders in the text editor with the Insert Placeholder action.
Placeholder Format
If you know the exact name of a field, you can also enter the placeholder manually. The format is explained below.
Placeholders are always written in the format ##FieldName##:
Begin and end with double hash marks (##)
Contain the English field name from Business Central
Find field names in your language: Placeholders always use the English field caption, regardless of your Business Central language setting. To find the correct English name of a field that you know in your language (e.g., "Bill-to Name"), use the Field Descriptions, Field List page. There you can search for the field caption in your language and copy the corresponding English name for the placeholder.
More Placeholder Examples
Example 1: Personalized Greeting with Customer Name
Text: "Dear ##Bill-to Name##, thank you for your order from ##Order Date##."
Result: "Dear Adatum Corporation, thank you for your order from 12/15/2025."
Example 2: Payment Terms with Due Date
Text: "Payment due: ##Due Date##. Please transfer the amount of ##Amount Including VAT## by this date."
Result: "Payment due: 01/14/2026. Please transfer the amount of $5,950.00 by this date."
Text: "Your order number: ##Your Reference##, External document number: ##External Document No.##"
Result: "Your order number: PO-2025-1234, External document number: EXT-5678"
More examples and tips of using placeholders can be found in the Working with the App, Example Scenarios.
Common Problems
Problem: Placeholder is not replaced
Cause: The placeholder is misspelled or the field does not exist in the table.
Solution:
Check the exact spelling: Does the placeholder begin and end with ##?
Use the Insert Placeholder function instead of manual entry
Verify that the field exists in the corresponding table:
Note case sensitivity and spaces in the field name
Problem: Placeholder shows empty value
Cause: The field is not filled in the document.
Solution:
Check whether the field has a value in the document
Example: ##Your Reference## remains empty if no customer reference was entered
Optional: Use a standard text as an alternative
Frequently Asked Questions
Can I create my own placeholders?
No, you can only use fields that exist in Business Central. If you need additional fields, they must first be created as table fields in Business Central.
Are placeholders also considered in formatting?
Yes, you can format placeholders (e.g., bold, italic). The formatting is retained when the placeholder is replaced with the actual value.
For more information, see Advanced Features, Formatting.
Are placeholders also replaced in the print preview?
Yes, you can already see the replaced values in the print preview. This is ideal for testing placeholders before you actually print or send the document.
Docs / App / NAVAX Document Text / Advanced Features Formatting
With the formatting functions in NAVAX Document Text, you can design your extended texts professionally and in accordance with corporate identity guidelines. You can adjust font type, size, and color, as well as control paragraph alignment and indentation.
How to Use the Formatting Functions
Open the text editor:
From a document: Open the document and select a Document Text Line for editing.
From Standard Text Codes: Open the Standard Text Codes page via the search in Business Central. Select the desired code and open the associated texts via the Extended Texts action.
Use the formatting fields in the text line to adjust font type, size, and color.
Optional: Change the paragraph alignment (left-aligned, centered, right-aligned).
Optional: Set padding top/bottom and indentation.
Changes are automatically saved when you close the line or switch to another line.
The following formatting options are available for document text lines:
Format
Effect
Bold
Specifies whether this line should be printed or displayed in bold.
The default value is No.
Italic
Specifies whether this line should be printed or displayed in italic.
The default value is No.
Color
Specifies in which color this line should be printed or displayed.
NAVAX Document Text supports the following colors:
Black
Red
Blue
Green
The default value is Black.
Paragraph
Specifies whether this line should be printed with alignment.
The following alignments are available:
Left-Aligned
Centered
Right-Aligned
The default value is Left-Aligned.
Font Name
Specifies the font for the text line.
The following fonts are available:
Segoe UI
Arial
Consolas
Courier New
Lucida Console
Times New Roman
Segoe Script
Segoe UI Light
Segoe UI Semilight
Kunstler Script
The default value is Segoe UI.
Warning
The fonts depend on the fonts installed on the system. The available fonts are standard Windows fonts!
Font Size
Specifies the font size for the text line in pt.
Sizes from 5-24 points are available.
The default value is 9.
Padding Top/Bottom
Specifies how much space in points (pt) should be inserted before or after the line.
Use these values to create spacing between text lines for better readability.
The default value is 2.
Indentation
Specifies how many points (pt) the line should be indented from the left margin.
Use indentation for lists or to visually structure text blocks (e.g., 10 pt indentation for sub-items).
The default value is 0.
Formatting Defaults
In the Document Text Setup, you can define default values for formatting that are automatically applied to all newly created text lines. This ensures consistent design and saves time when creating texts.
For more information, see Setup, Document Text Setup.
Practical Examples
Highlight Headings
For headings in beginning texts:
Bold: Yes
Font Size: 12 pt
Padding Bottom: 4 pt (for visual separation)
Mark Important Notes
For warnings or important information:
Color: Red
Bold: Yes
Padding Top/Bottom: 3 pt (for better visibility)
Structure Lists
For lists and sub-items:
Indentation: 10 pt for first level, 20 pt for second level
Consistency: Use consistent formatting for the same text types (e.g., format all headings the same way).
Readability: Use spacing and indentation to visually structure texts and improve readability.
Use colors sparingly: Use colors only for important highlights, not for the entire text.
Fonts: Choose easily readable fonts. Arial, Segoe UI, or Times New Roman are particularly suitable for business documents.
Check preview: Test the formatting in the print preview, as the on-screen display may differ from the printout.
Missing fonts: If a font is not installed on the system, a default font is automatically used. Therefore, choose standard Windows fonts for maximum compatibility.
Frequently Asked Questions
Why does the formatting look different in the preview than in the text editor?
The text editor only shows a simplified representation. You can see the actual formatting in the print preview or in the printed document.
Can different formatting be used within a single text line?
No, the formatting always applies to the entire text line. If you need different formatting, split the text across multiple lines.
How can I set default formatting for all texts?
Open the Document Text Setup and define default values for font, size, color, and spacing. These are automatically applied to new text lines.
For more information, see Setup, Document Text Setup.
Common Problems
Problem: Formatting does not appear in print
Cause: The report layout used does not support HTML formatting or HTML is disabled in the setup.
Solution:
Docs / App / NAVAX Document Text / Advanced Features Copy Documents
When you copy documents, a window may appear - depending on the setup - asking whether and which texts should be transferred with the document.
Depending on the configuration, texts are either automatically transferred, transferred on request, or not transferred at all to the new documents.
For more information, see Setup, Document Text Setup.
How to Copy a Sales Document
Example: Extended Text for a Beginning Text with Document Validity
Field
Value
Document Type - Old
Sales Invoice Header
Document Type - New
Sales Header
Field Name
Quote Valid Until Date
Step-by-Step Guide: Copying a Document
Open the Sales Orders page. You can reach this via Tell me what you want to do or directly from the Business Central home page if you have the Sales Order Processor role.
Click New to create a new sales order. The Sales Order page opens.
Click in the Customer Name field. The AssistEdit function displays all customers.
Select the desired customer from the list.
Click the Copy Document action in the Prepare menu. The Copy Sales Document page opens.
Select the Document Type to copy (Sales Invoice) and Document No.. The grayed-out fields are automatically filled with the data of the selected document and serve as a control.
Use the Include Header and Recalculate Lines fields to specify which information should be transferred. Click OK.
If the value On Request is set in the Document Text Setup in the Copy Documents with Texts field, the query Do you want to insert the document texts into the copied document? appears. Select whether you want to transfer beginning and ending texts, line texts, or both.
Upon completion, you will see the new sales document with all transferred information and texts.
Options
The following options are available:
Beginning/Ending Texts
Specifies whether existing beginning and ending texts should also be inserted into the new document.
Line Texts
Specifies whether existing line texts should also be inserted into the new document.
Frequently Asked Questions
The prompt to copy texts does not appear—why?
In the Document Text Setup, the option Copy Documents with Texts is set to Always or Never. Change the setting to On Request if you want to decide for each copy operation.
For more information, see Setup, Document Text Setup.
What happens to extended texts with document-type conditions?
Extended texts with conditions are automatically re-evaluated. An extended text with the condition "Document Type = Quote" will not be displayed when you copy to a sales order unless a corresponding extended text exists for orders.
For more information, see Working with the App, Sorting and Conditions.
Are personalized texts and formatting carried over?
Yes, if you activate the corresponding option, personalized texts (e.g., customer-specific salutations) and all formatting (bold, italic, colors, font size) are copied 1:1. For placeholders such as e.g. ##Customer Name##, the new customer is inserted automatically.
Docs / App / NAVAX Document Text / Advanced Features Report Layout Selection
The Report Layout Selection window defines which layout should be used when printing a document. For document texts to be printed on A4 documents, the corresponding NAVAX Document Text report layouts must be set up.
Note
Since Microsoft Dynamics 365 Business Central 2024 Wave 2 (BC25), both RDLC and Word report layouts are supported.
How to Set Up the NAVAX Document Text Report Layouts
To set up the NAVAX Document Text report layouts, you must perform the following steps:
Open the Report Layout Selection page via search.
Select the desired report layout from the list.
Tip
Use the search term
117|118|210|404|405|406|407|408|410|1016|1302|1303|1304|1305|1306|1307|1308|1309|5900|5902|5911|5912|5913|5936|5970|5971|5972|5973|6631|6636|6641
to filter all documents that are supported by document texts.
In the Layout Type field, select the desired type (RDLC or Word). The available NAVAX Document Text layouts are displayed according to your selection.
Note
From Business Central 2024 Wave 2 (BC25) onwards, both layout types are available. In earlier versions, only RDLC layouts are available.
Click Select Layout to display the list of available report layouts.
Select the desired layout from the list. The layout provided by NAVAX Document Text is named NVXDT Standard Layout and can be found in the Report Name column.
Save your changes by clicking OK.
Available NAVAX Document Text Report Layouts
NAVAX Document Text report layouts are available for the following documents.
Report ID
Report Name
NAVAX Document Text Layout
117
Reminder
./NVXDTReminder.rdlc
118
Finance Charge Memo
./NVXDTFinanceChargeMemo.rdlc
210
Blanket Sales Order
./NVXDTBlanketSalesOrder
404
Purchase - Quote
./NVXDTPurchaseQuote.rdlc
405
Purchase - Order
./NVXDTPurchaseOrder.rdlc
406
Purchase - Invoice
./NVXDTPurchaseInvoice.rdlc
407
Purchase - Credit Memo
./NVXDTPurchaseCreditMemo.rdlc
408
Purchase - Receipt
./NVXDTPurchaseReceipt.rdlc
410
Blanket Purchase Order
./NVXDTBlanketPurchaseOrder.rdlc
1016
Job Quote
./NVXDTJobQuote.rdlc
1302
Pro Forma Invoice
./NVXDTSalesProFormaInv.rdlc
1303
Draft Invoice
./NVXDTSalesDraftInvoice.rdlc
1304
Sales - Quote
./NVXDTSalesQuote.rdlc
1305
Order - Confirmation
./NVXDTSalesOrderConfirmation.rdlc
1306
Sales - Invoice
./NVXDTSalesInvoice.rdlc
1307
Sales - Credit Memo
./NVXDTSalesCreditMemo.rdlc
1308
Sales - Shipment
./NVXDTSalesShipment.rdlc
1309
Return Receipt
./NVXDTSalesReturnRcpt.rdlc
5900
Service Order
./NVXDTServiceOrder.rdlc
5902
Service Quote
./NVXDTServiceQuote.rdlc
5911
Service - Invoice
./NVXDTServiceInvoice.rdlc
5912
Service - Credit Memo
./NVXDTServiceCrMemo.rdlc
5913
Service - Shipment
./NVXDTServiceShipment.rdlc
5936
Service Item Worksheet
./NVXDTServiceItemWorksheet.rdlc
5970
Service Contract
./NVXDTServiceContract.rdlc
5971
Service Contract - Detail
./NVXDTServContractDetail.rdlc
5972
Service Contract Quote
./NVXDTServContractQuote.rdlc
5973
Service Contract Quote - Detail
./NVXDTServContQuoteDetail.rdlc
6631
Return Order Confirmation
./NVXDTSalesReturnOrderConfirmation.rdlc
6636
Purchase - Return Shipment
./NVXDTPurchaseReturnShipment.rdlc
6641
Return Order
./NVXDTReturnOrder.rdlc
Frequently Asked Questions
Why are the NAVAX Document Text layouts not displayed in the selection list?
Make sure that in the Layout Type field, the RDLC or Word option is selected. From Business Central 2024 Wave 2 (BC25) onwards, NAVAX Document Text supports both layout types. In earlier versions, only RDLC layouts are available.
Can I customize the NAVAX Document Text layout?
Yes, you can download the layout via the Export Layout action, edit it with an RDLC editor, and then upload it again via Import Layout. Note that the document text fields must remain present in the layout.
Do I have to set up the layouts for all documents individually?
Yes, you must select the desired layout separately for each document type (e.g., Sales Invoice, Sales Quote). Use the search filter in step 2 to display all relevant documents at once.
What happens if I want to reset the layout to standard later?
Select the original standard layout from the list or click Reset Layout if available. The NAVAX Document Text layouts remain available for selection.
Are the texts also printed on posted documents?
Yes, the document texts are archived when posting and appear on the posted document reports (e.g., Posted Sales Invoice), provided that the corresponding NAVAX Document Text layout is also set up there.
Troubleshooting
Problem: No NAVAX Document Text layouts visible
Causes and Solutions:
Layout type not matching: In the Layout Type field, select either RDLC or Word (from Business Central 2024 Wave 2 (BC25) onwards).
NAVAX Document Text not installed: Check whether the NAVAX Document Text extension is installed and activated in the Extension Management.
Permissions missing: Make sure you have sufficient permissions to manage report layouts.
Problem: Texts do not appear on the printed document
Possible Causes:
Wrong layout selected: Check whether the NVXDT Standard Layout is set up for the report.
No texts stored: Verify whether beginning texts, line texts, or ending texts have actually been entered for the document.
Conditions not met: Check the validity conditions (language, document type, period) of the Extended Texts.
Layout has been customized: If you have modified the layout, make sure that the document text fields are present in the layout.
Problem: Layout cannot be selected
Solution: A custom layout may already be active for this report. First reset the layout to a standard layout and then select the NAVAX Document Text layout.
Tips and Best Practices
Use test environment: Test the layouts first in a test environment before using them productively.
All documents at once: Use the search filter from step 2 to display all supported documents at once and set up the layouts in one go.
Document customizations: If you customize layouts, document your changes so you can track them during updates.
Use print preview: Use the print preview to check the result before actually printing or sending documents.
Create backup: Export customized layouts as a backup before making major changes.
Docs / App / NAVAX Document Text / Advanced Features Export/Import
With the export and import function, you transfer configured Standard Text Codes between different Business Central installations. This enables efficient management of your extended texts and saves time during setup.
When is Export/Import Useful?
Company change: Transfer extended texts from a test company to the production company
Version change: Migrate configurations when switching to a new Business Central version
Data backup: Create regular backups of your extended texts
Multiple environments: Synchronize extended texts between different systems (e.g., Test, Staging, Production)
Use templates: Create standard configurations that you can use for new companies
Collaboration: Share extended texts with other companies or locations
Important
Always create a backup of your current data before importing. The import can overwrite existing records.
Export of Standard Text Codes
Open the Standard Text Codes page via the search in Business Central.
Click Actions > Export.
All Standard Text Codes and their Extended Texts are combined in an XML file and automatically downloaded.
The file is saved in your standard download folder and can now be used for import into another system.
Important
Note: The Reminder field is not considered during import. Extended texts for reminders must be manually activated after import.
Tip
Name the exported file descriptively (e.g., with date and system name) to keep track later.
Import of Standard Text Codes
Open the Standard Text Codes page via the search in Business Central.
Click Actions > Import.
Click click here to browse and select the XML file to import.
Note
Alternatively, drag and drop the file into the blue frame.
If Standard Text Codes already exist, a selection dialog appears with the following options:
Create if not existing
Creates only new records that do not yet exist. Existing records remain unchanged.
Use case:
Addition of new extended texts without changing existing configurations.
Create & overwrite existing records
Completely replaces existing records with the imported records. All local changes are lost.
Use case:
Complete restoration of a backup or overwriting outdated configurations.
Create & update existing records (keep settings)
Updates the text content but retains existing settings (beginning text/ending text, language code, formatting, document types, etc.).
Use case:
Update text content while keeping individual customizations.
Select the desired option and confirm with OK. The import is started.
After a successful import, statistics are displayed showing how many records were imported, updated, or skipped.
Best Practices
Regular Backups
Create regular exports of your extended texts, especially:
Before major configuration changes
After completing important setup work
Before a Business Central update
At regular intervals (e.g., monthly) as a routine
Naming Export Files
Use descriptive file names that contain the following information:
Date: e.g., "2025-12-15"
System/Company: e.g., "Production" or "Test"
Purpose: e.g., "Backup" or "Template"
Example: "NCDT_2025-12-15_Production_Backup.xml"
Import Strategy
Test first: Always perform imports in a test environment first
Choose timing: Import outside business hours to avoid conflicts
Documentation: Record which files were imported when
Validation: Spot-check some critical extended texts after import
Version Control
Keep multiple versions of your exports
Do not delete old exports immediately - keep at least the last 3-5 versions
Store important exports in a secure location (e.g., network drive, cloud storage)
Important Notes
Compatibility: The export file is compatible between different Business Central versions, provided the field structure is identical.
Data backup: Create a backup of your existing configuration through an export before each import.
Test import: Perform the first import in a test environment to check the effects.
Verification after import: Spot-check some extended texts for completeness and correct settings after import.
Reminders: Manually activate the corresponding extended texts for reminders after import.
Frequently Asked Questions
Are formatting options retained during export/import?
Yes, all formatting (font, size, color, alignment, etc.) is completely exported and imported.
Can I export only individual extended texts?
No, the export function always exports all Standard Text Codes. However, you can manually delete unwanted extended texts after import.
What happens to placeholders during import?
Placeholders are transferred unchanged. Ensure that the referenced fields exist in the target system.
Can I use exports between different Business Central versions?
Generally yes, as long as the field structure is identical. For larger version jumps, a test import is recommended for validation.
How can I check what is contained in an export file?
Open the XML file with a text editor or XML viewer. The structure is readable and shows all Standard Text Codes and their settings.
Are conditions (language, time period) also exported?
Yes, all conditions and settings are fully exported and can be imported.
What is the difference between "Update" and "Overwrite"?
Overwrite: Replaces the entire record - all settings are taken from the import file
Update: Updates only the text content but retains your local settings (document types, formatting, etc.)
Can I use exports between different Business Central versions?
Generally yes, as long as the field structure is identical. For larger version jumps, a test import is recommended for validation.
Common Problems
Problem: Import fails with error message
Cause: The XML file is corrupted or has an invalid structure.
Solution:
Open the XML file with a text editor and check for obvious errors
Create a new export and try again
Ensure that the file was completely downloaded
Problem: Undo import
Solution: Import your previously created backup file with the option "Create & overwrite existing records".
Docs / App / NAVAX Document Text / Field Descriptions Standard Text Code Fields
Using Standard Text Codes, you can manage Extended Texts for documents in Dynamics 365 Business Central. These codes allow you to store frequently used texts centrally and insert them on documents as needed.
Standard Text Codes are particularly useful for ensuring consistent information across various documents, such as legal notices, payment terms, or general information.
For more information, see Setup, Extended Texts.
Fields
The following fields are added by NAVAX Document Text
Field
Description
Beginning Text
Specifies whether the text is an automatic beginning text.
Ending Text
Specifies whether the text is an automatic ending text.
Ext. Text Exists
Specifies whether an Extended Text exists and is set up.
Actions
Import
The import function allows you to import the Standard Text Codes and their Extended Texts as well as all settings. This can be helpful if you have already created texts in your sandbox or in another database and want to transfer them to the production database.
For more information, see Advanced Features, Export/Import.
Export
The export function allows you to export the Standard Text Codes and their Extended Texts as well as all settings. This can be helpful if you want to transfer already created texts from your database to your sandbox or another database.
For more information, see Advanced Features, Export/Import.
Text Blocks
Opens the list of extended texts for the selected Standard Text Code. Here you can manage individual text variants with their conditions (language, period, document type).
For more information, see Field Descriptions, Extended Texts.
Practical Notes
Beginning Text and Ending Text
The fields Beginning Text and Ending Text control whether a Standard Text Code is automatically inserted as a beginning or ending text on documents:
Beginning Text = Yes: The text appears automatically at the beginning of the document (before the document lines)
Ending Text = Yes: The text appears automatically at the end of the document (after the document lines)
Both options can be enabled at the same time if the text should appear in both positions
Important
Only extended texts with Beginning Text or Ending Text enabled are inserted automatically. Other extended texts must be assigned manually.
Ext. Text Exists
The field Ext. Text Exists is informational and indicates whether at least one extended text has been created for the Standard Text Code. This helps you see which codes are already configured.
Naming Conventions
Use meaningful codes: e.g., "TERMS-SALES" instead of "TEXT01"
Use prefixes for different areas: e.g., "SL-" for Sales, "PU-" for Purchase
The description should clearly communicate the content of the text
Codes are case-sensitive – ensure consistent spelling
Frequently Asked Questions
How do I create a new Standard Text Code?
In the Standard Text Codes list, click New, assign a unique code and a description. Enable Beginning Text or Ending Text depending on the desired position. Then open the Extended Texts action to manage the extended texts and create the actual texts.
Can I rename a Standard Text Code?
No, the code is the primary key and cannot be changed after creation. However, you can modify the description at any time. If needed, create a new code and delete the old one.
Docs / App / NAVAX Document Text / Field Descriptions Extended Texts
Extended texts are individually defined texts that can be automatically inserted into documents. You create extended texts on the Standard Text Codes page, which you can easily find via search.
Extended texts can be configured for different document types and conditions. For example, you can create beginning texts for sales quotes or ending texts for invoices.
For more information, see Setup, Extended Texts.
The texts can be flexibly designed: Use formatting such as bold, italic, colors, or individual fonts and font siztable>
General, Fields
Table Name
Shows the referenced table name for which the extended text was created.
No.
Shows the text code that you previously assigned to the Standard Text.
Text No.
Shows the text number automatically assigned by the system.
Language Code
Specifies the language used when the specified text is translated on documents for foreign business partners, for example, a description of the item on an order confirmation.
All Languages
Specifies that the text should be used for all language codes. If a language code has been selected in the "Language Code" field, it will be overridden by this function.
Description
Specifies a short description of the extended text.
Sorting Sequence No.
Specifies the sorting sequence for the extended text.
Starting Date
Specifies the starting date for the extended text. This defines the period during which the extended text is active.
Ending Date
Specifies the ending date for the extended text. This defines the period after which the extended text is no longer active.
For information on how to set the sorting and conditions for displaying texts on documents, see Sorting and Conditions.
Sales, Fields
Sales Quote
Specifies whether the text should be available on sales quotes.
Sales Blanket Order
Specifies whether the text should be available on blanket sales orders.
Sales Order
Specifies whether the text should be available on sales orders.
Sales Invoice
Specifies whether the text should be available on sales invoices.
Sales Pro Forma Invoice
Specifies whether the text should be available on pro forma invoices.
Sales Draft Invoice
Specifies whether the text should be available on sales invoice drafts.
Sales Return Order
Specifies whether the text should be available on sales return orders.
Sales Credit Memo
Specifies whether the text should be available on sales credit memos.
Sales Shipment
Specifies whether the text should be available on sales shipments.
Sales Return Receipt
Specifies whether the text should be available on sales return receipts.
Reminder
Specifies whether the text should be available on reminders.
Finance Charge Memo
Specifies whether the text should be available on finance charge memos.
Prepmt. Sales Invoice
Specifies whether the text should be available on prepayment sales invoices.
Prepmt. Sales Credit Memo
Specifies whether the text should be available on prepayment sales credit memos.
Purchase, Fields
Purchase Quote
Specifies whether the text should be available on purchase quotes.
Blanket Purchase Order
Specifies whether the text should be available on blanket purchase orders.
Purchase Order
Specifies whether the text should be available on purchase orders.
Purchase Invoice
Specifies whether the text should be available on purchase invoices.
Purchase Return Order
Specifies whether the text should be available on purchase return orders.
Purchase Credit Memo
Specifies whether the text should be available on purchase credit memos.
Purchase Receipt
Specifies whether the text should be available on purchase receipts.
Return Shipment
Specifies whether the text should be available on return shipments.
Prepmt. Purchase Invoice
Specifies whether the text should be available on prepayment purchase invoices.
Prepmt. Purchase Credit Memo
Specifies whether the text should be available on prepayment purchase credit memos.
Delivery Confirmation
Specifies whether the text should be available on delivery confirmations.
Service, Fields
Service Quote
Specifies whether the text should be available on service quotes.
Service Order
Specifies whether the text should be available on service orders.
Service Invoice
Specifies whether the text should be available on service invoices.
Service Credit Memo
Specifies whether the text should be available on service credit memos.
Service Contract
Specifies whether the text should be available on service contracts.
Service Contract Quote
Specifies whether the text should be available on service contract quotes.
Service Shipment
Specifies whether the text should be available on service shipments.
Project, Fields
Project
Specifies whether the text should be available on projects.
Actions
Copy from Extended Text
With this action, you can copy the lines from an existing extended text to the current extended text.
Disable Sequel Fields
With this action, you can deactivate all document sequel fields.
Activate Sequel Fields
With this action, you can activate all document sequel fields.
Lines, Fields
The Extended Text Lines table has been extended with the following fields by NAVAX Document Text.
Text
Specifies the text. The text can contain up to 2048 characters. Line breaks in the text are also possible. Click on the field to edit the text.
Note
An editor is provided for entering text lines, which can accept a maximum of 2048 characters. You can use the editor to insert pre-formatted texts by copying them from an external program into the text editor.
For more information, see Advanced Features, Text Editor and Placeholders.
Bold
Specifies whether this line should be printed or displayed in bold.
Italic
Specifies whether this line should be printed or displayed in italic.
Color
Specifies in which color this line should be printed or displayed.
Paragraph
Specifies how this line should be aligned when printed.
Font Name
Specifies the font for the text line.
Font Size (pt)
Specifies the font size in pt for the text line.
Padding Top (pt)
Specifies the padding top in pt for the text line.
Padding Bottom (pt)
Specifies the padding bottom in pt for the text line.
Indentation (pt)
Specifies the indentation in pt for the text line.
For more information about formatting texts, see Formatting.
Practical tips for key fields
Language Code and All Languages
Leave Language Code empty and enable All Languages for language-independent texts
Create multiple extended texts with the same code but different language codes for multilingual texts
The system automatically selects the appropriate text based on the customer/vendor language code
Sorting Sequence
Use steps of 10 (10, 20, 30, ...) to insert texts later between existing ones
Lower values appear first on the document
If the sorting sequence is the same, the Text No. (assigned automatically) decides the order
Periods with Start and End Date
Ideal for seasonal notes, time-limited promotions, or year-end changes
Leave both fields empty for texts that are always valid
The Document Text Date (not the posting or document date!) is used for validation
Enable document types
Enable only the document types on which the text should appear
To carry over to subsequent documents (e.g., Quote → Order → Invoice), enable all relevant document types
FastTabs are grouped by area: Sales, Purchase, Service, Project
Docs / App / NAVAX Document Text / Field Descriptions Document Header Fields
With NAVAX Document Text, you can add beginning and ending texts to all documents in Dynamics 365 Business Central. These texts appear in the document header and are suitable, for example, for greetings, notes, legal information, or individual messages.
Beginning and ending texts can be inserted automatically or manually. They are flexible in design: use formatting such as bold, italic, colors, or custom fonts and sizes.
The texts are available for various document types and can be customized. For example, you can define different beginning texts for sales and purchase documents or use ending texts for service orders.
For more information, see Working with the App, Using Beginning and Ending Texts.
Fields
The following fields are added by NAVAX Document Text to sales, purchase, service, and project documents:
Field
Description
Beginning Text - current/following documents
Indicates whether a beginning text has been selected for the document or the subsequent documents (e.g., when posting). The DrillDown function opens the list of texts.
Ending Text - current/following documents
Indicates whether an ending text has been selected for the document or the subsequent documents (e.g., when posting). The DrillDown function opens the list of texts.
Payment Terms Text
Indicates whether a payment terms text has been selected for the document or the subsequent documents (e.g., when posting). The DrillDown function opens the list of texts.
Shipment Method Text
Indicates whether a shipment method text has been selected for the document or the subsequent documents (e.g., when posting). The DrillDown function opens the list of texts.
Fin. Charge Terms Text
Specifies whether a financial charge terms text has been selected for the document. The DrillDown function opens the list of texts.
Document Text Date
Reference date for time-controlled texts (Starting Date/Ending Date). This date is used for validity checks and can be adjusted per document (default: Work Date).
Person Responsible
Specifies the person who is responsible for this business case.
Document Text Date
Reference date for time-controlled texts (Starting Date/Ending Date). This date is used for validity checks and can be adjusted per document (default: Work Date).
For more information, see Working with the App, Sorting and Conditions.
Service documents, Fields
The following fields are relevant for service documents:
Service Order Type Text
Specifies whether a service order type text has been selected for the document. The DrillDown function opens the list of texts.
Service Contract Group Text
Indicates whether a service contract group text has been selected for the document. The DrillDown function opens the list of texts.
Actions
Beginning texts
This action opens the list of configured beginning texts that should be printed for the vendor on documents.
Ending texts
This action opens the list of configured ending texts that should be printed for the vendor on documents.
Insert/Update Document Texts
Opens a dialog in which you can manually insert or update document texts (e.g., beginning texts, ending texts, payment terms texts, shipment method texts). You can select which types of texts should be applied and whether existing texts should be overwritten or retained.
For more information, see Working with the App, Manually Inserting Texts.
Tip
This action is particularly useful if the automatic insertion of document texts does not work as expected.
Practical notes
Miscellaneous Text Fields
The fields Payment Terms Text, Shipment Method Text, Fin. Charge Terms Text, Service Order Type Text, and Service Contract Group Text are informational fields. They indicate whether a text module is assigned for the corresponding setting (e.g., payment terms). These texts are automatically inserted when the respective condition is selected in the document.
For more information, see Setup, Miscellaneous Texts.
DrillDown Function
Click on a field with a Yes/No value to go directly to the overview of the assigned texts. There you can edit, add, or delete texts.
Docs / App / NAVAX Document Text / Field Descriptions Personalized Texts
The fields for personalized texts allow you to store Extended Texts specifically for a particular customer, vendor, or salesperson/purchaser.
Where to Find These Fields
You can find the fields on the following cards:
Customer Card
Vendor Card
Salesperson/Purchaser Card
Fields
Field
Description
Beginning Text
Specifies the Standard Text Code that is automatically suggested as beginning text in documents when this customer, vendor, or salesperson/purchaser is used in the document.
You can use the AssistEdit button (…) to select the desired Standard Text Code or create a new one.
Ending Text
Specifies the Standard Text Code that is automatically suggested as ending text in documents when this customer, vendor, or salesperson/purchaser is used in the document.
You can use the AssistEdit button (…) to select the desired Standard Text Code or create a new one.
Docs / App / NAVAX Document Text / Field Descriptions Document Lines Fields
In all documents in Dynamics 365 Business Central, you can add line texts. This lets you print additional information directly below the respective document line. Line texts are suitable, for example, for product information, notes, or legal information.
You can create line texts automatically or add them manually with NAVAX Document Text. The design is flexible: use formatting such as bold, italic, colors, or custom fonts and sizes.
For more information, see Working with the App, Using Line Texts.
Fields
The following fields are added to sales, purchase, service, and job document lines by NAVAX Document Text:
Line Texts
Indicates whether a line text is available for the document line. Use the DrillDown function to open the overview of line texts.
Actions
Insert Ext. Texts
Use this action to select standard text blocks and insert them into the lines.
Line Texts
This action opens the overview of configured line texts that should be printed on documents.
Insert Line Texts
Manually inserts line texts for the selected document line. The line texts are determined from the configured text blocks (item text blocks, item attributes, standard text blocks) and inserted into the line. Existing line texts will be overwritten.
Practical Tips
Field "Line Texts"
The Line Texts field shows Yes/No to indicate whether line texts exist for this document line. Click the field (DrillDown) to open and edit the list of line texts.
Automatic Line Texts
Line texts can be inserted automatically from:
Item text blocks: Texts linked directly to the item
Item attributes: Product properties such as material, color, size
Standard text blocks: General texts with conditions (language, period, document type)
Docs / App / NAVAX Document Text / Field Descriptions Line Positions on Master Data Cards
NAVAX Document Text allows you to link Extended Texts directly to master data such as items, resources, G/L accounts, or service items. These texts appear automatically as line texts below the respective line when you use the corresponding item, resource, G/L account, or service item in a document.
Where to Find These Fields
You can find the fields for Extended Texts on the following master data cards:
Item Card - for item-specific texts
Resource Card - for resource-specific texts
G/L Account Card - for G/L account-specific texts
Service Item Card - for service item-specific texts
The fields are typically located in the Extended Text Exists field or via the action Item > Extended Texts.
For more information, see Setup, Line Texts.
How It Works
When you add an item, resource, G/L account, or service item to a document line, NAVAX Document Text checks whether:
Extended Texts are stored for this master data record
The Automatic Ext. Texts option is activated
The Extended Texts meet the appropriate conditions (language, document type, period)
If all conditions are met, the Extended Texts are automatically inserted as line texts under the document line.
For more information, see Working with the App, Using Line Texts.
Fields
Field
Description
Extended Text Exists
Indicates whether Extended Texts have already been set up for this master data record (item, resource, G/L account, service item).
Yes: One or more Extended Texts are stored.
No: No Extended Texts exist.
This field is not editable and serves informational purposes only. However, you can use the AssistEdit button (…) in the field to go directly to the overview and editing of the Extended Texts.
Automatic Ext. Texts
Controls whether the stored Extended Texts should be automatically inserted into documents.
Activated: Extended Texts are automatically inserted as line texts when adding the item/resource/G/L account/service item.
Not activated: Extended Texts must be manually inserted via the Extended Texts action.
Note
This option applies to all document types (Sales, Purchase, Service, Job), unless configured otherwise in the Extended Texts.
Actions
Extended Texts
Opens the list of Extended Texts for the current master data record. Here you can:
Create new Extended Texts
Edit existing Extended Texts
Delete Extended Texts
Define conditions for Extended Texts (language, document type, period)
Adjust the sorting sequence of the texts
Docs / App / NAVAX Document Text / Field Descriptions Miscellaneous Texts
Miscellaneous texts in NAVAX Document Text allow you to display additional information on documents that is not directly associated with the usual document types such as sales or purchase documents. These texts can be used for various purposes, e.g., for legal notices, special instructions, or individual messages that cannot be captured in the standard fields of the documents.
For more information, see Working with the App, Using Miscellaneous Texts.
Fields
The following fields are added by NAVAX Document Text:
Field
Description
Standard Text Code
Specifies the Standard Text Code to be used for the suggestion on documents.
Practical Tips
What are miscellaneous texts?
Miscellaneous texts are automatically inserted based on settings in various master data:
Payment Terms: Texts about payment deadlines, cash discount conditions
Shipping Advice: Texts about shipping methods, delivery conditions
Interest Methods: Texts for reminders and interest calculations
Service Order Types: Specific texts for service scenarios
Service Contract Groups: Texts for service contracts
Setup
The linking of Standard Text Codes with the respective master data is done directly on the corresponding setup pages (e.g., on the Payment Terms card).
For more information, see Setup, Miscellaneous Texts.
Automatic insertion
As soon as you select a payment term, shipping advice, etc. on the document, the stored text block is inserted automatically. This only happens if a Standard Text Code is stored in the respective master data table.
Docs / App / NAVAX Document Text / Field Descriptions Document Text Line Fields
Document text lines are created automatically as soon as you use texts via NAVAX Document Text in documents. These lines contain the actual content that is displayed on the respective documents. They allow flexible design of the document texts, e.g., through formatting such as bold, italic, colors, or individual fonts and sizes. The text lines can be used for different document types and customized individually.
For more information, see Advanced Features, Formatting.
Fields
On the Document Text Lines page, you will find the following fields:
Field
Description
Text
Specifies the text. The text can contain up to 2048 characters. Line breaks in the text are also possible. Click on the field to edit the text.
Bold
Specifies that this line is to be printed or viewed in bold.
Italic
Specifies that this line is to be printed or viewed in italic.
Color
Specifies in which color this line is to be printed or viewed.
Paragraph
Specifies the alignment for this line when printed.
Font Name
Specifies the font for the text line.
Font Size (pt)
Specifies the font size in pt for the text line.
Padding Top (pt)
Specifies the padding top in pt for the text line.
Padding Bottom (pt)
Specifies the padding bottom in pt for the text line.
Indentation (pt)
Specifies the indentation in pt for the text line.
Sales Quote
Specifies whether the extended text will be available on sales quotes.
Sales Order
Specifies whether the extended text will be available on sales orders.
Service Quote
Specifies whether the extended text will be available on service quotes.
Service Order
Specifies whether the extended text will be available on service orders.
Service Contract Quote
Specifies whether the extended text will be available on service contract quote.
Service Contract
Specifies whether the extended text will be available on service contracts.
Project Quote
Specifies whether the extended text will be available on project quotes.
Sales Shipment
Specifies whether the extended text will be available on sales shipments.
Sales Invoice
Specifies whether the extended text will be available on sales invoices.
Sales Pro Forma Invoice
Specifies whether the extended text will be available on sales pro forma invoices.
Sales Draft Invoice
Specifies whether the extended text will be available on sales draft invoices.
Sales Credit Memo
Specifies whether the extended text will be available on sales credit memos.
Sales Blanket Order
Specifies whether the extended text will be available on sales blanket orders.
Sales Return Order
Specifies whether the extended text will be available on sales return orders.
Sales Return Receipt
Specifies whether the extended text will be available on sales return receipts.
Reminder
Specifies the value of the Reminder field.
Finance Charge Memo
Specifies the value of the Finance Charge Memo field.
Purchase Quote
Specifies whether the extended text will be available on purchase quotes.
Purchase Order
Specifies whether the extended text will be available on purchase orders.
Purchase Invoice
Specifies whether the extended text will be available on purchase invoices.
Purchase Credit Memo
Specifies whether the extended text will be available on purchase credit memos.
Purchase Receipt
Specifies whether the extended text will be available on purchase receipts.
Purchase Blanket Order
Specifies whether the extended text will be available on purchase blanket orders.
Purchase Return Order
Specifies whether the extended text will be available on purchase return orders.
Purchase Return Shipment
Specifies whether the extended text will be available on purchase return shipments.
Service Invoice
Specifies whether the extended text will be available on service invoices.
Service Credit Memo
Specifies whether the extended text will be available on service credit memos.
Service Shipment
Specifies whether the extended text will be available on service shipments.
Actions
Add
Inserts a new document text line (shortcut: Alt+N). The text editor opens automatically so you can start typing right away. If no lines exist yet, the first line is created. If you place the cursor on an existing line and choose Add, the new line is inserted directly below the current line. To add a line at the end, place the cursor on the last line and choose Add.
Insert Blank Line
Inserts an empty document text line directly below the current line (shortcut: Alt+L). Unlike Add, the text editor is not opened – the line remains blank. Blank lines are useful as visual spacing between text sections. Previously, this required a workaround: adding a new line, entering some text, and then deleting it again. With Insert Blank Line, this extra step is no longer necessary.
Edit
Opens the text editor for the currently selected line (shortcut: Alt+E). This allows you to edit the content of a line directly, without having to click on the Text field first. The action is only available when a line is selected.
Insert Ext. Texts
With this action, you can select and insert extended texts.
Up
The position or the order of the document text lines can be changed with Move Up.
Down
The position or order of the document text lines can be changed with Move Down.
Practical Notes
Text Field
The Text field can contain up to 2048 characters. Click the field to open the text editor, where you can insert placeholders and apply formatting.
For more information, see Advanced Features, Text Editor and Placeholders.
Formatting Fields
All formatting fields (bold, italic, color, font, etc.) apply to the entire text line. Create multiple text lines for different formats.
For more information, see Advanced Features, Formatting.
Document Type Fields
The numerous document-type fields control on which subsequent documents the text should appear. These settings are taken into account when posting or copying documents. Enable all document types on which the text should appear consistently.
Docs / App / NAVAX Document Text / Field Descriptions Field List
The field list provides you with an overview of all fields that can be selected from the chosen tables in document texts or extended texts to be used as placeholders.
For more information, see Advanced Features, Text Editor and Placeholders.
Fields
The Field List page shows all fields that can be used in the document texts of NAVAX Document Text.
Field
Description
No.
Shows the code for the field.
Field Caption
Shows the field caption.
Field Name
Shows the field name.
Practical Notes
Using the Field List
The field list serves as a reference for all fields you can use as placeholders in document texts. You don’t need to search this list manually—use the Insert Placeholder function in the text editor instead.
Field Name vs. Field Caption
Field Caption: The readable (localized) name of the field (e.g., "Customer Name")
Field Name: The technical English name used for placeholders (e.g., "Bill-to Name")
For placeholders always use the Field Name: ##Bill-to Name##
Available Fields by Table
The field list shows fields from different tables:
Document Header Tables: For pre- and post-texts and other texts
Document Line Tables: For line texts
Availability depends on whether you use the text in the document header or in a document line
Docs / App / NAVAX Document Text / Information for Developers Extending Documents
NAVAX Document Texts provides a set of standard documents that contain the Document Texts and can be used without customization. If this is not sufficient for your company or your documents need to be customized, you can also use NAVAX Document Texts on your own documents.
In the following section you will find the required modifications to add the NAVAX Document Text to your documents.
Customize individual reports to use NAVAX Document Text
NVXDT Report Management
To customize your documents to use the NAVAX Document Text the codeunit NVXDT Report Management is important. With the function GetReportText the texts can be HTML formatted or integrated as normal text. This allows you to create the documents either in Word format or as RDLC Report.
GetReportText
procedure GetReportText(RecordVariant: Variant; NVXDTTextType: Enum "NVXDT Text Type"; AsHTML: Boolean): Text
Parameters
RecordVariant
Here the record for which the texts are to be inserted is passed as a Variant.
This can be e.g.: a Sales Header, Purchase Header or also Sales Line or Purchase Line.
Important
It is important to make sure that the correct filters are set on the RecordVariant.
NVXDTTextType
The parameter specifies what kind of text lines should be inserted.
Ex: Beginning Text, Ending Text, Line Text, Payment Terms Text etc....
AsHTML
Specifies whether a text should be returned html formatted, this is used in RDL(C) reports, or as normal text, this is used e.g. in Word reports.
Important
If the text has to be implemented as HTML text in your report, a placeholder with the option HTML - interpret HTML tags as styles must be activated in the RDL(C) layout.
Implementation
To use Document Texts on a report, columns must be added to the report dataset with the return value of the GetReportText function.
Here is an example using the report Order as it is integrated in NAVAX Document Text:
Docs / App / NAVAX Document Text / Information for Developers Extending NAVAX Document Text
This page contains a list of all available events for the individual objects that can be used to extend the core functionality of NCDT Document Text.
Table - NVXDT Doc. Text Line
OnBeforeGetFormattedText
The event is used to format the text before it is rendered for reports.
[BusinessEvent(false)]
local procedure OnBeforeGetFormattedText(Text: Text[2048]; var RetText: Text; AsHTML: Boolean; var IsHandled: Boolean)
begin
end;
Parameters
Type
Name
Description
Text[2048]
Text
The input text to be formatted.
Text
RetText
[Pass by Reference] The formatted output text.
Boolean
AsHTML
If true, the text is formatted as HTML. If false the text returned as saved in the database.
Boolean
IsHandled
[Pass by Reference] If set to true, the execution of the calling function is interrupted.
OnAfterCreateStyleExpression
The event is used to create the style expression for the text.
[BusinessEvent(false)]
local procedure OnAfterCreateStyleExpression(StyleText: Text)
begin
end;
Parameters
Type
Name
Description
Text
StyleText
The style expression for the text.
OnBeforeEditText
The event is used to edit the text before it is saved.
[IntegrationEvent(false, false)]
local procedure OnBeforeEditText(var NVXDTDocTextLine: Record "NVXDT Doc. Text Line"; var IsHandled: Boolean)
begin
end;
Parameters
Type
Name
Description
Record "NVXDT Doc. Text Line"
NVXDTDocTextLine
[Pass by Reference] The document text line.
Boolean
IsHandled
[Pass by Reference] If set to true, the execution of the calling function is interrupted.
Table - NVXDT Doc. Text Line Archive
OnBeforeGetFormattedText
The event is used to format the text before it is rendered for reports.
[BusinessEvent(false)]
local procedure OnBeforeGetFormattedText(Text: Text[2048]; var RetText: Text; AsHTML: Boolean; var IsHandled: Boolean)
begin
end;
Parameters
Type
Name
Description
Text[2048]
Text
The input text to be formatted.
Text
RetText
[Pass by Reference] The formatted output text.
Boolean
AsHTML
If true, the text is formatted as HTML. If false the text returned as saved in the database.
Boolean
IsHandled
[Pass by Reference] If set to true, the execution of the calling function is interrupted.
OnAfterCreateStyleExpression
The event is used to create the style expression for the text.
[BusinessEvent(false)]
local procedure OnAfterCreateStyleExpression(StyleText: Text)
begin
end;
Parameters
Type
Name
Description
Text
StyleText
The style expression for the text.
Table - NVXDT Posted Doc. Text Line
OnBeforeGetFormattedText
The event is used to format the text before it is rendered for reports.
[BusinessEvent(false)]
local procedure OnBeforeGetFormattedText(Text: Text[2048]; var RetText: Text; AsHTML: Boolean; var IsHandled: Boolean)
begin
end;
Parameters
Type
Name
Description
Text[2048]
Text
The input text to be formatted.
Text
RetText
[Pass by Reference] The formatted output text.
Boolean
AsHTML
If true, the text is formatted as HTML. If false the text returned as saved in the database.
Boolean
IsHandled
[Pass by Reference] If set to true, the execution of the calling function is interrupted.
OnAfterCreateStyleExpression
The event is used to create the style expression for the text.
[BusinessEvent(false)]
local procedure OnAfterCreateStyleExpression(StyleText: Text)
begin
end;
Parameters
Type
Name
Description
Text
StyleText
The style expression for the text.
OnBeforeEditText
The event is used to edit the text before it is saved.
[IntegrationEvent(false, false)]
local procedure OnBeforeEditText(var NVXDTDocTextLine: Record "NVXDT Doc. Text Line"; var IsHandled: Boolean)
begin
end;
Parameters
Type
Name
Description
Record "NVXDT Doc. Text Line"
NVXDTDocTextLine
[Pass by Reference] The document text line.
Boolean
IsHandled
[Pass by Reference] If set to true, the execution of the calling function is interrupted.
Table - NVXDT Job Text Line
OnBeforeGetFormattedText
The event is used to format the text before it is rendered for reports.
[BusinessEvent(false)]
local procedure OnBeforeGetFormattedText(Text: Text[2048]; var RetText: Text; AsHTML: Boolean; var IsHandled: Boolean)
begin
end;
Parameters
Type
Name
Description
Text[2048]
Text
The input text to be formatted.
Text
RetText
[Pass by Reference] The formatted output text.
Boolean
AsHTML
If true, the text is formatted as HTML. If false the text returned as saved in the database.
Boolean
IsHandled
[Pass by Reference] If set to true, the execution of the calling function is interrupted.
OnAfterCreateStyleExpression
The event is used to create the style expression for the text.
[BusinessEvent(false)]
local procedure OnAfterCreateStyleExpression(StyleText: Text)
begin
end;
Parameters
Type
Name
Description
Text
StyleText
The style expression for the text.
OnBeforeEditText
The event is used to edit the text before it is saved.
[IntegrationEvent(false, false)]
local procedure OnBeforeEditText(var NVXDTDocTextLine: Record "NVXDT Doc. Text Line"; var IsHandled: Boolean)
begin
end;
Parameters
Type
Name
Description
Record "NVXDT Doc. Text Line"
NVXDTDocTextLine
[Pass by Reference] The document text line.
Boolean
IsHandled
[Pass by Reference] If set to true, the execution of the calling function is interrupted.
TableExt - Sales Header
NVXDTOnGetDocTextFlagsOnBeforeExit
This event is used to set flags indicating whether document texts exist for the selected document or subsequent documents. This event is called if no other document text lines exists for the selected document.
[IntegrationEvent(false, false)]
local procedure NVXDTOnGetDocTextFlagsOnBeforeExit(var NVXDTDocTextLine: Record "NVXDT Doc. Text Line"; var DocTextExist: Boolean; var FollDocTextExist: Boolean; SalesHeader: Record "Sales Header")
begin
end;
Parameters
Type
Name
Description
Record "NVXDT Doc. Text Line"
NVXDTDocTextLine
[Pass by Reference] The document text line record that is filtered to search for specific criteria.
Boolean
DocTextExist
[Pass by Reference] Indicates whether a document text exists for the selected document. This will be shown on the pages.
Boolean
FollDocTextExist
[Pass by Reference] Indicates whether a document text exists for sequel documents. This will be shown on the pages.
Record "Sales Header"
SalesHeader
The sales header record.
NVXDTOnAfterGetDocTextFlags
This event is used to set flags indicating whether document texts exist for the selected document or subsequent documents.
[IntegrationEvent(false, false)]
local procedure NVXDTOnAfterGetDocTextFlags(var NVXDTDocTextLine: Record "NVXDT Doc. Text Line"; var DocTextExist: Boolean; var FollDocTextExist: Boolean)
begin
end;
Parameters
Type
Name
Description
Record "NVXDT Doc. Text Line"
NVXDTDocTextLine
[Pass by Reference] The document text line record that is filtered to search for specific criteria.
Boolean
DocTextExist
[Pass by Reference] Indicates whether a document text exists for the selected document. This will be shown on the pages.
Boolean
FollDocTextExist
[Pass by Reference] Indicates whether a document text exists for sequel documents. This will be shown on the pages.
Record "Sales Header"
SalesHeader
The sales header record.
TableExt - Purchase Header
NVXDTOnGetDocTextFlagsOnBeforeExit
This event is used to set flags indicating whether document texts exist for the selected document or subsequent documents. This event is called if no other document text lines exists for the selected document.
[IntegrationEvent(false, false)]
local procedure NVXDTOnGetDocTextFlagsOnBeforeExit(var NVXDTDocTextLine: Record "NVXDT Doc. Text Line"; var DocTextExist: Boolean; var FollDocTextExist: Boolean; PurchaseHeader: Record "Purchase Header")
begin
end;
Parameters
Type
Name
Description
Record "NVXDT Doc. Text Line"
NVXDTDocTextLine
[Pass by Reference] The document text line record that is filtered to search for specific criteria.
Boolean
DocTextExist
[Pass by Reference] Indicates whether a document text exists for the selected document. This will be shown on the pages.
Boolean
FollDocTextExist
[Pass by Reference] Indicates whether a document text exists for sequel documents. This will be shown on the pages.
Record "Purchase Header"
PurchaseHeader
The purchase header record.
NVXDTOnAfterGetDocTextFlags
This event is used to set flags indicating whether document texts exist for the selected document or subsequent documents.
[IntegrationEvent(false, false)]
local procedure NVXDTOnAfterGetDocTextFlags(var NVXDTDocTextLine: Record "NVXDT Doc. Text Line"; var DocTextExist: Boolean; var FollDocTextExist: Boolean)
begin
end;
Parameters
Type
Name
Description
Record "NVXDT Doc. Text Line"
NVXDTDocTextLine
[Pass by Reference] The document text line record that is filtered to search for specific criteria.
Boolean
DocTextExist
[Pass by Reference] Indicates whether a document text exists for the selected document. This will be shown on the pages.
Boolean
FollDocTextExist
[Pass by Reference] Indicates whether a document text exists for sequel documents. This will be shown on the pages.
Record "Purchase Header"
PurchaseHeader
The purchase header record.
TableExt - Service Header
NVXDTOnGetDocTextFlagsOnBeforeExit
This event is used to set flags indicating whether document texts exist for the selected document or subsequent documents. This event is called if no other document text lines exists for the selected document.
[IntegrationEvent(false, false)]
local procedure NVXDTOnGetDocTextFlagsOnBeforeExit(var NVXDTDocTextLine: Record "NVXDT Doc. Text Line"; var DocTextExist: Boolean; var FollDocTextExist: Boolean; ServiceHeader: Record "Service Header")
begin
end;
Parameters
Type
Name
Description
Record "NVXDT Doc. Text Line"
NVXDTDocTextLine
[Pass by Reference] The document text line record that is filtered to search for specific criteria.
Boolean
DocTextExist
[Pass by Reference] Indicates whether a document text exists for the selected document. This will be shown on the pages.
Boolean
FollDocTextExist
[Pass by Reference] Indicates whether a document text exists for sequel documents. This will be shown on the pages.
Record "Service Header"
ServiceHeader
The service header record.
NVXDTOnAfterGetDocTextFlags
This event is used to set flags indicating whether document texts exist for the selected document or subsequent documents.
[IntegrationEvent(false, false)]
local procedure NVXDTOnAfterGetDocTextFlags(var NVXDTDocTextLine: Record "NVXDT Doc. Text Line"; var DocTextExist: Boolean; var FollDocTextExist: Boolean)
begin
end;
Parameters
Type
Name
Description
Record "NVXDT Doc. Text Line"
NVXDTDocTextLine
[Pass by Reference] The document text line record that is filtered to search for specific criteria.
Boolean
DocTextExist
[Pass by Reference] Indicates whether a document text exists for the selected document. This will be shown on the pages.
Boolean
FollDocTextExist
[Pass by Reference] Indicates whether a document text exists for sequel documents. This will be shown on the pages.
Record "Service Header"
ServiceHeader
The service header record.
TableExt - Service Contract Header
NVXDTOnGetDocTextFlagsOnBeforeExit
This event is used to set flags indicating whether document texts exist for the selected document or subsequent documents. This event is called if no other document text lines exists for the selected document.
[IntegrationEvent(false, false)]
local procedure NVXDTOnGetDocTextFlagsOnBeforeExit(var NVXDTDocTextLine: Record "NVXDT Doc. Text Line"; var DocTextExist: Boolean; var FollDocTextExist: Boolean; ServiceHeader: Record "Service Contract Header")
begin
end;
Parameters
Type
Name
Description
Record "NVXDT Doc. Text Line"
NVXDTDocTextLine
[Pass by Reference] The document text line record that is filtered to search for specific criteria.
Boolean
DocTextExist
[Pass by Reference] Indicates whether a document text exists for the selected document. This will be shown on the pages.
Boolean
FollDocTextExist
[Pass by Reference] Indicates whether a document text exists for sequel documents. This will be shown on the pages.
Record "Service Contract Header"
ServiceContractHeader
The service contract header record.
NVXDTOnAfterGetDocTextFlags
This event is used to set flags indicating whether document texts exist for the selected document or subsequent documents.
[IntegrationEvent(false, false)]
local procedure NVXDTOnAfterGetDocTextFlags(var NVXDTDocTextLine: Record "NVXDT Doc. Text Line"; var DocTextExist: Boolean; var FollDocTextExist: Boolean)
begin
end;
Parameters
Type
Name
Description
Record "NVXDT Doc. Text Line"
NVXDTDocTextLine
[Pass by Reference] The document text line record that is filtered to search for specific criteria.
Boolean
DocTextExist
[Pass by Reference] Indicates whether a document text exists for the selected document. This will be shown on the pages.
Boolean
FollDocTextExist
[Pass by Reference] Indicates whether a document text exists for sequel documents. This will be shown on the pages.
Record "Service Contract Header"
ServiceContractHeader
The service contract header record.
TableExt - Job
NVXDTOnGetDocTextFlagsOnBeforeExit
This event is used to set flags indicating whether document texts exist for the selected document or subsequent documents. This event is called if no other document text lines exists for the selected document.
[IntegrationEvent(false, false)]
local procedure NVXDTOnGetDocTextFlagsOnBeforeExit(var NVXDTDocTextLine: Record "NVXDT Doc. Text Line"; var DocTextExist: Boolean; var FollDocTextExist: Boolean; Job: Record "Job")
begin
end;
Parameters
Type
Name
Description
Record "NVXDT Doc. Text Line"
NVXDTDocTextLine
[Pass by Reference] The document text line record that is filtered to search for specific criteria.
Boolean
DocTextExist
[Pass by Reference] Indicates whether a document text exists for the selected document. This will be shown on the pages.
Boolean
FollDocTextExist
[Pass by Reference] Indicates whether a document text exists for sequel documents. This will be shown on the pages.
Record "Job"
Job
The job record.
NVXDTOnAfterGetDocTextFlags
This event is used to set flags indicating whether document texts exist for the selected document or subsequent documents.
[IntegrationEvent(false, false)]
local procedure NVXDTOnAfterGetDocTextFlags(var NVXDTDocTextLine: Record "NVXDT Doc. Text Line"; var DocTextExist: Boolean; var FollDocTextExist: Boolean)
begin
end;
Parameters
Type
Name
Description
Record "NVXDT Doc. Text Line"
NVXDTDocTextLine
[Pass by Reference] The document text line record that is filtered to search for specific criteria.
Boolean
DocTextExist
[Pass by Reference] Indicates whether a document text exists for the selected document. This will be shown on the pages.
Boolean
FollDocTextExist
[Pass by Reference] Indicates whether a document text exists for sequel documents. This will be shown on the pages.
Record "Job"
Job
The job record.
TableExt - NVXDT Extended Text Line
NVXDTOnBeforeEditText
The event is used to edit the text before it is saved.
[IntegrationEvent(false, false)]
local procedure NVXDTOnBeforeEditText(var ExtendedTextLine: Record "Extended Text Line"; var IsHandled: Boolean)
begin
end;
Parameters
Type
Name
Description
Record "Extended Text Line"
ExtendedTextLine
[Pass by Reference] The extended text line.
Boolean
IsHandled
[Pass by Reference] If set to true, the execution of the calling function is interrupted.
Codeunit - NVXDT Document Text Mgt.
OnBeforeGetRecordRefData
The event is used to read all necessary values of a document and store them in global variables. These global variables are then needed in the various functions of the codeunit. If IsHandled is set to true, the execution of the called function is interrupted.
[IntegrationEvent(false, false)]
local procedure OnBeforeGetRecordRefData(RecordRef: RecordRef; var _TableID: Integer; var _DocNo: Code[20]; var _DocDate: Date; var _DocType: Enum "NVXDT Document Type"; var _DocStatus: Option; var _DocLineNo: Integer; var _DocLineTheNo: Code[20]; var _DocLineTheType: Option; var IsHandled: Boolean; LanguageCode: Code[10])
begin
end;
Parameters
Type
Name
Description
RecordRef
RecordRef
The RecordRef that refers to the document.
Integer
_TableID
[Pass by Reference] The Table Id for this document.
Code[20]
_DocNo
[Pass by Reference] The document number.
Date
_DocDate
[Pass by Reference] The Document Text Date (reference date used for validity checks).
Enum "NVXDT Document Type"
_DocType
[Pass by Reference] The document type.
Option
_DocStatus
[Pass by Reference] The document status.
Integer
_DocLineNo
[Pass by Reference] The document line number.
Code[20]
_DocLineTheNo
[Pass by Reference] The number of line type.
Option
_DocLineTheType
[Pass by Reference] The type of transaction that is being posted for the document line.
Boolean
IsHandled
[Pass by Reference] If set to true, the execution of the calling function is interrupted.
Code[10]
LanguageCode
The language code.
OnAfterGetRecordRefData
The event is used to read all necessary values of a document and store them in global variables. These global variables are then needed in the various functions of the codeunit.
[IntegrationEvent(false, false)]
local procedure OnAfterGetRecordRefData(RecordRef: RecordRef; var _TableID: Integer; var _DocNo: Code[20]; var _DocDate: Date; var _DocType: Enum "NVXDT Document Type"; var _DocStatus: Option; var _DocLineNo: Integer; var _DocLineTheNo: Code[20]; var _DocLineTheType: Option; LanguageCode: Code[10])
begin
end;
Parameters
Type
Name
Description
RecordRef
RecordRef
The RecordRef that refers to the document.
Integer
_TableID
[Pass by Reference] The Table Id for this document.
Code[20]
_DocNo
[Pass by Reference] The document number.
Date
_DocDate
[Pass by Reference] The Document Text Date (reference date used for validity checks).
Enum "NVXDT Document Type"
_DocType
[Pass by Reference] The document type.
Option
_DocStatus
[Pass by Reference] The document status.
Integer
_DocLineNo
[Pass by Reference] The document line number.
Code[20]
_DocLineTheNo
[Pass by Reference] The number of line type.
Option
_DocLineTheType
[Pass by Reference] The type of transaction that is being posted for the document line.
Code[10]
LanguageCode
The language code.
OnGetRecordRefDataUnknownTable
The event is used to read all necessary values of a non standard Business Central table and store them in global variables. These global variables are then needed in the various functions of the codeunit.
[IntegrationEvent(false, false)]
local procedure OnGetRecordRefDataUnknownTable(RecordRef: RecordRef; var _TableID: Integer; var _DocNo: Code[20]; var _DocDate: Date; var _DocType: Enum "NVXDT Document Type"; var _DocStatus: Option; var GlobalVersionNo: Integer; var _DocLineNo: Integer; var _DocLineTheNo: Code[20]; var _DocLineTheType: Option; var Handled: Boolean)
begin
end;
Type
Name
Description
RecordRef
RecordRef
The RecordRef that refers to the document.
Integer
_TableID
[Pass by Reference] The Table Id for this document.
Code[20]
_DocNo
[Pass by Reference] The document number.
Date
_DocDate
[Pass by Reference] The Document Text Date (reference date used for validity checks).
Enum "NVXDT Document Type"
_DocType
[Pass by Reference] The document type.
Option
_DocStatus
[Pass by Reference] The document status.
Integer
GlobalVersionNo
[Pass by Reference] The version number of the document.
Integer
_DocLineNo
[Pass by Reference] The document line number.
Code[20]
_DocLineTheNo
[Pass by Reference] The number of line type.
Option
_DocLineTheType
[Pass by Reference] The type of transaction that is being posted for the document line.
OnBeforeDeleteText
The event is used to delete the text lines before deleting the document.
[IntegrationEvent(false, false)]
local procedure OnBeforeDeleteText(RecordRef: RecordRef; var IsHandled: Boolean)
begin
end;
Type
Name
Description
RecordRef
RecordRef
The RecordRef that refers to the document.
Boolean
IsHandled
[Pass by Reference] If set to true, the execution of the calling function is interrupted.
OnAfterDoPrintUnknownTableID
The event is used to print the text lines of a non standard Business Central table.
[IntegrationEvent(false, false)]
local procedure OnAfterDoPrintUnknownTableID(TableID: Integer; DocLineTheType: Option; DocLineTheType2: Option; DocLineTheNo: Code[20]; Unconditionally: Boolean; var AutoText: Boolean; var Handled: Boolean)
begin
end;
Type
Name
Description
Integer
TableID
The Table Id for this document.
Option
DocLineTheType
The type of transaction that is being posted for the document line.
Option
DocLineTheType2
The type of transaction that is being posted for the document line.
Code[20]
DocLineTheNo
The number of line type.
Boolean
Unconditionally
Print the text unconditionally.
Boolean
AutoText
[Pass by Reference] Print the text automatically.
Boolean
Handled
[Pass by Reference] If set to true, the execution of the calling function is interrupted.
OnBeforeDoPrintText
The event is used to edit the text lines before printing.
[IntegrationEvent(false, false)]
local procedure OnBeforeDoPrintText(var TableID: Integer; var DocLineTheType: Option; var DocLineTheType2: Option; var DocLineTheNo: Code[20]; var Unconditionally: Boolean; var AutoText: Boolean; var IsHandled: Boolean)
begin
end;
Type
Name
Description
Integer
TableID
[Pass by Reference] The Table Id for this document.
Option
DocLineTheType
[Pass by Reference] The type of transaction that is being posted for the document line.
Option
DocLineTheType2
[Pass by Reference] The type of transaction that is being posted for the document line.
Code[20]
DocLineTheNo
[Pass by Reference] The number of line type.
Boolean
Unconditionally
[Pass by Reference] Print the text unconditionally.
Boolean
AutoText
[Pass by Reference] Print the text automatically.
Boolean
IsHandled
[Pass by Reference] If set to true, the execution of the calling function is interrupted.
OnBeforeExtTextToDocTextSetSequelFields
The event is used to set the sequel fields for the document flow of the document text line.
[IntegrationEvent(false, false)]
local procedure OnBeforeExtTextToDocTextSetSequelFields(var TempDocTextLine: Record "NVXDT Doc. Text Line"; var ExtendedTextHeader: Record "Extended Text Header")
begin
end;
Type
Name
Description
Record "NVXDT Doc. Text Line"
TempDocTextLine
[Temporary] [Pass by Reference] The document text line.
Record "Extended Text Header"
ExtendedTextHeader
[Pass by Reference] The extended text header.
OnBeforeExtTextToJobTextSetSequelFields
The event is used to set the sequel fields for the job flow of the document text line.
[IntegrationEvent(false, false)]
local procedure OnBeforeExtTextToJobTextSetSequelFields(var TempNVXDTJobTextLine: Record "NVXDT Job Text Line"; var ExtendedTextHeader: Record "Extended Text Header")
begin
end;
Type
Name
Description
Record "NVXDT Job Text Line"
TempNVXDTJobTextLine
[Temporary] [Pass by Reference] The job text line.
Record "Extended Text Header"
ExtendedTextHeader
[Pass by Reference] The extended text header.
OnBeforeResetDocTypeFilterSetFilterGroup
The event is used to set the filter group for the document type.
[IntegrationEvent(false, false)]
local procedure OnBeforeResetDocTypeFilterSetFilterGroup(var ExtendedTextHeader: Record "Extended Text Header")
begin
end;
Type
Name
Description
Record "Extended Text Header"
ExtendedTextHeader
[Pass by Reference] The extended text header.
OnBeforeSetExtTextHeaderFilters
The event is used to set the filters for the extended text header.
[IntegrationEvent(false, false)]
local procedure OnBeforeSetExtTextHeaderFilters(var ExtendedTextHeader: Record "Extended Text Header"; LanguageCode: Code[10]; TableID: Integer; DocNo: Code[20]; var DocType: Enum "NVXDT Document Type"; var DocDate: Date; DocLineTheType: Option; DocLineTheNo: Code[20]; var DocLineNo: Integer; var TextType: Enum "NVXDT Text Type"; var Unconditional: Boolean; var AddedLines: Boolean; var IsHandled: Boolean)
begin
end;
Type
Name
Description
Record "Extended Text Header"
ExtendedTextHeader
[Pass by Reference] The extended text header.
Code[10]
LanguageCode
The language code.
Integer
TableID
The Table Id for this document.
Code[20]
DocNo
The document number.
Enum "NVXDT Document Type"
DocType
[Pass by Reference] The document type.
Date
DocDate
The Document Text Date (reference date used for validity checks).
Option
DocLineTheType
The type of transaction that is being posted for the document line.
Code[20]
DocLineTheNo
The number of line type.
Integer
DocLineNo
[Pass by Reference] The document line number.
Enum "NVXDT Text Type"
TextType
[Pass by Reference] The text type.
Boolean
Unconditional
[Pass by Reference] Print the text unconditionally.
Boolean
AddedLines
[Pass by Reference] Print the text automatically.
Boolean
IsHandled
[Pass by Reference] If set to true, the execution of the calling function is interrupted.
OnAfterSetExtTextHeaderFilters
The event is used to set the filters for the extended text header.
[IntegrationEvent(false, false)]
    local procedure OnAfterSetExtTextHeaderFilters(var ExtendedTextHeader: Record "Extended Text Header"; var AddedLines: Boolean; var LanguageCode: Code[10]; var TableID: Integer; var DocNo: Code[20]; var DocType: Enum "NVXDT Document Type"; var DocDate: Date; var DocLineTheType: Option; var DocLineTheNo: Code[20]; var DocLineNo: Integer; var TextType: Enum "NVXDT Text Type"; Unconditionally: Boolean)
    begin
    end;
Type
Name
Description
Record "Extended Text Header"
ExtendedTextHeader
[Pass by Reference] The extended text header.
Boolean
AddedLines
[Pass by Reference] Print the text automatically.
Code[10]
LanguageCode
The language code.
Integer
TableID
[Pass by Reference] The Table Id for this document.
Code[20]
DocNo
[Pass by Reference] The document number.
Enum "NVXDT Document Type"
DocType
[Pass by Reference] The document type.
Date
DocDate
The Document Text Date (reference date used for validity checks).
Option
DocLineTheType
[Pass by Reference] The type of transaction that is being posted for the document line.
Code[20]
DocLineTheNo
[Pass by Reference] The number of line type.
Integer
DocLineNo
[Pass by Reference] The document line number.
Enum "NVXDT Text Type"
TextType
[Pass by Reference] The text type.
Boolean
Unconditionally
Print the text unconditionally.
OnAfterSetExtTextHeaderFiltersJobPlanningLine
The event is used to set the filters for the extended text header for job planning lines.
[IntegrationEvent(false, false)]
local procedure OnAfterSetExtTextHeaderFiltersJobPlanningLine(var ExtendedTextHeader: Record "Extended Text Header"; var AddedLines: Boolean; var LanguageCode: Code[10]; var JobNo: Code[20]; var JobTaskNo: Code[20]; var DocDate: Date; var DocLineTheType: Option; var DocLineTheNo: Code[20]; var DocLineNo: Integer; Unconditionally: Boolean)
begin
end;
Type
Name
Description
Record "Extended Text Header"
ExtendedTextHeader
[Pass by Reference] The extended text header.
Boolean
AddedLines
[Pass by Reference] Print the text automatically.
Code[10]
LanguageCode
The language code.
Code[20]
JobNo
The job number.
Code[20]
JobTaskNo
The job task number.
Date
DocDate
The Document Text Date (reference date used for validity checks).
Option
DocLineTheType
[Pass by Reference] The type of transaction that is being posted for the document line.
Code[20]
DocLineTheNo
[Pass by Reference] The number of line type.
Integer
DocLineNo
[Pass by Reference] The document line number.
Boolean
Unconditionally
Print the text unconditionally.
OnBeforeSetDocTextLineFields
The event is used to set the fields for the document text line.
[IntegrationEvent(false, false)]
local procedure OnBeforeSetDocTextLineFields(TableID: Integer; var DocType: Enum "NVXDT Document Type"; DocNo: Code[20]; var DocLineNo: Integer; var TextType: Enum "NVXDT Text Type"; var IsHandled: Boolean)
begin
end;
Type
Name
Description
Integer
TableID
The Table Id for this document.
Enum "NVXDT Document Type"
DocType
[Pass by Reference] The document type.
Code[20]
DocNo
The document number.
Integer
DocLineNo
[Pass by Reference] The document line number.
Enum "NVXDT Text Type"
TextType
[Pass by Reference] The text type.
Boolean
IsHandled
[Pass by Reference] If set to true, the execution of the calling function is interrupted.
OnBeforeShowTexts
The event is used to show the texts.
[IntegrationEvent(false, false)]
local procedure OnBeforeShowTexts(RecordRef: RecordRef; TextType: Enum "NVXDT Text Type"; var Handled: Boolean)
begin
end;
Type
Name
Description
RecordRef
RecordRef
The RecordRef that refers to the document.
Enum "NVXDT Text Type"
TextType
The text type.
Boolean
Handled
[Pass by Reference] If set to true, the execution of the calling function is interrupted.
OnAfterSetDocTextLineFilterOnUnknownTableID
The event is used to set the filter for the document text line of a non standard Business Central table.
[IntegrationEvent(false, false)]
local procedure OnAfterSetDocTextLineFilterOnUnknownTableID(TableID: Integer; DocType: Enum "NVXDT Document Type"; DocNo: Code[20]; DocLineNo: Integer; var DocTextLine: Record "NVXDT Doc. Text Line"; var Handled: Boolean)
begin
end;
Type
Name
Description
Integer
TableID
The Table Id for this document.
Enum "NVXDT Document Type"
DocType
The document type.
Code[20]
DocNo
The document number.
Integer
DocLineNo
The document line number.
Record "NVXDT Doc. Text Line"
DocTextLine
[Pass by Reference] The document text line.
Boolean
Handled
[Pass by Reference] If set to true, the execution of the calling function is interrupted.
The event is used to set the filter for the extended text header of a non standard Business Central table.
[IntegrationEvent(false, false)]
local procedure OnAfterSetExtTextHeaderDocTypeFiltersOnUnknownTableID(TableID: Integer; DocType: Enum "NVXDT Document Type"; var ExtendedTextHeader: Record "Extended Text Header"; var Handled: Boolean)
begin
end;
Type
Name
Description
Integer
TableID
The Table Id for this document.
Enum "NVXDT Document Type"
DocType
The document type.
Record "Extended Text Header"
ExtendedTextHeader
[Pass by Reference] The extended text header.
Boolean
Handled
[Pass by Reference] If set to true, the execution of the calling function is interrupted.
The event is used to set the filter for the extended text header of a non standard Business Central table.
[IntegrationEvent(false, false)]
local procedure OnAfterSetExtTextHeaderTableFilterOnUnknownTableID(TableID: Integer; DocLineTheType: Option; DocLineTheNo: Code[20]; var ExtendedTextHeader: Record "Extended Text Header"; var Handled: Boolean)
begin
end;
Type
Name
Description
Integer
TableID
The Table Id for this document.
Option
DocLineTheType
The type of transaction that is being posted for the document line.
Code[20]
DocLineTheNo
The number of line type.
Record "Extended Text Header"
ExtendedTextHeader
[Pass by Reference] The extended text header.
Boolean
Handled
[Pass by Reference] If set to true, the execution of the calling function is interrupted.
OnInsertItemAttributeTextLineUnknownTableID
The event is used to insert the item attribute text line of a non standard Business Central table.
[IntegrationEvent(false, false)]
local procedure OnInsertItemAttributeTextLineUnknownTableID(RecordRef: RecordRef; TableID: Integer; DocType: Enum "NVXDT Document Type"; DocNo: Code[20]; DocLineNo: Integer; TextType: Enum "NVXDT Text Type"; var AddedLines: Boolean; var IsHandled: Boolean)
begin
end;
Type
Name
Description
RecordRef
RecordRef
The RecordRef that refers to the document.
Integer
TableID
The Table Id for this document.
Enum "NVXDT Document Type"
DocType
The document type.
Code[20]
DocNo
The document number.
Integer
DocLineNo
The document line number.
Enum "NVXDT Text Type"
TextType
The text type.
Boolean
AddedLines
[Pass by Reference] Print the text automatically.
Boolean
IsHandled
[Pass by Reference] If set to true, the execution of the calling function is interrupted.
OnSetDocTextLineFieldTableNotDefined
The event is used to set the fields for the document text line of a non standard Business Central table.
[IntegrationEvent(false, false)]
local procedure OnSetDocTextLineFieldTableNotDefined(TableID: Integer; var DocType: Enum "NVXDT Document Type"; DocNo: Code[20]; var DocLineNo: Integer; var TextType: Enum "NVXDT Text Type"; var IsHandled: Boolean)
begin
end;
Type
Name
Description
Integer
TableID
The Table Id for this document.
Enum "NVXDT Document Type"
DocType
[Pass by Reference] The document type.
Code[20]
DocNo
The document number.
Integer
DocLineNo
[Pass by Reference] The document line number.
Enum "NVXDT Text Type"
TextType
[Pass by Reference] The text type.
Boolean
IsHandled
[Pass by Reference] If set to true, the execution of the calling function is interrupted.
OnBeforeGetCustomerOrVendorTextCodes
The event is used to get the customer or vendor Text Codes.
[IntegrationEvent(false, false)]
local procedure OnBeforeGetCustomerOrVendorTextCodes(GlobalTableID: Integer; Customer: Record Customer; Vendor: Record Vendor; var IsHandled: Boolean)
begin
end;
Type
Name
Description
Integer
GlobalTableID
The Table Id for this document.
Record Customer
Customer
The customer record.
Record Vendor
Vendor
The vendor record.
Boolean
IsHandled
[Pass by Reference] If set to true, the execution of the calling function is interrupted.
OnCopyJobTextToDocText
The event is used to copy the job text to the document text.
[IntegrationEvent(false, false)]
local procedure OnCopyJobTextToDocText(var FromNVXDTJobTextLine: Record "NVXDT Job Text Line"; var ToNVXDTDocTextLine: Record "NVXDT Doc. Text Line")
begin
end;
The event is used to set the sequel fields for the document text line.
[IntegrationEvent(false, false)]
local procedure OnAfterCopyJobTextLineToTempDocTextLineOnSetSequelFields(var FromNVXDTJobTextLine: Record "NVXDT Job Text Line"; var TempNVXDTDocTextLine: Record "NVXDT Doc. Text Line");
begin
end;
Type
Name
Description
Record "NVXDT Job Text Line"
FromNVXDTJobTextLine
[Pass by Reference] The job text line.
Record "NVXDT Doc. Text Line"
TempNVXDTDocTextLine
[Pass by Reference] The document text line.
OnBeforeSetFilterOnCopyText
The event is used to set the filter on copy text.
[IntegrationEvent(false, false)]
local procedure OnBeforeSetFilterOnCopyText(FromRecordRef: RecordRef; ToRecordRef: RecordRef; DeleteFromText: Boolean)
begin
end;
Type
Name
Description
RecordRef
FromRecordRef
The RecordRef that refers to the document.
RecordRef
ToRecordRef
The RecordRef that refers to the document.
Boolean
DeleteFromText
Delete the text from the text line.
OnAfterSetFilterOnCopyText
The event is used to set the filter on copy text.
[IntegrationEvent(false, false)]
local procedure OnAfterSetFilterOnCopyText(FromRecordRef: RecordRef; ToRecordRef: RecordRef; DeleteFromText: Boolean)
begin
end;
Type
Name
Description
RecordRef
FromRecordRef
The RecordRef that refers to the document.
RecordRef
ToRecordRef
The RecordRef that refers to the document.
Boolean
DeleteFromText
Delete the text from the text line.
OnBeforeFindDocTextLinesCopyTextNormal
The event is used to filter document text lines in the CopyText function. The event is called before the document text lines are collected from the database.
[IntegrationEvent(false, false)]
local procedure OnBeforeFindDocTextLinesCopyTextNormal(FromRecordRef: RecordRef; ToRecordRef: RecordRef; FromNVXDTDocTextLine: Record "NVXDT Doc. Text Line");
begin
end;
Type
Name
Description
RecordRef
FromRecordRef
The RecordRef that refers to the source document.
RecordRef
ToRecordRef
The RecordRef that refers to the destination document.
Record "NVXDT Doc. Text Line"
FromNVXDTDocTextLine
The document text line record.
OnBeforeInsertCopyTextNormal
The event is used to set the sequel fields for the document text lines when integrate new document types.
[IntegrationEvent(false, false)]
local procedure OnBeforeInsertCopyTextNormal(var FromNVXDTDocTextLine: Record "NVXDT Doc. Text Line"; var ToNVXDTDocTextLine: Record "NVXDT Doc. Text Line"; var IsHandled: Boolean);
begin
end;
Type
Name
Description
Record "NVXDT Doc. Text Line"
FromNVXDTDocTextLine
[Pass by Reference] The source document text line.
Record "NVXDT Doc. Text Line"
ToNVXDTDocTextLine
[Pass by Reference] The destination document text line.
Boolean
IsHandled
[Pass by Reference] If set to true, the execution of the calling function is interrupted.
OnBeforeFindDocTextLinesCopyTextPosted
The event is used to filter document text lines in the CopyText function. The event is called before the document text lines are collected from the database.
[IntegrationEvent(false, false)]
local procedure OnBeforeFindDocTextLinesCopyTextPosted(FromRecordRef: RecordRef; ToRecordRef: RecordRef; FromNVXDTDocTextLine: Record "NVXDT Posted Doc. Text Line");
begin
end;
Type
Name
Description
RecordRef
FromRecordRef
The RecordRef that refers to the source document.
RecordRef
ToRecordRef
The RecordRef that refers to the destination document.
Record "NVXDT Posted Doc. Text Line"
FromNVXDTDocTextLine
The document text line record.
OnBeforeInsertCopyTextPosted
The event is used to set the sequel fields for the document text lines when integrate new document types.
[IntegrationEvent(false, false)]
local procedure OnBeforeInsertCopyTextPosted(var FromPostedNVXDTDocTextLine: Record "NVXDT Posted Doc. Text Line"; var ToNVXDTDocTextLine: Record "NVXDT Doc. Text Line"; var IsHandled: Boolean);
begin
end;
Type
Name
Description
Record "NVXDT Posted Doc. Text Line"
FromPostedNVXDTDocTextLine
[Pass by Reference] The source document text line.
Record "NVXDT Doc. Text Line"
ToNVXDTDocTextLine
[Pass by Reference] The destination document text line.
Boolean
IsHandled
[Pass by Reference] If set to true, the execution of the calling function is interrupted.
OnBeforeFindDocTextLinesCopyTextArchive
The event is used to filter document text lines in the CopyText function. The event is called before the document text lines are collected from the database.
[IntegrationEvent(false, false)]
local procedure OnBeforeFindDocTextLinesCopyTextArchive(FromRecordRef: RecordRef; ToRecordRef: RecordRef; FromNVXDTDocTextLine: Record "NVXDT Doc. Text Line Archive");
begin
end;
Type
Name
Description
RecordRef
FromRecordRef
The RecordRef that refers to the source document.
RecordRef
ToRecordRef
The RecordRef that refers to the destination document.
Record "NVXDT Doc. Text Line Archive"
FromNVXDTDocTextLine
The document text line record.
OnBeforeInsertCopyTextArchive
The event is used to set the sequel fields for the document text lines when integrate new document types.
[IntegrationEvent(false, false)]
local procedure OnBeforeInsertCopyTextArchive(var FromNVXDTDocTextLineArchive: Record "NVXDT Doc. Text Line Archive"; var ToNVXDTDocTextLine: Record "NVXDT Doc. Text Line"; var IsHandled: Boolean);
begin
end;
Type
Name
Description
Record "NVXDT Doc. Text Line Archive"
FromNVXDTDocTextLineArchive
[Pass by Reference] The source document text line.
Record "NVXDT Doc. Text Line"
ToNVXDTDocTextLine
[Pass by Reference] The destination document text line.
Boolean
IsHandled
[Pass by Reference] If set to true, the execution of the calling function is interrupted.
OnBeforeTestDocTextLineInsert
The event is used to test the document text line insert.
[IntegrationEvent(false, false)]
local procedure OnBeforeTestDocTextLineInsert(var NVXDTDocTextLine: Record "NVXDT Doc. Text Line"; var Result: Boolean; var IsHandled: Boolean)
begin
end;
Type
Name
Description
Record "NVXDT Doc. Text Line"
NVXDTDocTextLine
[Pass by Reference] The document text line.
Boolean
Result
[Pass by Reference] The result of the test.
Boolean
IsHandled
[Pass by Reference] If set to true, the execution of the calling function is interrupted.
OnTestDocTextLineInsertUnknownTable
The event is used to test the document text line insert of a non standard Business Central table.
[IntegrationEvent(false, false)]
local procedure OnTestDocTextLineInsertUnknownTable(var NVXDTDocTextLine: Record "NVXDT Doc. Text Line"; var Result: Boolean);
begin
end;
Type
Name
Description
Record "NVXDT Doc. Text Line"
NVXDTDocTextLine
[Pass by Reference] The document text line.
Boolean
Result
[Pass by Reference] The result of the test.
OnAfterTestDocTextLineInsert
The event is used to test the document text line insert.
[IntegrationEvent(false, false)]
local procedure OnAfterTestDocTextLineInsert(var NVXDTDocTextLine: Record "NVXDT Doc. Text Line"; var Result: Boolean);
begin
end;
Type
Name
Description
Record "NVXDT Doc. Text Line"
NVXDTDocTextLine
[Pass by Reference] The document text line.
Boolean
Result
[Pass by Reference] The result of the test.
OnAfterResetSequelFields
The event is used to reset the sequel fields.
[IntegrationEvent(false, false)]
local procedure OnAfterResetSequelFields(var NVXDTDocTextLine: Record "NVXDT Doc. Text Line");
begin
end;
Type
Name
Description
Record "NVXDT Doc. Text Line"
NVXDTDocTextLine
[Pass by Reference] The document text line.
OnAfterResetSequelFieldsArchive
The event is used to reset the sequel fields for the archive.
[IntegrationEvent(false, false)]
local procedure OnAfterResetSequelFieldsArchive(var NVXDTDocTextLineArchive: Record "NVXDT Doc. Text Line Archive");
begin
end;
Type
Name
Description
Record "NVXDT Doc. Text Line Archive"
NVXDTDocTextLineArchive
[Pass by Reference] The document text line archive.
OnSetExtTextHeaderDocTypeFiltersSales
The event is used to set the filter for the extended text header for sales.
[IntegrationEvent(false, false)]
local procedure OnSetExtTextHeaderDocTypeFiltersSales(var ExtendedTextHeader: Record "Extended Text Header"; TableID: Integer; DocType: Enum "NVXDT Document Type")
begin
end;
Type
Name
Description
Record "Extended Text Header"
ExtendedTextHeader
[Pass by Reference] The extended text header.
Integer
TableID
The Table Id for this document.
Enum "NVXDT Document Type"
DocType
The document type.
OnSetExtTextHeaderDocTypeFiltersPurchase
The event is used to set the filter for the extended text header for purchase.
[IntegrationEvent(false, false)]
local procedure OnSetExtTextHeaderDocTypeFiltersPurchase(var ExtendedTextHeader: Record "Extended Text Header"; TableID: Integer; DocType: Enum "NVXDT Document Type")
begin
end;
Type
Name
Description
Record "Extended Text Header"
ExtendedTextHeader
[Pass by Reference] The extended text header.
Integer
TableID
The Table Id for this document.
Enum "NVXDT Document Type"
DocType
The document type.
OnSetExtTextHeaderDocTypeFiltersService
The event is used to set the filter for the extended text header for service.
[IntegrationEvent(false, false)]
local procedure OnSetExtTextHeaderDocTypeFiltersService(var ExtendedTextHeader: Record "Extended Text Header"; TableID: Integer; DocType: Enum "NVXDT Document Type")
begin
end;
Type
Name
Description
Record "Extended Text Header"
ExtendedTextHeader
[Pass by Reference] The extended text header.
Integer
TableID
The Table Id for this document.
Enum "NVXDT Document Type"
DocType
The document type.
OnSetExtTextHeaderDocTypeFiltersJob
The event is used to set the filter for the extended text header for job.
[IntegrationEvent(false, false)]
local procedure OnSetExtTextHeaderDocTypeFiltersJob(var ExtendedTextHeader: Record "Extended Text Header"; TableID: Integer; DocType: Enum "NVXDT Document Type")
begin
end;
Type
Name
Description
Record "Extended Text Header"
ExtendedTextHeader
[Pass by Reference] The extended text header.
Integer
TableID
The Table Id for this document.
Enum "NVXDT Document Type"
DocType
The document type.
OnBeforeSetSequelFieldsSales
The event is used to set the sequel fields for sales.
[IntegrationEvent(false, false)]
local procedure OnBeforeSetSequelFieldsSales(var NVXDTDocTextLine: Record "NVXDT Doc. Text Line"; FromNVXDTDocTextLine: Record "NVXDT Doc. Text Line"; MakeNew: Boolean; var IsHandled: Boolean);
begin
end;
Type
Name
Description
Record "NVXDT Doc. Text Line"
NVXDTDocTextLine
[Pass by Reference] The document text line.
Record "NVXDT Doc. Text Line"
FromNVXDTDocTextLine
The document text line from which the sequel fields are copied.
Boolean
MakeNew
Make a new document text line.
Boolean
IsHandled
[Pass by Reference] If set to true, the execution of the calling function is interrupted.
OnAfterSetSequelFieldsSales
The event is used to set the sequel fields for sales.
[IntegrationEvent(false, false)]
local procedure OnAfterSetSequelFieldsSales(var NVXDTDocTextLine: Record "NVXDT Doc. Text Line"; FromNVXDTDocTextLine: Record "NVXDT Doc. Text Line"; MakeNew: Boolean);
begin
end;
Type
Name
Description
Record "NVXDT Doc. Text Line"
NVXDTDocTextLine
[Pass by Reference] The document text line.
Record "NVXDT Doc. Text Line"
FromNVXDTDocTextLine
The document text line from which the sequel fields are copied.
Boolean
MakeNew
Make a new document text line.
OnBeforeSetSequelFieldsPurchase
The event is used to set the sequel fields for purchase.
[IntegrationEvent(false, false)]
local procedure OnBeforeSetSequelFieldsPurchase(var NVXDTDocTextLine: Record "NVXDT Doc. Text Line"; FromNVXDTDocTextLine: Record "NVXDT Doc. Text Line"; MakeNew: Boolean; var IsHandled: Boolean);
begin
end;
Type
Name
Description
Record "NVXDT Doc. Text Line"
NVXDTDocTextLine
[Pass by Reference] The document text line.
Record "NVXDT Doc. Text Line"
FromNVXDTDocTextLine
The document text line from which the sequel fields are copied.
Boolean
MakeNew
Make a new document text line.
Boolean
IsHandled
[Pass by Reference] If set to true, the execution of the calling function is interrupted.
OnAfterSetSequelFieldsPurchase
The event is used to set the sequel fields for purchase.
[IntegrationEvent(false, false)]
local procedure OnAfterSetSequelFieldsPurchase(var NVXDTDocTextLine: Record "NVXDT Doc. Text Line"; FromNVXDTDocTextLine: Record "NVXDT Doc. Text Line"; MakeNew: Boolean);
begin
end;
Type
Name
Description
Record "NVXDT Doc. Text Line"
NVXDTDocTextLine
[Pass by Reference] The document text line.
Record "NVXDT Doc. Text Line"
FromNVXDTDocTextLine
The document text line from which the sequel fields are copied.
Boolean
MakeNew
Make a new document text line.
OnBeforeSetSequelFieldsService
The event is used to set the sequel fields for service.
[IntegrationEvent(false, false)]
local procedure OnBeforeSetSequelFieldsService(var NVXDTDocTextLine: Record "NVXDT Doc. Text Line"; FromNVXDTDocTextLine: Record "NVXDT Doc. Text Line"; MakeNew: Boolean; var IsHandled: Boolean);
begin
end;
Type
Name
Description
Record "NVXDT Doc. Text Line"
NVXDTDocTextLine
[Pass by Reference] The document text line.
Record "NVXDT Doc. Text Line"
FromNVXDTDocTextLine
The document text line from which the sequel fields are copied.
Boolean
MakeNew
Make a new document text line.
Boolean
IsHandled
[Pass by Reference] If set to true, the execution of the calling function is interrupted.
OnAfterSetSequelFieldsService
The event is used to set the sequel fields for service.
[IntegrationEvent(false, false)]
local procedure OnAfterSetSequelFieldsService(var NVXDTDocTextLine: Record "NVXDT Doc. Text Line"; FromNVXDTDocTextLine: Record "NVXDT Doc. Text Line"; MakeNew: Boolean);
begin
end;
Type
Name
Description
Record "NVXDT Doc. Text Line"
NVXDTDocTextLine
[Pass by Reference] The document text line.
Record "NVXDT Doc. Text Line"
FromNVXDTDocTextLine
The document text line from which the sequel fields are copied.
Boolean
MakeNew
Make a new document text line.
OnBeforeSetSequelFieldsJob
The event is used to set the sequel fields for job.
[IntegrationEvent(false, false)]
local procedure OnBeforeSetSequelFieldsJob(var NVXDTDocTextLine: Record "NVXDT Doc. Text Line"; FromNVXDTDocTextLine: Record "NVXDT Doc. Text Line"; MakeNew: Boolean; var IsHandled: Boolean);
begin
end;
Type
Name
Description
Record "NVXDT Doc. Text Line"
NVXDTDocTextLine
[Pass by Reference] The document text line.
Record "NVXDT Doc. Text Line"
FromNVXDTDocTextLine
The document text line from which the sequel fields are copied.
Boolean
MakeNew
Make a new document text line.
Boolean
IsHandled
[Pass by Reference] If set to true, the execution of the calling function is interrupted.
OnAfterSetSequelFieldsJob
The event is used to set the sequel fields for job.
[IntegrationEvent(false, false)]
local procedure OnAfterSetSequelFieldsJob(var NVXDTDocTextLine: Record "NVXDT Doc. Text Line"; FromNVXDTDocTextLine: Record "NVXDT Doc. Text Line"; MakeNew: Boolean);
begin
end;
Type
Name
Description
Record "NVXDT Doc. Text Line"
NVXDTDocTextLine
[Pass by Reference] The document text line.
Record "NVXDT Doc. Text Line"
FromNVXDTDocTextLine
The document text line from which the sequel fields are copied.
Boolean
MakeNew
Make a new document text line.
OnBeforeSetSequelFieldsJobPlanningLine
The event is used to set the sequel fields for job planning line.
[IntegrationEvent(false, false)]
local procedure OnBeforeSetSequelFieldsJobPlanningLine(var NVXDTJobTextLine: Record "NVXDT Job Text Line"; MakeNew: Boolean; var IsHandled: Boolean);
begin
end;
Type
Name
Description
Record "NVXDT Job Text Line"
NVXDTJobTextLine
[Pass by Reference] The job text line.
Boolean
MakeNew
Make a new job text line.
Boolean
IsHandled
[Pass by Reference] If set to true, the execution of the calling function is interrupted.
OnAfterSetSequelFieldsJobPlanningLine
The event is used to set the sequel fields for job planning line.
[IntegrationEvent(false, false)]
local procedure OnAfterSetSequelFieldsJobPlanningLine(var NVXDTJobTextLine: Record "NVXDT Job Text Line"; MakeNew: Boolean);
begin
end;
Type
Name
Description
Record "NVXDT Job Text Line"
NVXDTJobTextLine
[Pass by Reference] The job text line.
Boolean
MakeNew
Make a new job text line.
OnAfterSetSequelFields
The event is used to set the sequel fields.
[IntegrationEvent(false, false)]
local procedure OnAfterSetSequelFields(var ToNVXDTDocTextLine: Record "NVXDT Doc. Text Line"; var FromNVXDTDocTextLine: Record "NVXDT Doc. Text Line"; MakeNew: Boolean);
begin
end;
Type
Name
Description
Record "NVXDT Doc. Text Line"
ToNVXDTDocTextLine
[Pass by Reference] The document text line.
Record "NVXDT Doc. Text Line"
FromNVXDTDocTextLine
The document text line from which the sequel fields are copied.
Boolean
MakeNew
Make a new document text line.
OnExtTextToDocTextOnBeforeFindExtendedTextLines
The event is used to filter extended text lines when converting extended text to document text.
[IntegrationEvent(false, false)]
local procedure OnExtTextToDocTextOnBeforeFindExtendedTextLines(var ExtendedTextHeader: Record "Extended Text Header"; var ExtendedTextLine: Record "Extended Text Line"; TableID: Integer; DocType: Enum "NVXDT Document Type"; DocNo: Code[20]; DocLineNo: Integer; TextType: Enum "NVXDT Text Type")
begin
end;
Type
Name
Description
Record "Extended Text Header"
ExtendedTextHeader
[Pass by Reference] The extended text header.
Record "Extended Text Line"
ExtendedTextLine
[Pass by Reference] The extended text line.
Integer
TableID
The Table Id for this document.
Enum "NVXDT Document Type"
DocType
The document type.
Code[20]
DocNo
The document number.
Integer
DocLineNo
The document line number.
Enum "NVXDT Text Type"
TextType
The text type.
Codeunit - NVXDT File Management
OnBeforeExportOnBeforeDialog
The event is used to export the file before the dialog.
[IntegrationEvent(false, false)]
local procedure OnBeforeExportOnBeforeDialog(ClientFileName: Text[1024]; var TempBlob: Codeunit "Temp Blob"; var IsHandled: Boolean)
begin
end;
Type
Name
Description
Text[1024]
ClientFileName
The client file name.
TempBlob
[Pass by Reference] The temporary blob where the binary stream is to be saved.
IsHandled
[Pass by Reference] If set to true, the execution of the calling function is interrupted.
OnAfterExportOnAfterExport
The event is used to export the file after the export.
[IntegrationEvent(false, false)]
local procedure OnAfterExport(ClientFileName: Text[1024]; var TempBlob: Codeunit "Temp Blob")
begin
end;
Type
Name
Description
Text[1024]
ClientFileName
The client file name.
Codeunit "Temp Blob"
TempBlob
[Pass by Reference] The temporary blob where the binary stream is to be saved.
OnBeforeImportOnBeforeDialog
The event is used to import the file before the dialog.
[IntegrationEvent(false, false)]
local procedure OnBeforeImportOnBeforeDialog(ClientFileName: Text[1024]; var TempBlob: Codeunit "Temp Blob"; FilterString: Text[250]; ExtFilterString: Text[250]; var IsHandled: Boolean)
begin
end;
Type
Name
Description
Text[1024]
ClientFileName
The client file name.
Codeunit "Temp Blob"
TempBlob
[Pass by Reference] The temporary blob where the binary stream is to be saved.
Text[250]
FilterString
The filter string.
Text[250]
ExtFilterString
The extension filter string.
Boolean
IsHandled
[Pass by Reference] If set to true, the execution of the calling function is interrupted.
OnAfterImport
The event is used to import the file after the import.
[IntegrationEvent(false, false)]
local procedure OnAfterImport(ClientFileName: Text[1024]; var TempBlob: Codeunit "Temp Blob")
begin
end;
Type
Name
Description
Text[1024]
ClientFileName
The client file name.
Codeunit "Temp Blob"
TempBlob
[Pass by Reference] The temporary blob where the binary stream is to be saved.
Codeunit - NVXDT Placeholder Mgt.
OnBeforeConvertPlaceholder
The event is used to convert the placeholder.
[BusinessEvent(true)]
local procedure OnBeforeConvertPlaceholder(var Text: Text; var RecordRef: RecordRef; var IsHandled: Boolean)
begin
end;
Type
Name
Description
Text
Text
[Pass by Reference] The text to be converted.
RecordRef
RecordRef
[Pass by Reference] The RecordRef that refers to the document.
Boolean
IsHandled
[Pass by Reference] If set to true, the execution of the calling function is interrupted.
OnAfterConvertPlaceholder
The event is used to convert the placeholder.
[BusinessEvent(true)]
local procedure OnAfterConvertPlaceholder(var Text: Text)
begin
end;
Type
Name
Description
Text
Text
[Pass by Reference] The text to be converted.
Codeunit - NVXDT Report Management
OnGetReportText
The event is used to get the report text.
[IntegrationEvent(false, false)]
procedure OnGetReportText(var RecordRef: RecordRef; NVXDTTextType: enum "NVXDT Text Type"; AsHTML: Boolean; var Output: Text; var IsHandled: Boolean);
begin
end;
Type
Name
Description
RecordRef
RecordRef
[Pass by Reference] The RecordRef that refers to the document.
Enum "NVXDT Text Type"
NVXDTTextType
The type of the text.
Boolean
AsHTML
True if the text is in HTML format; otherwise, false.
Text
Output
[Pass by Reference] The output text.
Boolean
IsHandled
[Pass by Reference] If set to true, the execution of the calling function is interrupted.
Docs / App / NAVAX Document Text / Information for Developers Events
If you're building your own app and need something specific from us, like an event, you can help improve the general extensibility of our apps. We'll have a look at your request, and if we can we'll implement it asap. If we can't we'll let you know and briefly explain why not. When that happens, don't be discouraged. Go back to the drawing board, see if you can work it out, and then come back and submit another request.
The NAVAX License Management page (in older versions "NAVAX License Overview" or "NCEX License Overview") displays the current license status of the NAVAX extensions.
Fields
Name
Specifies the name of the Extension.
License Status
Specifies the current license status of the Extension.
Serial No.
Specifies the serial number of the Extension.
Version
Specifies the currently installed version of the Extension.
Trial Version
A NAVAX extension can be tested or used free of charge for 30 days after installation. After that, the extension can only be used with a valid license.
Request License
The license can be requested or checked via the Current Status action. This opens a new page.
The following example shows the NAVAX extension Excel Report Builder.
Fill in the fields in the page and then click Send License Request. Please note that the licensing process may take some time. In the next few days you will receive an email with further information.
Note
For licensing, calling the online help and performing some actions, access to https://www.navax.app must be granted.
Public IP from www.navax.app for setting firewall access: 94.136.22.236, Port: TCP/443
Checking the connection to https://www.navax.app using PS: Test-NetConnection navax.app -port 443 (PS must be performed with the M-Tier service user)
CRL Servers In addition, the following CRL Servers must also be accessible for the certificate check: https://certificates.godaddy.com/* http://crl.godaddy.com/* or their IP: 192.124.249.36
Activate/Update License
As soon as the licensing has been completed, you will receive an email and the license can be activated via the Update License action. The license is company independent. So it does not matter in which company the action is called.
Note
The licence must be updated once a year via the Update License action.
The update is only possible or necessary within the last 30 days before the license expires, or afterwards. Within the last 30 days before the license expires, notes are displayed.
If the Automatic License Renewal is enabled, the Update License action is called automatically before the license expires. During this process, all licenses for which automatic license renewal is enabled are checked and updated if necessary. If automatic renewal is not successful, notifications will be displayed within the last 15 days before the license expires. Note that the setting is only active after the license has been activated.
This action can be used to open the Microsoft AppSource ratings page for the extension. We would be very happy if you submit your rating and let us know about your experience with the Extension.
This page contains important information about the installation and technical requirements of NAVAX Document Text. The information is primarily intended for administrators and IT managers.
The following Granules are required for an on-premises installation:
70714775 NCDT Document Text by NAVAX
1010860 Extension Base by NAVAX
Installation
Installation via AppSource (Cloud)
Open Microsoft Dynamics 365 Business Central
Search for Extension Management via "Tell me what you want to do"
Click Marketplace and search for "NAVAX Document Text"
Click Free Trial or Get it now, depending on the licensing model
Follow the installation instructions
After installation: Open the Document Text Setup and perform the basic configuration
For more information, see Setup, Document Text Setup.
Tip
You can test the free trial version for 30 days with full functionality and no restrictions. All features are available to you during the trial period.
Installation On-Premises
Ensure that the required Granules (see above) are available
Download the extension file (.app)
Open Extension Management in Business Central
Click Upload and select the .app file
Click Deploy to install the extension
After installation: Open the Document Text Setup and perform the basic configuration
For more information, see Setup, Document Text Setup.
Troubleshooting Installation
Problem: Extension cannot be installed
Cause: Missing dependencies or insufficient permissions.
Solution:
Check whether NAVAX Extension Base is installed
Ensure that you have SUPER permissions
Check the Business Central version (at least version 21.0 required)
Problem: Document Text Setup is not visible after installation
Cause: Extension was not deployed correctly or permissions are missing.
Solution:
Check in Extension Management whether the extension is shown as "Installed"
Cause: Required granules are not included in the license.
Solution: Contact your Microsoft partner to acquire the required granules.
External Addresses
https://www.navax.app
For licensing, calling the online help and performing some actions, access to https://www.navax.app must be granted.
Public IP from www.navax.app for setting firewall access: 94.136.22.236, Port: TCP/443
Checking the connection to https://www.navax.app using PS: Test-NetConnection navax.app -port 443 (PS must be performed with the M-Tier service user)
CRL Servers In addition, the following CRL Servers must also be accessible for the certificate check: https://certificates.godaddy.com/* http://crl.godaddy.com/* or their IP: 192.124.249.36
Would you like to know what has changed in the extension? Below you'll find an overview of the new features and changes made in the updates.
Version 26.4.0.1
as of Business Central 26 2026/05/13
Note
This version is also available as a downgrade version for Business Central 21.
Corrections
Fixed an issue when copying documents that could result in duplicate document text lines. This issue occurred when the document text lines to be copied had the old sorting applied.
Another issue has been corrected: E.g., if an item had an Extended Text with empty language and an Extended Text in language ENU assigned, both Extended Texts were incorrectly copied when creating a document in ENU language.
Fixed an issue when adding new lines in Project Text Lines. New lines are now sorted correctly.
Version 26.4.0.0
as of Business Central 26 2026/04/22
Improvements
New action Add added to the Document Text Lines page. It opens the text editor and adds a new line below the selected line. This ensures correct sorting of the lines, as they are automatically sorted when added via the text editor.
Field Descriptions, Document Text Line Fields
New action Insert Blank Line added to the Document Text Lines page. With this action, a blank line can be inserted directly below the current line - without opening the text editor.
Field Descriptions, Document Text Line Fields
Fixed an error that occurred after adding new document text lines. When new lines were added at a certain position, they were not positioned correctly after saving.
Version 26.3.4.5
as of Business Central 26 2026/03/26
Corrections
In posted prepayment invoices and prepayment credit memos, subsequently added document text lines were not included when printing. This has been corrected - newly added document texts are now correctly included in the printout.
Version 26.3.4.4
as of Business Central 26 2026/03/23
Modifications
The action Insert/Update Document Texts on the Project Card page has been moved to the Setup group.
For more information, see Field Descriptions, Document Header Fields.
The actions Import and Export on the Standard Text Codes page have also been moved to the Setup group.
For more information, see Setup, Document Text Setup.
Corrections
The action Insert Ext. Texts disrupted the sorting of existing document text lines, newly added lines were not sorted correctly.
The value of the Sorting Sequence No. field was not updated or set correctly.
For more information, see Field Descriptions, Extended Texts.
Version 26.3.4.3
as of Business Central 26 2026/03/13
Modifications
New field Document Text Date added to document headers. This date controls the selection of time-controlled document texts (Starting Date/Ending Date). During the upgrade, the field is initialized from the existing Document Date to preserve current behavior. When creating new documents, the Document Text Date is by default set to the Work Date but can be adjusted per document as needed.
Field Descriptions, Document Header Fields
Corrections
Placeholders in document text lines were converted incorrectly, which led to misinformation. Placeholders are now replaced only when printing documents to avoid misinformation.
When changing the posting date in documents, updating the document texts was triggered. As a result, the prompt asking whether to re-fetch the document texts appeared unintentionally, e.g., when the posting date (and thus indirectly the document date) was changed.
Version 26.3.4.2
as of Business Central 26 2026/03/02
Corrections
An error has been fixed that occurred when a document was created directly from the customer or vendor list.
Placeholders were not replaced on Service Contracts.
Version 26.3.4.1
as of Business Central 26 2026/02/27
Modifications
Field label changed in NCDT Document Text Setup.
Corrections
An error has been fixed that occurred when a document was created directly from the customer or vendor list.
Field Payment Terms Text added to the Posted Purchase Invoice.
Instead of the field Project Quote, the standard field Project is now used. An upgrade routine was created so that existing extended texts used for project quotes are switched to the new field.
Note
This does not apply to the downgrade version for Business Central 21. The Project Quote field remains in place there.
Corrections
Tooltips on the Document Text Lines page corrected.
Version 26.3.2.1
as of Business Central 26 2025/09/29
Improvements
Improved rendering of document text lines in posted documents: formatting (indentation, padding, styles, line breaks) is now applied consistently with open documents and reports for better readability on pages and printouts.
Text Editor is now also available in posted documents.
The automatic license renewal no longer tries to update the license directly, but instead automatically starts a job queue. During this process, all licenses for which automatic license renewal is enabled are checked and updated if necessary.
For more information, see Appendix, NAVAX License Management.
Version 26.3.2.0
as of Business Central 26 2025/09/29
Improvements
Archiving functionality of project document texts added.
Error when selecting placeholders via the standard text modules corrected.
Version 26.3.1.0
as of Business Central 26 2025/07/03
Important
For On-Premises an update of the License or the following granules is required:
70714775 NAVAX Document Text
Improvements
New feature: Salesperson/Purchaser prefix and suffix texts.
Archived document texts are now available in all available archive areas.
Field Payment Terms Text added to the Project Card.
Modifications
The event methods have been adapted to the requirements of Business Central Version 26 and extended with additional parameters to improve functionality and integration flexibility.
For more information, see Information for Developers, Extending NAVAX Document Text.
The actions Beginning Text and Ending Text have been organized into the appropriate action groups on the relevant pages, making them clearer and accessible according to the standard navigation of Business Central.
The field Shipment Method Text was displayed on some pages even when the associated Shipment Method field was still hidden and only became visible after clicking Show more. The visibility of both fields has now been unified.
When creating project planning lines, the function for document texts was not applied. Instead, lines of type Comment were inserted according to the configured Standard Text Code.
Important
This bug fix requires at least Application version 26.2.34746.35167 of Business Central, as some event subscribers necessary for it were not available in previous versions.
When printing the Proforma Invoice, the associated document texts were not displayed in the NVXDT Standard Layout.
Display errors in the Project Quote report have been fixed so that all relevant fields and texts are now displayed correctly. In addition, the layout has been revised and adapted to the current Business Central standard.
Version 21.3.0.2
as of Business Central 21 2025/04/02
Corrections
An error in the upgrade and installation routine has been fixed.
Version 21.3.0.1
as of Business Central 21 2025/03/24
Corrections
An error in the upgrade and installation routine has been fixed. This error caused an incorrect entry in the license management.
Version 21.3.0.0
as of Business Central 21 2025/03/07
New product name
The NCDT Document Text extension has been renamed to NAVAX Document Text.
The resourceExposurePolicy settings of the extension have been changed.
Adjusted column widths for all text lines where formatting is available.
New report extension Purchase - Order added.
Change of relevant captions (descriptions) in the projects area.
Corrections
Missing indentation option added to the posted document text lines.
Version 21.2.1.0
as of Business Central 21 2024/08/30
Improvements
New feature padding top/bottom added.
With these new formatting options, you can expand the lines upwards or downwards to create spacing between the lines.
New feature indentation added.
This new formatting option can be used to implement an indent at the beginning of the line.
Modifications
The summaries in the report layouts have been set.
Renamed Job to Project according new Business Central name convention.
Corrections
Correction of the event subscribers triggering the appending of document lines to prevent errors when adding new document lines.
When creating a sales order or a sales invoice, texts that were intended for the proforma invoice or the invoice draft (sales invoice) were not appended. This made it impossible to print these documents with the corresponding text lines.
Version 21.2.0.3
as of Business Central 21 2024/08/01
Improvements
The Shipment Method Text has been added on the Service Order page.
New functions Disable sequel fields and Enable sequel fields to simultaneously enable/disable the document sequel fields in the Extended Texts.
Modifications
The logo of the extension has been changed.
Corrections
When posting a warehouse shipment with option delivery or delivery and invoicing out of a service order, the error message 'Service Shipment Line' does not exist. Identifying fields and values: Document no.='xxxxxx',Line no.='xxxxxx'
As a result of an error message, it was not possible to create a service order or a service invoice directly from the customer card or customer list.
The document sequel fields for the line texts of the service item lines were not shown or filled correctly.
The payment terms text was not automatically pulled in service documents.
Version 21.2.0.2
as of Business Central 21 2024/07/05
Corrections
Error when posting a service order when using the Ship or Invoice options.
In the Service Contract Quotes and Service Contracts, the field Service Contract Group Text was not included, so it could not be used when creating custom layouts.
Changes for developers resp. the extensibility of the app.
Corrections
When a proforma invoice was printed from a sales order, the texts that were set up for printing on a proforma invoice did not appear.
When creating a project planning line (job planning lines) by directly clicking into the No. field, an error message occurred because the line number had not yet been assigned.
The functionality added in Business Central 24 to retrieve project planning lines (job planning lines) in the lines of a sales invoice caused an error and project planning lines could not be retrieved.
In service contracts or service contract quotes, it was not possible to use service contract group texts.
Report layout for the Pro Forma Invoice corrected. The line texts were positioned incorrectly.
The document sequel fields were not set correctly when a sales order was created from a sales quote.
Version 21.2.0.0
as of Business Central 21 2024/04/11
Improvements
New feature added to job planning lines that allows users to create and edit texts at the line level. With this feature, users can now add specific information and instructions directly to individual lines in the job planning lines to improve task organization and management. Additionally, automatic texts can be pulled from items, resources, and general ledger accounts to provide additional contextualization.
Corrections
When printing a Service Invoice, no texts were printed in the layout.
When printing the Service Delivery Note, a rendering error occurred.
When printing document lines with items, some attributes were displayed multiple times if an article had multiple attributes but not all were enabled for printing.
Version 21.1.7.0
as of Business Central 21 2024/02/28
Improvements
The Line Text field has been added to the Service Quote Lines page. Previously, texts were added but were not customizable, or no texts could be added manually.
The events for inserting the Extended Texts on the service side have been improved, previously these events were executed several times which could lead to errors. This also had an impact on performance.
The IsHandled pattern has been implemented in some functions in the NVXDT Document Text Mgt. codeunit for developers of customers or partners.
All Extended Text List have now been added to the text module overview. These are hidden by default, but can be added as required via Personalize.
The action Copy from Extended Text on the Extended Text page caused an error if the data record has not yet been initialized. The action is now greyed out as long as the data record has not yet been initialized and all required fields have a value.
Modifications
On the Service Lines and Service Quote Lines pages, the Line Texts action has been moved to the Related > Line menu.
On the Extended Text page, the tooltip of the Sales Shipment document option field has been corrected.
Incorrect tooltips on the Job Card page corrected.
When creating a service line in the service order page, the following error message appeared: 'Line no.' must contain a value in 'Service line': 'Document type=Order, document no.=X, line no.=0'. It cannot be zero or empty.
In the help, the hyperlink has been corrected so that you can now access the corresponding help page in the individual documents (from Business Central).
When changing the document options on the Extended Text page, the Service Quote option was ignored when changing multiple options.
Version 21.1.6.1
as of Business Central 21 2023/10/30
Modifications
The action Copy from Extended Text on the Extended Text page has been improved.
Corrections
Extended texts set up with the combination All languages and Language code = "empty" were not inserted correctly in the documents.
When creating Extended Texts, the prompt whether all documents in the group should be changed appeared incorrectly several times when selecting the documents.
When manually created Document Texts were added to a document, in certain constellations there was a prompt several times asking whether the existing Document Texts should be kept or newly created.
Version 21.1.6.0
as of Business Central 21 2023/09/21
Important
For On-Premises an update of the License or the following granules is required:
70714775 NCDT Document Text by NAVAX
Improvements
New import/export function added. It is now possible to export/import the already configured Standard Text Codes and text modules using XML.
For more information, see Export/Import of Standard Text Codes.
The Placeholder selection no longer displays obsolete table fields. Previously, these fields were displayed and caused an error when selected.
On the NCDT Field List page, the link to the online help was incorrect, this has been corrected.
For Sales Orders, the sequel fields were calculated incorrectly, the Sales Shipment value was not considered.
With Business Central version 22 the direct call of the page Extended Texts has been enabled. If you have created an Extended Text via this page, it was inserted incorrectly in some constellations.
If a Start & End Date was assigned to a document text, it happened that this was not drawn correctly.
Version 21.1.5.0
as of Business Central 21 2023/03/17
Improvements
New feature, Default Formattings for newly created text lines. New fields have been added to NCDT Document Text Setup, these fields are used to configure default formatting for newly created text lines.
For more information, see Setup, Document Text Setup.
The document text lines for reminders added with version 21.1.3.0 have been redesigned. The texts in the Reminder Levels did not make sense and have now been moved to the Reminder Terms. Reminder Text lines were reset again as they were no longer configurable.
Note
The settings for Beginning and Ending Texts in the Reminder Level table are deleted during the update. An assignment to the reminder terms is not possible because there are several reminder levels per reminder terms and therefore not clearly assignable.
Errors in the layouts of the reports: NCDT Reminder, NCDT Sales Invoice, NCDT Draft Invoice, NCDT Proforma Invoice and NCDT Sales Credit Memo have been fixed.
Version 21.1.4.0
as of Business Central 21 2023/01/25
Improvements
Events have been added on top level to override the functionality of NCDT Document Text to implement custom filters and settings. The following events have been added to all relevant documents.
The frequency of the license check for NCDT Document Texts has been optimized. Previously, this was performed excessively often and this impacted performance.
When creating an extended text on the Standard Text Codes page, the value of the Extended Text Exists field was not updated after leaving the Extended Text List page.
In the codeunits NVXDT Document Text Mgt. and NVXDT Copy Document Management the access level was changed from Internal to Public. The reason for this change is that the events in the code unit were not visible when these events are to be implemented in customer projects.
In the document text line archive the document sequel fields where not set correctly. The error has been fixed.
In the purchase quote document, the shipment term was not shown correctly. As a result, the shipment term text was placed in the middle of the document without any reference to the shipment term.
The functions Make Order and Make Invoice in a Sales Quote have not applied the formatting of the document text lines.
Version 21.1.3.1
as of Business Central 21 2022/12/23
Corrections
When using the Copy Document function the document sequel fields where not set correctly. The error has been fixed.
When Canceling, Correcting Posted Sales Invoices, the error: 'Sales header' does not exist. Identified fields and values: Document type = 'Quote', No. = '**' occurred. The reason for the error was a faulty event subscriber.
In archived documents, the document sequel fields were not set correctly.
Version 21.1.3.0
as of Business Central 21 2022/12/20
Business Central Update
Improvements
Actions has been improved. The action groups newly introduced with Business Central, Document Texts have been integrated in the current version of NCDT and the actions has been improved.
The language control in NCDT did not work correctly. Texts set up for All Languages were only used if the language code was empty. Texts set up for All Languages are now also used regardless of the language code.
Modifications
Projects have been extended so that Beginning and Ending Texts can also be assigned per project.
NCDT Document Texts are now available for reminders. Beginning and Ending Texts can be set up for each reminder level.
Corrections
When deleting a purchase document, the following error occurred: 'Purchase Header' does not exist. Identifying fields and values: Document type='_1',No.='xxxx'. Error has been corrected.
Version 20.1.2.2
as of Business Central 20 2022/07/20
Corrections
When deleting a purchase document, the following error occurred: 'Purchase header' does not exist. Identifying fields and values: Document Type='_1',No.='xxxx'. Error has been fixed.
The action Copy Document and Get Posted Document Lines to reverse did not copy all document text lines when creating a credit memo for a posted invoice.
A menu with Category8 was shown in the Purchase Order Archives, this has been removed.
The action Beginning Text and Ending Text on Customer and Vendor Cards respectively brought the error "Table * not defined.", the error has been fixed.
The printout of Pro-Forma Invoices and the Draft Invoice did not print the correct Document Text, the error has been fixed now.
Version 20.1.2.1
as of Business Central 20 2022/06/21
Corrections
An error in the Extended Text Lines has been fixed. If text was entered via the new text editor, then the text (max. 100 characters) was not transferred to the standard text field, thus the field was invalidated and could no longer be used.
The insertion of a placeholder did not work properly when lines were created from defined tables. For example, if the extended text page was opened on the item page and you then wanted to create a placeholder, a prompt to select the document type appeared before the field was selected.
Unnecessary action "Insert Placeholder" has been removed from the Extended Text Lines page. The action has been moved to the Text Editor page.
If there was no value for a placeholder when creating a document, then the placeholder was deleted. This caused that this value was not printed as expected when printing the document.
Version 20.1.2.0
as of Business Central 20 2022/06/07
Business Central Update
Improvements
To make it easier to create/edit text lines, a Text Editor has been implemented. It is now possible to paste (copy) already predefined texts into the Text Editor.
The character length of text lines has been increased to 2048.
Events provided to extend functionality.
Corrections
Fixed an error when manually creating text lines in Posted Purchase Receipts.
An error when manually creating text lines in Posted Return Shipments has been fixed.
Version 19.1.1.2
as of Business Central 19 2022/03/24
Improvements
Reports enhancement - function improved and layouts redesigned.
Placeholders are already converted when the document text lines are created. Therefore, the values are visible on the documents instead of the placeholders.
Modifications
Orders from Dynamics 365 CRM are now provided with Document Text, analogous to the process of creating them in Dynamics 365 Business Central.
Corrections
Errors getting Document Texts in some documents fixed.
Improved calculation of the "Current/Following Documents" indicator.
Version 19.1.1.0
as of Business Central 19 2022/02/04
Corrections
Error in sales return orders when loading lines via the " Get Posted Document Lines to Reverse" function has been fixed. The error message for this was: "The record already exists in the Line Buffer table. Identified fields and values: Old Line No.='0'".
Filtering for sales invoice drafts has been corrected. In the document text lines overview, texts were shown and also printed that were not actually configured for an invoice draft.
Error in the Sales Shipment report has been fixed.
Improvements
Tooltips have been optimized for better understanding.
The indication of the Beginning and Ending Texts in the documents was improved so that it is now easier to see whether there are texts for the selected document and/or for subsequent documents.


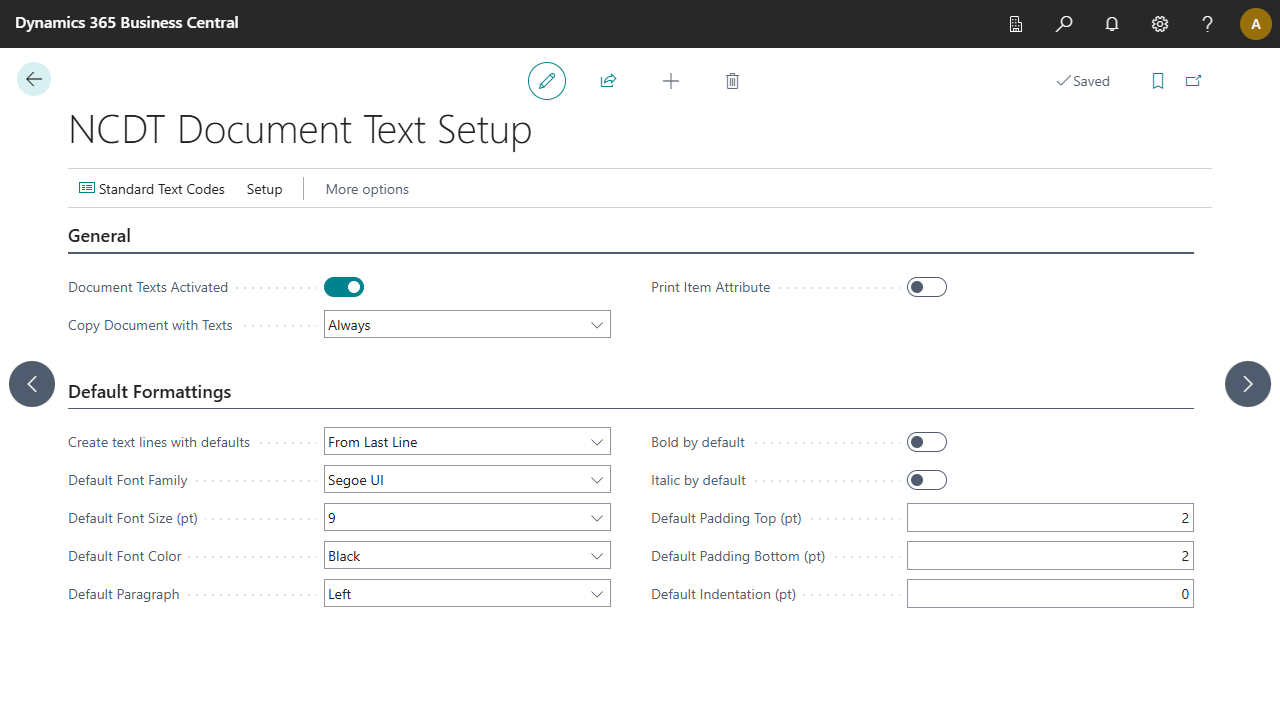


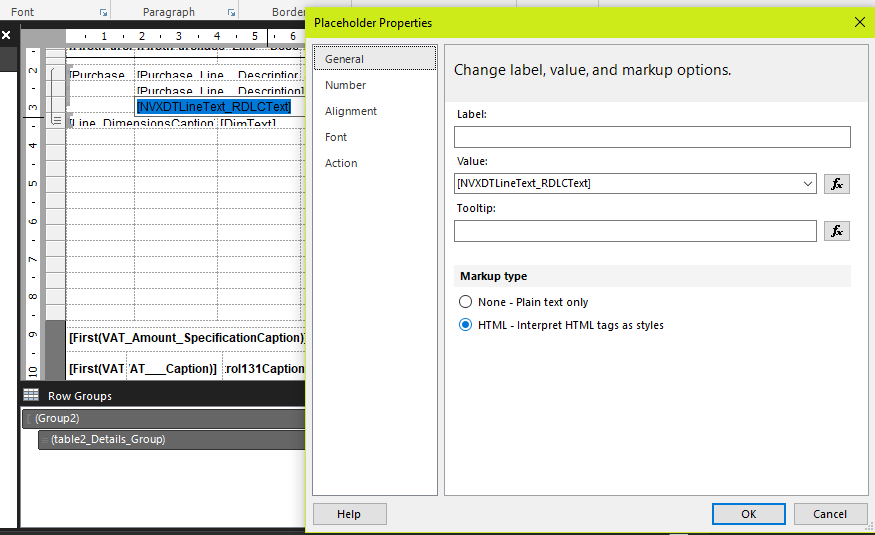

 Fill in the fields in the page and then click Send License Request. Please note that the licensing process may take some time. In the next few days you will receive an email with further information.

