Create payment files for your bank and import files from your bank.
Current Versions: Exports 26.2.5.2as of Business Central 26, konfipay Export 26.2.3.2as of Business Central 26, Imports 26.2.4.1as of Business Central 26 and konfipay Import 25.2.3.5as of Business Central 25. For older BC versions, downgrades are available. AppSource Names: NAVAX Payment Exports, NAVAX Payment Imports, NAVAX konfipay Connector Export, NAVAX konfipay Connector Import
Manual
Creation date: 2026/03/24 The current version of this manual can be found at:
☰ Contents
General
NAVAX Payment Welcome to the help page of NAVAX Payment. This page provides you with comprehensive information and support for our payment solutions, including NAVAX Payment Exports and NAVAX Payment Imports. Our goal is to enable you to seamlessly and efficiently manage your payment transactions. The modules NAVAX Payment Exports and NAVAX Payment Imports, as well as their NAVAX konfipay Connector extension, are available separately...
Role Center Integration NAVAX Payment is integrated into the Finance, Accountant and Accounting Manager role but can also be accessed from any role via the Search function...
Setup
General
Bank Account Setup The NCP Bank Account Setup page is the central management interface for all bank accounts used in NAVAX Payment Processing. Here you enter and maintain all bank master data required for payment processing, exports, and imports in Microsoft Dynamics 365 Business Central...
Vendor/Customer/Employee Bank Account In the Vendor/Customer Bank Account overview, you can manage the bank accounts associated with your vendors and customers. To access this overview, navigate to the vendor or customer list or card, and then select Vendor/Customer > Bank Accounts...
Bank Codes This page describes the management and use of bank codes in the application. You will learn which fields are recorded for banking institutions, how to download, import, or export bank codes from various sources, and what options are available to you. Bank codes are essential for payment transactions and are regularly updated to ensure correct bank connections...
Countries/Regions In this overview you can setup and manage settings for countries and regions to use them for payment transactions...
Pay with QR-Code With the NCP Pay with QR Code function you can create a QR code that can then be placed on your invoices - whether digital or paper. The customer thus saves the tedious typing of data and also does not run the risk of entering incorrect data. This also makes it easier to apply payments later that were imported into Business Central via bank account statement...
Exports
Exports Setup Wizard Before the NAVAX Payment Exports can be used, its basic functionality must be set up. This wizard will help you to setup the necessary parameters by walking through them step by step, so you can immediately start working with the NAVAX Payment Exports...
Exports Setup Before the NAVAX Payment Exports extension can be used, it must be set up...
Language Setup All necessary settings for the individual language codes are set up here. Also the Payment Notification Texts and the SEPA Mandates Texts can be stored or set up here...
XML Schemas The XML format is the Europe-wide recognized standard for payment transactions and is actively promoted by the European Payments Council (EPC) and the EU. The goal is to standardize the multitude of national payment formats and, in the long term, to fully replace them with the XML format. This harmonizes and simplifies the processing of transactions both between banks and for end customers from a technical perspective...
Customs Formats With custom formats, you can import payment files whose structure is not covered by the standard formats...
SEPA-Direct Debit-Mandates With the authorization of your customer, you can collect payments directly from the customer's bank account...
Imports
Imports Setup Wizard Before NAVAX Payment Imports can be used, its basic functionality must be set up. In the window NCP Imports Setup the general settings and defaults are defined...
Imports Setup To make optimal use of the NAVAX Payment Import, a basic setup is required first. In the NCP Imports Setup window, you configure all central settings and specifications necessary for importing and further processing payment transaction data...
Imports Codes The NCP Import Codes are references to various types of transactions. Different code fields are filled depending on the imported file format...
NAVAX Dropzone Setup In the NAVAX Dropzone Setup page the settings and defaults for the different Dropzones are defined...
Fixed Account Allocations If a bank account is determined when importing a payment file (Import Payment File), the system first checks whether fixed account allocations exist. If there are any, this bank account is used...
konfipay Connector
konfipay Connector Setup This section explains how to set up and use NAVAX konfipay Connector Export/Import in Microsoft Dynamics 365 Business Central. NAVAX konfipay Connector Export/Import enables you to automate payment processes and securely exchange banking data...
Real Data Permissions Real Data Permissions add an additional level of security to actions and processes. This is to prevent test data from being accidentally interpreted as real data. Particularly critical actions and processes (e.g. sending data to an external service) can therefore only be executed if a real data permission has been granted for the current environment...
Data Update Setup To enable automatic data updates with the NAVAX Konfipay Connector Export/Import in Microsoft Dynamics 365 Business Central, you must set up the job queue correctly...
konfipay Online Payment Service Access NAVAX konfipay Connector Export/Import operates exclusively in conjunction with a validated konfipay - Online Payment Service account. Please note that additional costs will be incurred when using konfipay...
Tasks
Exports
Make Payment or Direct Debit Suggestions NAVAX Payment Exports allows you to create payments to vendors via a SEPA payment file from the payment journal. Similarly, you can create a payment file for direct debits to customers via the cash receipt journal...
Create Payment File This chapter describes how to create a payment file. Typically, the payment file must then be manually downloaded to be uploaded into your banking software...
Make One-Time Transfers With a one-time transfer, you can perform a transfer ad hoc without having to manage vendors/customers and external bank accounts. In the journals, it can be defined per line whether it is a one-time instruction...
Fast Payments: Urgent & Instant Transfer NAVAX Payment Exports offers the possibility to make urgent payments or instant payments. These payment types allow you to process payments particularly quickly, which can be advantageous in urgent cases...
Payment Notification E-Mail Suggestion A payment notification is a message to the payment recipient that contains details about the payments transferred or collected via a payment file. A payment notification is particularly useful for batch payments, as it helps the recipient correctly allocate the payments. By default, a payment notification is created when the purpose exceeds 140 characters...
Journals Exports The description on this help page applies to the Cash Receipt- and the Payment Journal and explains the extensions that NAVAX Payment Imports provides...
Imports
Import Payment File This chapter describes the import functionality for bank statements in Business Central. This import functionality is integrated into the modules NAVAX Payment Imports and NAVAX konfipay Connector Import. Typically, bank statements are exported from banking software in a standard format and then manually imported into Business Central...
Dropzone for Bank Files This chapter describes the functionality of the Dropzone for bank files in Business Central. The Dropzone is a feature that allows bank files to be imported quickly and easily via Drag & Drop. The file is automatically checked for validity and imported into Business Central...
Applying Open Entries With the journals, you can efficiently reconcile and close open entries based on the imported data. NAVAX Payment Imports supports you with the automatic application suggestion, which determines the best possible match based on defined criteria...
Bank Account Reconciliation You must regularly reconcile your bank, receivables, and payables accounts by applying payments recorded in the bank to their related open (unpaid) invoices and credit memos or other open entries in Business Central...
Journals Imports The description on this help page applies to the Cash Receipt- and the Payment Journal and explains the extensions that NAVAX Payment Imports provides...
konfipay Connector Export
Send Payment File With the NAVAX konfipay Connector Export, you can transmit payment files created with NAVAX Payment Exports directly and securely to your bank. The transfer is automated via the konfipay Online Payment Service, so you do not need to export the file manually or upload it in the bank portal...
Retrieve Payment Status After you have transmitted a payment file via the konfipay Online Payment Service, it is first checked and processed. konfipay then forwards the file to the bank. Please note that there may be delays in updating the payment status, as banks do not always check and process incoming data immediately. In such cases, it may be necessary to retrieve the transmitted status manually...
konfipay Connector Import
Importing Acc. Transaction Entries With the NAVAX konfipay Connector Import, you can import account transaction files (e.g., camt.052, camt.053, camt.054, MT940) directly from the konfipay Online Payment Service into Microsoft Dynamics 365 Business Central...
Pay With QR Code
Create invoices with QR code With the Pay with QR Code function, you can print a standardized EPC QR code on your invoices that contains all relevant payment data such as payee, IBAN, BIC, amount, and payment reference. Your customers can scan this QR code with their banking app, allowing them to make the transfer quickly, conveniently, and without errors, eliminating the need to manually enter payment data. This makes it easier to allocate payments in any system that processes incoming payments...
FAQ and Troubleshooting This FAQ page helps you resolve common questions and issues in NAVAX Payment more quickly. The content is structured as short checklists: if something is “not considered”, you can verify step by step which prerequisite is missing...
Reports and Analysis
Exports
Payment Statistics This page views a line for each Payment File that was created from the journal...
Imports
Importlist This report provides a complete overview of all bank files imported using NAVAX Payment Imports and their contents...
Imports Allocation Analysis If the indicator Show Analysis Window is set in the NCP Imports Setup, the system does not carry out a comparison of the Remittance Info when you execute the function Apply Entries in the journal. Instead, this window shows how the application is performed...
Import General Journal Deviation This report provides an overview of all lines in the general journal that are related to a payment import and where deviations such as remaining amounts, cash discounts, or tolerances exist...
Archive
Exports
Vendor/Customer and Bank Ledger Entries On the pages Vendor- and Customer-Ledger Entries the following NAVAX Payment fields are added...
Clearing Entries In the window NCP Clearing Entries the history of all created payment files are listed...
Payment Entries The action Create Payment File in the Payment Journals creates a NCP Clearing Entry with status Created, which contains information about the payment file...
Imports
Import Operations & Transaction Overview On this page you can see the overview of the imported bank files. For each of the imported files a Import line is created, these in turn can have several transaction lines and remittance info lines...
konfipay Connector
Account Transaction Entries An account transaction file is a file that contains all the transactions of a bank account, including the resulting balance. A special variant is the electronic account statement, where the account statement data, for example in online banking, is provided in file format...
Payment Status Entries After a payment file is created, it can be directly transmitted to the bank using the konfipay Connector Export extension. During this process, a payment status entry is created to reflect the status from konfipay in Business Central...
Service Log On the konfipay Connector Service Log page, you can see all web service requests and responses with time, status, data, and any error messages...
Information for Developers
Exports Auf der folgenden Seite sind Events aufgelistet die Ihnen dabei helfen sollen, Integrationen in NAVAX Zahlungsverkehr Exports einzubinden...
Imports The following page lists events that are intended to help you integrate with NAVAX Payment Payment Imports...
konfipay Error messages occasionally occur due to a faulty file structure or more often due to missing bank authorizations. More rarely, connection interruptions or general transmission errors to the bank server are the cause. konfipay contains a sophisticated warning and notification system for this purpose...
Event Request
Appendix
Comparison with BC Standard Would you like to know what advantages the NAVAX Payment offers compared to the Business Central Standard...
Data Structure
konfipay Bank Account List The konfipay Bank Account Overview page displays all bank accounts that are available for synchronization with konfipay - Online Payment Service. You can access this overview by selecting the Import Bank Accounts button on the Bank Account Setup page...
Delete Data
QR-Code Document Data Payments with QR Code generates a standardized QR Code, also called Girocode or EPC QR Code, this QR Code created by NCP Pay with Code can then be placed on your invoices...
NAVAX License Management The NAVAX License Management page (in older versions NAVAX License Overview or NCEX License Overview) displays the current license status of the NAVAX extensions...
Installation Notes
Release Notes
Overview
Release Notes Payment Exports
Release Notes Payment Imports
Release Notes konfipay Connector Export
Release Notes konfipay Connector Import
Docs / App / NAVAX Payment / General NAVAX Payment
Welcome to the help page of NAVAX Payment. This page provides you with comprehensive information and support for our payment solutions, including NAVAX Payment Exports and NAVAX Payment Imports. Our goal is to enable you to seamlessly and efficiently manage your payment transactions. The modules NAVAX Payment Exports and NAVAX Payment Imports, as well as their NAVAX konfipay Connector extension, are available separately.
Export of payment files
The NAVAX Payment Exports extends Dynamics 365 Business Central with the functionality to efficiently and securely process your outgoing payments.
With this solution, you can:
Create and export payment files:
Create payment files in the required formats and export them. Additionally, the file can be transmitted directly to your bank via the NAVAX konfipay Connector.
Supported Formats:
Non-SEPA Credit Transfer
SEPA Credit Transfer
SEPA Direct Debit
Simplified payment processing:
Use simplified processes to minimize manual interventions and increase accuracy.
Compliance with standards:
Ensure that all payments comply with applicable legal and regulatory requirements.
Note
SEPA Direct Debit is only possible for customers.
Import of account transactions
The NAVAX Payment Imports extends Dynamics 365 Business Central with the functionality to efficiently manage incoming payments.
This solution allows you to:
Import and process incoming payments:
Import incoming payments and process them directly in your system.
Supported Formats for NAVAX Payment Imports:
camt.052
- includes the balance report and the intraday sales.
This includes debits and credits to the corresponding accounts. The camt.052 message also contains details of the individual transactions on the accounts.
camt.053
- includes posted transactions on the relevant accounts.
It contains the posted transactions, details of the corresponding postings, and the balance notifications for the accounts.
camt.054
- provides information about upcoming and posted transactions and their details.
MT940
- includes posted transactions on the relevant accounts.
File (MT=Message Type) corresponds to a bank statement in electronic form. It contains all relevant information on bank transactions made in the SWIFT standard for the electronic transfer of account statement data.
Automatic reconciliation with open entries:
Automate the reconciliation of incoming payments with open invoices to simplify accounting and reduce errors.
Efficient management of incoming payments:
Keep track of your incoming payments and efficiently manage them in your system.
NAVAX konfipay Connector
The NAVAX konfipay Connector has been added with the NAVAX Payment update to version 22.2.0.0 and is a powerful extension for Microsoft Business Central that enables seamless integration between Microsoft Business Central and Konfipay. Konfipay is a specialized platform for automated payment transaction processing that offers significant time and cost savings for businesses.
The NAVAX konfipay Connector is a standalone app extension for technical communication between Business Central and windata GmbH & Co.KG.
As a service provider, windata GmbH & Co.KG handles the transmission of your payment orders and the retrieval of your account statements.
Communication between konfipay and bank data centers is performed via EBICS (Electronic Banking Internet Communication Standard). Depending on the account setup, this uses either your own EBICS contact or a connection through the service data center.
In this context, EBICS only defines the communication layer to the bank and is not a payment file schema. The payment file structure (for example pain.001/pain.008) is still controlled by the configured XML schemas.
konfipay offers fully automated online banking, even for large transaction volumes, with the highest level of security.
With the NAVAX konfipay Connector, users can:
Consolidate financial accounting and payment processing in one system
Integrating financial accounting and payment processing into a single system allows for seamless management of all financial processes.
This leads to significant efficiency gains and better control over company finances.
Simplified payment processing:
Payments are transmitted from Microsoft Business Central to konfipay, reducing manual input and errors.
Track and monitor financial transactions in real-time:
Users can track the status of their payments in real-time, providing better control and transparency over financial transactions.
Support multiple payment methods:
The konfipay Connector supports various payment methods, including bank transfers, direct debits, and SEPA transactions.
Security and compliance:
The konfipay Connector ensures that all payments are processed securely and in compliance with current legal regulations.
By integrating konfipay into Microsoft Business Central, businesses can optimize their payment processes, reduce the risk of errors, and save valuable resources.
This extension is ideal for companies that have a high volume of payments and want to manage them efficiently and securely.
For more information, see konfipay - Online Payment Services
On this help page, you will find detailed instructions, frequently asked questions (FAQs), troubleshooting tips, and useful resources about the features and processes of NAVAX Payment. Use the menu or the search function to find specific information.
If you need further assistance, our support team is always available. We are here to help you get the most out of our payment solutions and optimize your financial processes.
Navigation
NAVAX Payment Exports and NAVAX Payment Imports are integrated in the Profiles (Roles) Accountant and Accounting Manager.
Fields, actions, pages and reports originating from the NAVAX Payment Exports extension are identified by the abbreviation NCP Exports.
NCP Exports stands for NAVAX Consulting Payments Exports.
Fields, actions, pages and reports originating from the NAVAX Payment Imports extension are identified by the abbreviation NCP Imports.
NCP Imports stands for NAVAX Consulting Payments Imports.
The search terms "ncp", "sepa", "payments", ("ncpe", "ncpi" for compatibility reasons) and "navax" are recognized by "Tell me what you want to do".
This allows very fast access to the individual sections of the NCVV VAT Registration No. validation.
Permission Sets NAVAX Payment
The following permission sets are available for NAVAX Payment Exports and NAVAX Payment Imports
Name
Description
NCPE
NAVAX Payment Exports
You need these permissions to use the NAVAX Payment Exports.
NCPE, SETUP
NAVAX Payment Exp. Setup
You need these permissions to set up the NAVAX Payment Exports.
For more information, see Setup, Exports, Exports Setup.
NCPI
NAVAX Payment Imports
You need these permissions to use the NAVAX Payment Imports.
NCPI, SETUP
NAVAX Payment Imp. Setup
You need these permissions to set up the NAVAX Payment Imports.
For more information, see Setup, Imports, Imports Setup.
Permission Sets konfipay Connector
The following permission sets are available for NAVAX konfipay Connector Export and NAVAX konfipay Connector Import
Name
Description
NCPEK
NAVAX konfipay Connector Export
You need these permissions to use the NAVAX konfipay Connector Export.
Docs / App / NAVAX Payment / General Role Center Integration
NAVAX Payment is integrated into the Finance, Accountant and Accounting Manager role but can also be accessed from any role via the Search function.
NAVAX Payment consists of several actions that are grouped under NAVAX Payment:
Payment Journals and Cash Receipt Journals
These actions guide you to the respective journals where you can export payment files (NAVAX Payment Exports) and/or match transactions from previously imported bank statements with entries in Business Central (NAVAX Payment Imports).
For more information, see Tasks, Exports, Create Payment File.
For more information, see Tasks, Imports, Applying Open Entries.
Imports
This action is available when NAVAX Payment Imports is installed and is used to import bank statements or transfer them to journals.
Clearing Entries
This action opens the overview of created payment files (NAVAX Payment Exports).
For more information, see Archive, Exports, Clearing Entries.
Administration
This group contains the basic options for using NAVAX Payment.
Exports Setup
The action opens the NAVAX Payment Exports Setup page where you can define the basic settings for using NAVAX Payment Exports.
For more information, see Setup, Exports, Exports Setup.
Imports Setup
The action opens the NAVAX Payment Imports Setup page where you can define the basic settings for using NAVAX Payment Imports.
For more information, see Setup, Imports, Imports Setup.
Bank Account Setup
With the action you define all necessary options on the bank accounts for using NAVAX Payment.
For more information, see Setup, General, Bank Account Setup.
Pay with QR-Code
The action opens the QR-Code Setup page where you can define the basic settings for using NAVAX Payment QR-Code.
For more information, see Setup, General, Pay with QR-Code.
Docs / App / NAVAX Payment / Setup / General Bank Account Setup
The NCP Bank Account Setup page is the central management interface for all bank accounts used in NAVAX Payment Processing. Here you enter and maintain all bank master data required for payment processing, exports, and imports in Microsoft Dynamics 365 Business Central.
You can create new bank accounts, edit or remove existing accounts, and manage all relevant fields such as IBAN, currency code, and country/region code. These details are essential to ensure payments are processed correctly and in compliance with regulatory requirements.
For each bank account, you can assign the appropriate SEPA XML schemas for transfers and direct debits. These schemas ensure that your payment files comply with current SEPA standards and are processed smoothly.
If you use the konfipay Connector Export/Import extension, you also configure the necessary settings for synchronization with konfipay on this page. This allows you to synchronize bank accounts and payment data directly with your bank and use automated payment processes.
For more information, see www.konfipay.de
Step-by-step guide: Setting up bank account for Payment Processing Exports
Create bank account setup
Open the NCP Bank Account Setup page in Business Central.
Click New to create a new bank account setup.
In the Bank Account Number field, select the existing bank account; the values for Name, IBAN, Country/Region Code, and Currency Code will be automatically filled with the values from the bank account.
Important
The fields IBAN, Country/Region Code, and Currency Code must be filled in for the bank account setup to be used in payment processing.
Assign SEPA XML schemas
Assign the required SEPA XML schemas for credit transfers, direct debits, and, if necessary, non-SEPA credit transfers to the bank account setup.
Before you can assign the SEPA XML schemas, they must be downloaded or imported on the NCP Exports XML Schemas page.
For more information, see Setup, Exports, XML Schemas.
Select the appropriate schema in the SEPA Credit Transfer Schema and SEPA Direct Debit Schema fields.
For payments outside SEPA, select the Non-SEPA Credit Transfer Schema.
Check bank account posting group
Check whether the Bank Account Posting Group is assigned to the bank account. To do this, open the Bank Account Card via the Bank Account, Bank Account Card action.
Select the Bank Acc. Posting Group here to ensure payments can be posted correctly.
Important
The Bank Account Posting Group is necessary to ensure that postings on the bank account are carried out correctly. If no bank account posting group is assigned, errors may occur during posting.
Check further settings (optional)
Activate Pay with QR Code if this account should be used for QR payments.
If necessary, check other fields such as Max. Amount for Instant Payment or Originator ID and Originator ID Issuer (only if required or supported by your bank).
Save and test (optional)
Save the settings.
Perform a test export to ensure the bank account is correctly set up for payment processing exports.
You can cancel the generated payment file at any time and reset the postings to remove the test data.
Note
Further information about the individual fields can be found in the tables further down on this page.
Step-by-step guide: Setting up a bank account for konfipay Connector Export
Create bank account setup
Open the NCP Bank Account Setup page in Business Central.
Click New to create a new bank account setup.
In the Bank Account Number field, select the existing bank account; the values for Name, IBAN, Country/Region Code, and Currency Code will be automatically filled with the values from the bank account.
Important
The fields IBAN, Country/Region Code, and Currency Code must be filled in for the bank account setup to be used in payment processing.
Assign SEPA XML schemas
Assign the required SEPA XML schemas for credit transfers, direct debits, and, if necessary, non-SEPA credit transfers to the bank account setup.
Before you can assign the SEPA XML schemas, they must be downloaded or imported on the NCP Exports XML Schemas page.
For more information, see Setup, Exports, XML Schemas.
Select the appropriate schema in the SEPA Credit Transfer Schema and SEPA Direct Debit Schema fields.
For payments outside SEPA, select the Non-SEPA Credit Transfer Schema.
Check bank account posting group
Check whether the Bank Account Posting Group is assigned to the bank account. To do this, open the Bank Account Card via the Bank Account, Bank Account Card action.
Select the Bank Acc. Posting Group here to ensure payments can be posted correctly.
Important
The Bank Account Posting Group is necessary to ensure that postings on the bank account are carried out correctly. If no bank account posting group is assigned, errors may occur during posting.
Activate synchronization (optional)
Activate Synchronize and Auto. send with konfipay if you want to send payment files directly to the bank via konfipay.
After activating synchronization, the account balance from konfipay will be synchronized in Business Central.
Important
If you created the bank account before installing and configuring the konfipay Connector Export/Import extension, you must update the bank account setup to enable synchronization. To do this, run the Bank Account, Retrieve Bank Account Information action. This links the bank account in Business Central with the corresponding bank account in konfipay and enables synchronization.
Check further settings (optional)
Check whether additional fields such as Max. Amount for Instant Transfer or Originator ID are set correctly (only if required by your bank).
Save and test
Save the settings.
Perform a test export by creating a payment file and checking whether the file is correctly transferred via konfipay.
Note
Further information about the individual fields can be found in the tables further down on this page.
Step-by-step guide: Setting up bank account for Payment Processing Imports
Create bank account setup
Open the NCP Bank Account Setup page in Business Central.
Click New to create a new bank account setup.
In the Bank Account Number field, select the existing bank account; the values for Name, IBAN, Country/Region Code, and Currency Code will be automatically filled with the values from the bank account.
Important
The fields IBAN, Country/Region Code, and Currency Code must be filled in for the bank account setup to be used in payment processing.
Check bank account posting group
Check whether the Bank Account Posting Group is assigned to the bank account. To do this, open the Bank Account Card via the Bank Account, Bank Account Card action.
Select the Bank Acc. Posting Group here to ensure payments can be posted correctly.
Important
The Bank Account Posting Group is necessary to ensure that postings on the bank account are carried out correctly. If no bank account posting group is assigned, errors may occur during posting.
Set import settings
Select the Charge Account No. if you use NAVAX Payment Processing Imports to import charges from your bank and post them to a G/L account via automatic matching.
Check further settings (optional)
Check whether all fields contain correct data.
Save and test (optional)
Save the settings.
Perform a test import by importing an account statement file and checking whether the data is imported correctly and the automatic matching works properly. You can activate the Analysis View in the NCP Imports Setup for this purpose.
Note
Further information about the individual fields can be found in the tables further down on this page.
Step-by-step guide: Setting up bank account for konfipay Connector Import
Create bank account setup
Open the NCP Bank Account Setup page in Business Central.
Click New to create a new bank account setup.
In the Bank Account Number field, select the existing bank account; the values for Name, IBAN, Country/Region Code, and Currency Code will be automatically filled with the values from the bank account.
Important
The fields IBAN, Country/Region Code, and Currency Code must be filled in for the bank account setup to be used in payment processing.
Check bank account posting group
Check whether the Bank Account Posting Group is assigned to the bank account. To do this, open the Bank Account Card via the Bank Account, Bank Account Card action.
Select the Bank Acc. Posting Group here to ensure payments can be posted correctly.
Important
The Bank Account Posting Group is necessary to ensure that postings on the bank account are carried out correctly. If no bank account posting group is assigned, errors may occur during posting.
Set import settings
In the Import section, select the desired Account Transaction File Format (e.g., camt.052, camt.053, camt.054, MT940).
If required, activate the Auto. File Acknowledge option so that imported account transaction files are automatically marked as confirmed.
Activate synchronization (optional)
Activate the Synchronize field if you want to send payment files directly to the bank via konfipay.
After activating synchronization, the account balance from konfipay will be synchronized in Business Central.
Important
If you created the bank account before installing and configuring the konfipay Connector Export/Import extension, you must update the bank account setup to enable synchronization. To do this, open the Bank Account action and select Retrieve Bank Account Information. This links the bank account in Business Central with the corresponding bank account in konfipay and enables synchronization.
Check further settings (optional)
Check whether additional fields such as Test Account or Agreement Document exists are set correctly (e.g., for test environments or special bank requirements).
Save and test
Save the settings.
Perform a test import by importing an account statement file and checking whether the data is imported correctly.
Note
Further information about the individual fields can be found in the tables further down on this page.
Fields
Bank Account Number
Specifies the bank account number for which the Payment Processing Bank Account Setup was created.
Name
Displays the name of the linked bank account.
IBAN
Displays the IBAN of the linked bank account.
Country/Region Code
Displays the country/region code of the bank account.
Important
The Country/Region Code field must be specified for the bank account to be used in payment processing.
Pay with QR Code
Indicates that this bank account should be used by default for Pay with QR Code. Only one account can be marked!
For more information, see Setup, General, Pay with QR-Code.
Note
If you do not use the Pay with QR Code feature, this field can be left empty.
Synchronize
Indicates that konfipay should act as middleware for communication with your bank. Enabling this option allows you to directly import bank statements into Business Central and send generated payment files (collections and transfers) to the bank from Business Central through the middleware without having to store files.
Test Account
Indicates whether the bank account in konfipay is a Sandbox Bank Account or a Production Bank Account.
Important
Test accounts do not send information to the bank; instead, konfipay simulates the validations. Therefore, do not use test accounts for real transactions!
Acc. Balance Currency Code
Displays the currency code of the account balance according to konfipay.
Account Balance Date
Displays the date of the account balance according to konfipay.
By default, this field is hidden and can be displayed using the Personalize function.
No. of Pending Payment Status Entries
Displays the number of pending payment status entries for this bank account. The payment status entries overview can be accessed using the AssistEdit function.
By default, this field is hidden and can be displayed using the Personalize function.
Home, Actions
Import Bank Accounts
Use the Import Bank Accounts action to import bank accounts from konfipay into Business Central. This function allows you to automatically transfer existing bank accounts from the konfipay system to your Business Central environment. This saves time and reduces errors as the account data does not need to be manually entered. During the import process, all relevant bank information is transferred and stored in Business Central, allowing you to work with synchronized data immediately.
Note
After importing a bank account, you still need to specify the bank account posting group on the bank account card, otherwise, there may be an error when posting.
Download Acc. Transaction Entries
Use this action to initiate the process of retrieving and importing account statement files from konfipay into Business Central. This converts the selected bank account's statement data into a format suitable for Business Central. After the import, the data is available as an XML file, which can then be further processed using the NCPI Payment Import.
Navigate, Actions
Payment Journals
Opens the most recently used cash receipt journal where you can register direct debits to customers.
Payment Output Journals
Opens the most recently used payment journal where you can register transfers to creditors.
NCP Imports
In the Payment Import window, you can import files, transfer data to payment journals or bank account reconciliations, and manage the associated journals and reconciliations. Depending on the setup, different actions and fields will be displayed.
Agreement Document
The action opens the agreement document in konfipay that was signed during the setup of the bank account. If the agreement document has not been imported yet, the download will be performed automatically.
The agreement document defines the permissions the user receives and how access to the various functions and services of konfipay is regulated. This is particularly important for the security and protection of sensitive financial data.
It establishes the legal framework under which the user can use the services of the bank or payment service provider.
By signing the agreement document, the user commits to comply with certain standards and rules in handling the offered services. This creates binding obligations and ensures smooth payment processes.
Posten, Actions
Clearing Entries
Displays the clearing entries for this bank account. When creating a payment file, a clearing entry is generated for each record.
For more information, see Archive, Exports, Clearing Entries.
Opens the overview of imported account transaction entries from konfipay. These account transaction entries can then be imported into the NCPI Import page.
For more information, see Archive, konfipay Connector, Account Transaction Entries.
Bank Account, Actions
Bank Account Card
Use this action to open the Bank Account Card where you can set the data for this bank account.
Bank Account Information
This action lists all the information from konfipay related to this bank account. This function can be used to synchronize the data in Business Central with the data in konfipay.
Bank Account Setup Card
General, Fields
Bank Account No.
Specifies the bank account number for which the Payment Processing Bank Account Setup was created.
Name
Displays the name of the linked bank account.
IBAN
Displays the IBAN of the linked bank account.
SWIFT Code
Shows the SWIFT code of the referring bank account.
Bank Account No.
Shows the bank account number of the referring bank account.
Bank Branch No.
Shows the bank branch number of the referring bank account.
Country/Region Code
Displays the country/region code of the bank account.
Important
The Country/Region Code field must be specified for the bank account to be used in payment processing.
Currency Code
Specifies the relevant currency code for the bank account.
Pay with QR Code
Specifies that this bank account should be used by default for payments with QR code. Only one account can be marked!
Posting, Fields
Charge Account No.
Specifies the expense account for the direct transfer of charges to a journal, or the indirect transfer to a journal via bank account reconciliation.
Import, Fields
Acc. Transaction File Format
Specifies in which Camt format the account transactions should be requested from konfipay.
Autom. File Acknowledge
Specifies that after successfully retrieving the account transaction entries from konfipay, the corresponding account transaction file should be automatically marked as confirmed. The file will not be downloaded again during the next retrieval from konfipay.
The initial value of the field is Yes.
For more information, see Transaction view
Export, Fields
SEPA Credit Transfer Schema
Specifies which payment XML schema should be used for SEPA transfers.
For more information, see Setup, Exports, XML Schemas.
SEPA Direct Debit Schema
Specifies which payment XML schema should be used for SEPA direct debits.
For more information, see Setup, Exports, XML Schemas.
Non-SEPA Credit Transfer Schema
Specifies which payment XML schema should be used for non-SEPA transfers.
For more information, see Setup, Exports, XML Schemas.
Originator ID
If necessary, specify the originator ID for the payment XML schemas.
Note
Only specify the originator ID if allowed or required by your bank in the XML file.
Originator ID Issuer
If necessary, specify the issuer of the originator ID for the payment XML schemas.
Note
Only specify the issuer of the originator ID if allowed or required by your bank in the XML file.
Max. Amount for Instant Transfer
Specifies the maximum amount for real-time transfers. If the field is left empty, the default value for SEPA real-time transfers will be used, which is € 100,000.
konfipay, Fields
Synchronize
Enabling this option allows you to import bank statements directly into Business Central. In addition, generated payment files (collections and transfers) can be sent from Business Central to the bank via the middleware without having to save files locally.
Connection Type
Specifies the data center access through which the account is connected between konfipay and the bank.
The following options are available:
Connection via EBICS
If you have your own fully initialized EBICS contact, EBICS will be automatically set as the connection type.
Note
The connection via EBICS allows for some more detailed setup options for the affected accounts, such as specifying automation intervals.
Connection via Service Data Center
If you do not have your own EBICS contact, the account will be linked to the bank's data center via a service data center connection. konfipay uses a company-owned connection to the bank, eliminating the need to set up your own EBICS contact.
Note
However, in order to use accounts via a service data center connection, it is essential that the customer fills out and sends the participation agreement to the bank, so that the bank can release the account for the service data center procedure on their side.
Test Account
Specifies whether the bank account in konfipay is a sandbox bank account or a productive bank account.
Important
Test accounts do not send information to the bank; instead, konfipay simulates the validations. Therefore, do not use test accounts for real transactions!
Auto. send with konfipay
Specifies that automatic sending to konfipay is activated after file creation.
Allow Cancel Posted
Specifies whether canceling posted payments is allowed in konfipay.
Important
Enabling this option can lead to inconsistencies in accounting data and should only be used with caution.
Statistics, Fields
Created Clearingentries
Displays the number of clearing entries with the status Created for this bank account.
Sent Clearingentries
Displays the number of clearing entries with the status Sent for this bank account.
Posted Clearingentries
Displays the number of clearing entries with the status Posted for this bank account.
No. of Payment Status Entries
Displays the number of payment status entries for this bank account. The payment status entries overview can be accessed using the AssistEdit function.
By default, this field is hidden and can be displayed using the Personalize function.
No. of Pending Payment Status Entries
Displays the number of pending payment status entries without a final status for this bank account. The payment status entries overview can be accessed using the AssistEdit function.
By default, this field is hidden and can be displayed using the Personalize function.
No. of Completed Payment Status Entries
Displays the number of completed payment status entries for this bank account. The AssistEdit function can be used to view the overview of payment status entries.
New Account Statement Entries
Displays the number of available account statement files.
By default, this field is hidden and can be displayed using the Personalize function.
Imported Account Statement Entries
Displays the number of already imported account statement files.
By default, this field is hidden and can be displayed using the Personalize function.
Last Import Date
Displays the date of the NCPI Import record for the account statement file.
By default, this field is hidden and can be displayed using the Personalize function.
Account Balance
Displays the account balance according to konfipay.
Account Balance Currency Code
Displays the currency code of the account balance according to konfipay.
Account Balance Date
Displays the date of the account balance according to konfipay.
Home, Actions
Download Acc. Transaction Entries
This action initiates the import of the account statement files available for the selected bank account from konfipay.
Navigate, Actions
Cash Receipt Journals
Creates an incoming payment journal line for the bank account, for example, to record a payment received.
Payment Journals
Opens the list of outgoing payment journal lines where you can register payments to creditors.
Payment Import
In the Payment Import window, you can import files, transfer data to journal lines or bank account reconciliations, and manage the associated journal lines and reconciliations. Depending on the setup, different actions and fields will be displayed.
Agreement Document
The action opens the konfipay participation agreement that was signed during the setup of the bank account. If the participation agreement has not been imported yet, the download will be performed automatically.
Entry, Actions
Clearing Entries
Displays the clearing entries for this bank account. When creating a payment file, a clearing entry is generated for each record.
For more information, see Archive, Exports, Clearing Entries.
Account Transaction Entries
Opens the overview of imported account statements from konfipay. These bank account statement lines can then be imported into the NCPI Import page.
Payment Status Entries
The action opens the overview of payment status entries for this bank account.
Bank Account, Actions
Bank Account Card
Displays or sets detailed information about your bank account, such as the IBAN and SWIFT code or bank account number, the currency to be used, and general data.
Update Account Balance
Synchronizes the account balance in Business Central with konfipay Online Payment Services.
Retrieve Bank Account Information
Lists all information from konfipay related to this bank account. This function can be used to synchronize the data in Business Central with the data in konfipay.
Docs / App / NAVAX Payment / Setup / General Vendor/Customer/Employee Bank Account
In the Vendor/Customer Bank Account overview, you can manage the bank accounts associated with your vendors and customers. To access this overview, navigate to the vendor or customer list or card, and then select Vendor/Customer > Bank Accounts.
This allows you to view, add, or update the bank account details for the selected vendor or customer.
For more information, see Set up bank accounts in the Business Central online help.
Employees
For employees, the setup of bank accounts is done via the Employee Card. Navigate to the Payments tab, where you can enter the corresponding bank account details.
For more information, see Employee.
Fields
The following fields have been added or extended on the Vendor/Customer Bank Account page.
Code
Description
NCP Account Holder
Specifies the name of the account holder for this bank account, which may differ from the vendor/customer name.
Important
As of September 8, 2025, banks are required to uniquely identify the account holder. A missing or incorrect account holder name may lead to delays or rejections in payment processing. Change the value of this field only if the actual account holder differs from the vendor/customer name.
NCP Main Bank Account
Indicates that this is the main bank account of the vendor/customer, which should be used by default in payment journal lines for export to a payment file.
Tip
The main bank account can be selected via the Preferred Bank Account Code field on the Vendor/Customer card. The NCP Main Bank Account field is then automatically updated on the corresponding bank account. If the NCP Main Bank Account field is activated, the Preferred Bank Account Code field on the Vendor/Customer card is also updated.
NCP SEPA Mandates
Shows the number of SEPA mandates linked to this bank account. You can view or edit the SEPA mandates via DrillDown.
For more information, see Setup, Exports, SEPA-Direct Debit-Mandates.
Note
This field is only displayed on a customer bank account.
Country/Region Code
Specifies the country or region code of the address.
Important
This code is important to correctly determine the payment method when creating a payment proposal or generating a payment file.
SWIFT Code
Specifies the SWIFT code (international bank identification number) of the bank where the vendor/customer holds the account.
Via DrillDown, you can display a list of available SWIFT codes to facilitate the setup of bank accounts.
Note
This field is especially important when sending payments to or receiving payments from another country. A missing SWIFT code can cause issues with payment processing using NAVAX Payment Exports.
Actions
Direct Debit Mandates
Display the direct debit mandates that you have set up to reflect agreements with debtors for the direct collection of payments from their bank account, or edit them.
Docs / App / NAVAX Payment / Setup / General Bank Codes
This page describes the management and use of bank codes in the application. You will learn which fields are recorded for banking institutions, how to download, import, or export bank codes from various sources, and what options are available to you. Bank codes are essential for payment transactions and are regularly updated to ensure correct bank connections.
Downloading Bank Codes
Bank codes are necessary for payment transactions. You can download the bank codes directly from the major banks. The application supports downloading bank codes from the following banks:
Austrian National Bank
German Bundesbank
SIX Interbank Clearing AG
To download the bank codes, proceed as follows:
Open the Bank Codes page in the application.
You can access the Bank Codes page via NCP Exports Setup or NCP Imports Setup using the Bank Codes action.
On the NCP Bank Codes page, click the setup action, Download in the action bar.
Select the desired bank from which you want to download the bank codes, or select all.
Confirm your selection. The application downloads the current bank codes and imports them into the database.
If there are already records in the NCP Bank Code table, you will be asked how to proceed. You can choose how to handle the import of the data,
with the following options available:
Create only new records
Only bank codes that are not yet in the database will be downloaded. Existing bank codes will not be overwritten.
Create new records & overwrite existing records
All downloaded bank codes will be created in the database. Existing bank codes will be overwritten with the default values. Custom adjustments will be lost.
Create new records & update existing records (settings remain)
All downloaded bank codes will be created in the database. Existing bank codes will be updated, custom adjustments will be retained. Only the fields changed in the downloaded NCP bank code will be updated.
After the download is complete, you will receive confirmation that the bank codes have been successfully updated.
Note
Please note that an online connection is established when downloading the bank codes.
Exporting Bank Codes
You can export the bank codes from the database to a JSON file. This file can be used for importing into other databases or for backing up the bank codes. To export the bank codes, proceed as follows:
Open the Bank Codes page in the application.
On the NCP Bank Codes page, click the setup action, Export in the action bar.
The application exports all bank codes from the database to a JSON file.
Save the file to a desired location on your computer.
The exported file can later be used for importing into other databases.
Importing Bank Codes
You can import bank codes from a JSON file into the database. This is useful if you have bank codes from older systems or other sources. To import bank codes, proceed as follows:
Open the Bank Codes page in the application.
On the NCP Bank Codes page, click the setup action, Import in the action bar.
Select the JSON file containing the bank codes you want to import.
The application imports the bank codes from the file into the database.
If there are already records in the NCP Bank Code table, you will be asked how to proceed. You can choose how to handle the import of the data,
with the following options available:
Create only new records
Only bank codes that are not yet in the database will be downloaded. Existing bank codes will not be overwritten.
Create new records & overwrite existing records
All downloaded bank codes will be created in the database. Existing bank codes will be overwritten with the default values. Custom adjustments will be lost.
Create new records & update existing records (settings remain)
All downloaded bank codes will be created in the database. Existing bank codes will be updated, custom adjustments will be retained. Only the fields changed in the downloaded NCP bank code will be updated.
After the import is complete, you will receive confirmation that the bank codes have been successfully imported.
Fields
The following fields or columns are available in table NCP Bank Codes:
SWIFT/BIC Code
Specifies the SWIFT code of the bank.
Bank Branch No.
Specifies the bank branch no. of the bank. If the data was imported via Download, the bank branch no., if available, is only imported and viewed for austrian and german bank institutes.
Name
Specifies the name of the bank institute.
ISO Country Code
Specifies the ISO code for the country or region of the bank.
Address
Specifies the address of the bank. If the data was imported via the Download, the address, if available, is only imported and viewed for austrian institutes.
Post Code
Specifies the postal code of the bank.
City
Specifies the city of the bank.
County
Specifies the federal region or country of the bank. If the data was imported using the Download, the county, if available, is imported and viewed only for austrian banks.
Telefon No.
Specifies the phone number of the bank. If the data was imported via the Download, the telephone number, if available, is only imported and viewed for austrian banks.
Fax No.
Specifies the fax number of the bank. If the data was imported via the Download, the fax number, if available, is only imported and viewed for austrian banks.
E-Mail
Specifies the e-mail address of the bank. If the data was imported via the Download, the e-mail address, if available, is only imported and viewed for austrian banks.
Website
Specifies the website address of the bank. If the data was imported via the Download, the website address, if available, is only imported and viewed for austrian banks.
Information
Contains further information about the bank. With Download of the German bank codes, the short name of the bank is entered in this field. With the Download of the Austrian bank codes you can see if the bank is the main bank or a branch. This makes it easier to find out whether it is a branch or the main bank
Actions
Download
The campaign starts the download of the current bank codes directly from the selected main banks. You need these bank codes to use the NAVAX Payment Exports. A detailed guide for downloading can be found in the Downloading Bank Codes section on this page.
Import
This action starts the import of bank codes from a JSON file. These can be codes from older systems that you have already configured and exported using the export function. For detailed instructions on importing, see the Importing Bank Codes section on this page.
Export
Exports all bank codes from your database to a JSON file. This exported file can be used for importing into other databases. For detailed instructions on exporting, see the Exporting Bank Codes section on this page.
Note
Please note that older versions of NCP Payment Export cannot be imported with the exported files in JSON format.
In this overview you can setup and manage settings for countries and regions to use them for payment transactions.
For more information, see Change basic settings on Business Central online help.
Fields
Use this setup page to define the settings for the individual countries/regions for your business.
Code
Specifies the country/region of the address.
Name
Specifies the name of the country/region.
ISO-Code
Specifies a two-letter country code defined in ISO 3166-1.
SEPA
Indicates whether the country or region participates in SEPA. SEPA (Single Euro Payments Area) stands for the Single Euro Payments Area and aims to use the same procedures and standards in euro payments. With the help of the action Initialize SEPA countries, the countries participating in SEPA can be created automatically.
Important
If this check mark is not correctly set, no SEPA file can be created for the customers and vendors to which it applies.
ISO Numeric Code
Specifies a three-digit code number defined in ISO 3166-1.
Address Format
Specifies the format of the address that is displayed on external-facing documents. You link an address format to a country/region code so that external-facing documents based on cards or documents with that country/region code use the specified address format.
Note
If the County field is filled in, then the county will be printed above the country/region unless you select the City+County+Post Code option.
Contact Adress Format
Specifies where you want the contact name to appear in mailing addresses.
Intrastat Code
Specifies an Intrastat Code for the country/region you are trading with.
For more information, see Intrastat on Business Central online help.
VAT Scheme
Specifies the national body that issues the VAT registration number for the country/region in connection with electronic document sending.
Actions
Custom Address Format
Define the scope and order for fields that make up the country/region address.
VAT Reg. No. Formats
Specifies that the tax registration number for an account, such as customer, corresponds to the standard format for tax registration numbers in an account's country/region.
Initialize SEPA Countries
With this action, all SEPA Countries are automatically created. If the entry already exists, a message is displayed to decide whether the value should be adopted.
Docs / App / NAVAX Payment / Setup / General Pay with QR-Code
With the NCP Pay with QR Code function you can create a QR code that can then be placed on your invoices - whether digital or paper. The customer thus saves the tedious typing of data and also does not run the risk of entering incorrect data. This also makes it easier to apply payments later that were imported into Business Central via bank account statement.
Before the NCP Pay with Code Setup extension can be used, it must be set up. The general settings and defaults are defined in this window.
Fields
Pay with Code active
Specifies whether the pay with QR Code function is enabled and that a QR code should be printed on customer documents.
Name
Specifies the name to be used as the recipient name in the QR code. When the NCP Pay with Code Setup page is opened for the first time, the field is automatically filled with the company name.
QR Code Version
Specifies the QR Code Version to be used when creating the QR Code.
QR-Code Size
Specifies the QR-Code size for the documents.
QR-Code Resolution
Specifies the actual size of the QR-Code in pixels. If no value is specified, the QR-Codes will be created with a resolution of 600x600 pixels.
Payment Reference
Specifies the structure and values for the payment reference that will be used for the QR code generation. Wildcards can be used in this field. Note that there is a maximum of 35 characters allowed in the payment reference. You can get more information about this via AssistEdit.
The following placeholders can be entered in the Payment Reference field:
%1 Document No.
%2 External Document No.
%3 Customer No.
%4 Customer Name
%5 Our Account No.
%6 Customer Ledger Entry Description
%7 Document Date
%8 Your reference
Tip
Use square brackets, e.g. [REF%8], if you want to output the text only if the placeholder contains a value.
By specifying a numerical value within angle brackets directly after the placeholder, e.g. %1<2> or [Info: %10<15>], you can limit the maximum number of characters of the placeholder.
Important
Note that there is a maximum of 35 characters for the payment reference.
Actions
Bank Accounts
In the window Bank Account Setup, all bank accounts that are required for payment transactions are stored or managed.
Payment Methods
Set up the payment terms that you select from customer cards or sales documents to define when the customer must pay, such as within 14 days.
Setting up a payment method for Pay with QR Code
On the Payment Methods page, the NCP Pay with QR Code field has been added. If the field is enabled and you create an invoice using this payment method, a QR code will be generated for the document. In the NCP Pay with Code Setup, Pay with QR Code active must be enabled.
Set up an bank account for using Pay with QR Code
When generating the QR code, the bank account that should be applied must be specified. This is achieved on the Bank Account Setup page by activating the Bank Account for Pay with QR Code field.
Important
Only one bank account can be set as the default for creating the QR code. If a second one is checked, an error message will appear.
Before the NAVAX Payment Exports can be used, its basic functionality must be set up. This wizard will help you to setup the necessary parameters by walking through them step by step, so you can immediately start working with the NAVAX Payment Exports.
In the following section the steps with the parameters are explained.
Note
You can skip individual steps at any time and complete the configuration at a later time in the NCP Exports Setup.
Fields, Page Originator Setup
Name
Specifies the originator name.
Name 2
Specifies an addition to the originator name.
Address
Specifies the address of the originator.
Address 2
Specifies an addition to the address of the originator.
Post Code
Specifies the post code of the originator.
City
Specifies the city of the originator.
Country/Region Code
Specifies the country/region code of the originator used in payment transactions.
Creditor Identifier (CI)
The SEPA Direct Debit Scheme (SDD), requires the mandatory provision of a Creditor Identifier, Creditor ID or CID with each direct debit. This ID is stored in this field.
With next you get to the next setup page of the wizard.
Page, XML Schemas Setup
XML Schemas are required for the generation of SEPA and non-SEPA files. With this wizard you can import predefined schemas.
In order to be able to use them for the export of the payment file for your bank, you must assign the XML Scheme to a bank. The association of the schemas
to the individual bank accounts is done in the Bank Account Setup which you will find later within the wizard. With the action
Download XML Schemas the download and import into the database is started.
Note
The XML Schemas can change or be supplemented in the future. We provide the latest rulebooks online, these updates and changes can be downloaded
in the NCP Exports Setup using the action XML Schemas. In the opened page click the action Download in the XML Schemas setup.
For more information, see Setup, XML Schemas.
Page, SEPA Countries Setup
With this wizard page you can set up the SEPA countries in the countries/regions table. The field "SEPA" is set, which is used to identify the participating SEPA countries based on a list of all participating countries. With the action Setup SEPA Countries the setup is started.
Page, Bank Codes Setup
With this wizard, you can import bank codes from 3 different sources. You have the choice to download the data from the specific banking institutions or from all of them together. The sources of the data are the European Central Bank, the Austrian National Bank or the Deutsche Bundesbank. This download creates records in the table Bank Codes.
Page, Bank Account Setup
In this step the Bank Account Setup can be completed. If you click on the action Open Bank Account Setup, the page will open where you can enter your bank details and link the XML Schemas that you want to use.
For more information, see Setup, Bank Account Setup.
Fields, Payment File Setup
Create Bal. Account Line
Here you can configure whether an balanced account line should be created.
Modify allowed after "File Created"
With this option you can determine whether the payment data can still be manipulated after creation.
Payment Notification Nos.
Here the payment notification number series is set up.
The action Payment File Setup creates default entries that are not assigned to a specific account. A line is created in the table Payment File Setup for each Payment Type.
Fields, Payment Notification E-Mail Setup
Sender Name
Here the sender name of the payment notification e-mails is specified. This is also the name the recipient of the e-mail can see in his e-mail program.
Sender E-Mail
The sender e-mail of the payment notification e-mails is specified here.
CC E-Mail
Here the CC e-mail of the payment notification e-mails is specified.
BCC E-Mail
Here the BCC e-mail of the payment notification e-mails is specified.
HTML Formatted
This value specifies that the payment notification e-mails should be sent in HTML format.
With the action Send Test Message an E-Mail can be sent to check the settings.
Note
Before you can send a test message or use the notification e-mail functionality, you must first complete the SMTP Mail Setup. You can find information about this in the Business Central Online Help under Set Up E-Mail
Page, Language Setup
All the necessary settings for the individual language codes, as well as notification texts and the SEPA mandate texts will be set up on this page. Values can be suggested for the language setup via the action Initialize Languages. In most cases, no language code is stored for vendors and customers. You should therefore also set up a record without a language code.
Finish Setup
If you click on Finish the configuration will be written into the table NCP Exports Setup.
Before the NAVAX Payment Exports extension can be used, it must be set up.
In the window NCP Exports Setup, the general settings and defaults are defined.
Fields, General
LCY Code
Shows the currency code for the local currency. This value has been stored in the General Ledger Setup.
ISO LCY Code
Specifies the ISO LCY Code, this will be pre-filled with EUR when LCY Code is set to EUR or EURO in the General Ledger Setup and the field has not yet been configured.
Fields, Suggest Payments
In the section Suggest Payments the settings for the creation of the Payment Suggestions are defined.
Due Date Calculation
Specifies a date formula with which the Last Due Date field in the Payment Suggestion should be suggested. The date is calculated based on the work date.
Discount Date Calculation
Specifies a date formula with which the field Last Discount Date in the Payment Suggestion should be suggested. The date is calculated based on the work date.
Posting Date Calculation
Specifies a date formula with which the field Posting Date in the Payment Suggestion should be suggested. The date is calculated based on the work date.
Execution Date Calculation
The execution date is calculated as follows: For urgent payments, the date is set to today. Otherwise the date is set to the next day, unless it is a SEPA direct debit in combination with direct debit type CORE - basic direct debit, in this case the date is set to Today + 2 days.
External Bank Account Search
Specifies how the field External Bank Account Search (vendor/customer bank account) is determined in the general ledger lines for the Payment Suggestion.
The following applies to all options: If the vendor/customer item contains a value in the field 'External Bank Account Search', this value is suggested.
SEPA Direct Debit Mandate ID Separator
Against the bank, the same mandate ID can be used for multiple customers/vendors. To use the same ID for multiple customers/vendors in payment transactions, you can specify a separator and a unique identifier. The separator and all subsequent characters will not be exported.
Enter the separator here. Use this special character when naming the mandate ID. When the setup is initialized, the value for the separator is empty.
Note
By default, this field is hidden and can be displayed using the Personalize function.
Incl. Customers with Credit
Specifies that customers with credit should be included in the payment suggestion.
Incl. Vendors with Credit
Specifies that vendors with credit should be included in the payment suggestion.
Fields, Originator
In the section Originator Setup the settings for the export file are defined. When the payment file is exported, this data is exported to make you or your company identifiable as the ordering party. When you start the wizard for the first time, the values from the company data are used as default values for this step.
Name
Specifies the originator name.
Name 2
Specifies the originator name 2.
Address
Specifies the originator address.
Address 2
Specifies the originator address 2.
Post Code
Specifies the originator post code.
City
Specifies the originator city.
Country/Region Code
Specifies the country code of the ordering party used in payment transactions.
Creditor Identifier (CI)
The SEPA Direct Debit Scheme (SDD), requires the mandatory specification of a Creditor Identifier, Creditor ID or CID with each direct debit. This ID is stored in this field.
Fields, Create Payment File
Create Bal. Account Line
Specifies whether an offsetting entry line is to be created for the balanced account lines when the payment file is created.
An offsetting entry line will only be created if there is more than one journal line for an offsetting entry line.
For different document types, the offsetting entry line will only be created if all journal lines involved have a Applies-to Doc. No. set.
If this is the case, the Document Type will be set to Payment for all affected journal lines.
These changes will be saved. If the transaction is cancelled, the Document Type will be reset to the original value.
Modify allowed after File Created
With this option you can determine whether the payment data can still be manipulated after file creation.
Summary after creation
On this page you can specify whether a summary of the payment file should be shown after the payment file has been created.
In the summary, you have the option to either import the created file into your banking software using the Export Payment File action or send it directly via NAVAX konfipay Connector to konfipay with the Transfer Payment File action to forward it to your bank.”
Payment Notification Nos.
Here the payment notification number series is set up.
Pmt. Notification Report ID
Specifies the ID of the report that is printed when you print the payment notification.
Tip
Here you can enter your own report layout if the standard report does not meet your requirements.
By default, the report with the ID 70322078 - NCP Exports Pmt. Notification is entered here.
Pmt. Notification Report Caption
Specifies the name of the report that is printed when you print the payment notification.
Payment Type
Specifies the payment method for which the settings apply. The settings must be defined for all payment types that are in use.
The following options are available:
Non-SEPA Credit Transfer
SEPA Credit Transfer
SEPA Direct Debit
Bank Account No.
Specifies the bank account to which the settings apply. The setting is optional.
If no bank account is specified, the settings are valid for all bank accounts for which no special settings exist.
File Name
Specifies the name to be used to save the payment file.
The following placeholders can be used in the File Name field:
%1,%2,%3,%4,%5 Date of creation (day,week,month,year,year 4 digits)
%6 Bank Account No.
%7 File Reference (Message Reference)
%8 Clearing Entry No.
%9 User-ID
%10 Payment Type
Remittance Info. Length
Shows the maximum number of characters for the payment remittance information.
Remittance Info.
Specifies the structure and values for the remittance information in the payment file.
The following Wildcards can be used in this field.
%1 Document Type
%2 External Document No. (if available) or Document No.
%3 External Document No.
%4 Document No.
%5 Currency
%6 Amount
%7 Discount
%8 Vendor or Customer Number
%9 Our Bank Account No.
%10 Gen. Journal Line Description
%11 Document Date
%12 Payment Text (from Journal Line)
Note
The Payment Text field is hidden in Payment and Cash Receipt Journals to use it, add the field to the page using the Personalize function.
Tip
Use brackets, for example [Discount:% 7], if you want to output the text only if the placeholder has a value.
You can determine the maximum number of characters for the placeholder by specifying a numerical value within angle brackets immediately after the placeholder. Example %1<2> or [Note: %10<15>].
Collective Transaction
Specifies whether transactions should be combined when the payment file is created. They are then sent to the bank as collective transactions.
When submitting transactions to the bank, they can be consolidated for more efficient and cost-saving processing. This is done by bundling posting lines that have the same creditor, customer, or bank account number, the same external bank account code, and the same currency code into a collective transaction.
However, there are certain types of transactions, such as individual transfers and transfers with a payment reference, that are excluded from this consolidation. Credits that are balanced with a document number are also considered if the collective transaction results in a positive amount, which also applies to direct debits.
The use of this functionality is advisable when the options to summarize per creditor or debtor are not selected in the payment proposal. If booking lines have been consolidated into a collective transaction, the resulting payment item receives a corresponding label. The description of the payment item is supplemented with collective transaction.
Note
The fields for the document number and booking date are only filled in if all booking lines within the collective transaction match. If there are differences, these fields remain empty.
Always Create Notification
Specifies whether a payment notice should always be generated when the payment file is created, regardless of if the payment remittance information can be transmitted in completely form or not.
Fields, Pmt. Notification E-Mail
Edit before sending
If this option is enabled, the notification e-mails can be edited with the e-mail editor before sending.
Note
This option is only available if the Email features active option is enabled.
HTML Formatted
This value specifies that the payment notification e-mail message should be sent in HTML format.
Sender Name
Here the sender name of the payment notification e-mail message is specified. This is the name the recipient of the e-mail can see in his e-mail program.
This option is only available if the Email features active option is disabled.
CC E-Mail
Here the CC e-mail of the payment notification e-mail message is specified.
BCC E-Mail
Here the BCC e-mail of the payment notification e-mail message is specified.
In the Reports section, the layouts for the printable reports used in NAVAX payment are defined. It is possible to use custom reports if the standard reports do not meet your requirements. The reports can be identified by the Report ID. This ID can be stored in the Report Layout to use the desired layout.
Pmt. Notification Report ID
Specifies the ID of the report that is printed when you print the payment notification.
Pmt. Notification Report Caption
Specifies the name of the report that is printed when you print the payment notification.
Clearing List Report ID
Specifies the ID of the report that is printed when you print the Clearing List.
Clearing List Report Caption
Specifies the name of the report that is printed when you print the Clearing List.
SEPA Mandate Report ID
Specifies the ID of the report that is printed when you print the SEPA mandate.
SEPA Mandate Report Caption
Specifies the name of the report that is printed when you print the SEPA mandate.
Pmt. Suggestion List Report ID
Specifies the ID of the report that is printed when you print the payment suggestion list.
Pmt. Suggestion List Report Caption
Specifies the name of the report that is printed when you print the payment suggestion list.
History, Fields
Delete Data Date Calculation
This allows you to specify the period for deleting the data via NCP Exports - Delete Data. Only data that is at least 6 months old can be deleted. If the field is empty, the minimum period is used.
Last Date Archived Files deleted
Shows the date on which NCP Exports - Delete Data were last executed.
Archived Files deleted until
Specifies the date until which archived files were deleted from the clearing entries.
In the window NCP Bank Account Setup, all bank accounts required for NAVAX Payment are defined or managed.
For more information, see Setup, Bank Account Setup.
Bank Codes
In this window, the Branch Codes and the SWIFT Codes of the banks are defined or managed.
For more information, see Setup, Bank Codes.
XML Schemas
XML schemas are required for SEPA and non-SEPA files creation. The assignment of the schemes to the individual bank accounts can be done in the NCP Bank Account Setup page.
For more information, see Setup, Exports, XML Schemas.
Payment Notification Texts und SEPA Mandate Texts are displayed and managed in the Language Setup window for each language code.
For more information, see Setup, Exports, Language Setup.
Update Bank Code URLs
Fills or updates the bankcode URL fields.
The up-to-date URL's are entered in the corresponding fields, this data is permanently updated on www.navax.app and offered as download.
System, Actions
NAVAX License Management
Opens the NAVAX License Management which displays the current license status of the NAVAX extensions.
For more information, see Appendix, NAVAX License Management.
Send Pmt. Notification Test Message
This action, gives you the possibility, to test the settings of the payment notice e-mail functionality. If the function is called, the e-mail address to which the payment notice test message is to be sent must be specified in the field Test message to.
Delete Data
By creating a payment file, an entry is made in the clearing entries. The created payment file is also saved there. If necessary, you can use this action to remove the archived payment files from the clearing items.
All necessary settings for the individual language codes are set up here. Also the Payment Notification Texts and the SEPA Mandates Texts can be stored or set up here.
With the Assisted Setup, values can be suggested for the setup.
Note
In most cases, no language code is stored with the vendors and customers. Therefore, you should also set up a data record without language code.
Fields
Language Code
Specifies the code for the language. If you want to perform setup for vendors and customers who have not defined a language code, leave this field blank. Click the field to view the existing language codes in the Language table.
Language Name
Views the description for the language.
Linked Language Code
Using the field Linked language code allows you to link texts from another language code. This means that the text is not set up with the current language code, but with a linked code.
SEPA Mandates Text Exists
Views if there is a SEPA mandate text for this language setting or not. Click on the field or on the SEPA Mandate Text action to view the text.
Pmt. Notification Payment File Text
Specifies the text to be used for the payment notification in the payment file. The following placeholders can be used in the Payment Notification Text in Payment File field: %1 Payment Notification No.
Pmt. Notification E-Mail Subject
Specifies the text that is to be used for the subject of a notification e-mail. The following placeholders can be used in the Notification E-mail Subject field: %1 Notification No.
QR Code Display Text
Specifies the text to be used as display text of a QR code for payments with QR code. The following placeholders can be used in the field Pmt. Notification Payment File Text: %1 Document No.
QR Code Detail Text
Specifies the text to be used as detail text of a QR code for payments with QR code. The use of placeholders is possible in this field.
The following Wildcards can be used in this field.
%1 Document Type
%2 External Document No. (if available) or Document No.
%3 External Document No.
%4 Document No.
%5 Currency
%6 Amount
%7 Invoice Discount
%8 Customer Number
%9 Vendor Name
%10 Customer Ledger Entry Description
%11 Document Date
%12 Payment Reference
Tip
Use brackets, for example [Invoice Discount:% 7], if you want to output the text only if the placeholder has a value.
You can determine the maximum number of characters for the placeholder by specifying a numerical value within angle brackets immediately after the placeholder. Example %1<2> or [Note: %10<15>].
Actions
Pmt. Notification E-Mail Text
You can use this action to configure the texts in different languages for the payment notification e-mail messages.
SEPA Mandates Text
With this action the mandate text lines can be defined in different languages.
For more information, see Setup, SEPA Mandates Text Lines.
The XML format is the Europe-wide recognized standard for payment transactions and is actively promoted by the European Payments Council (EPC) and the EU. The goal is to standardize the multitude of national payment formats and, in the long term, to fully replace them with the XML format. This harmonizes and simplifies the processing of transactions both between banks and for end customers from a technical perspective.
On this page, you manage the XML schemas required for exporting payment files in Business Central. The schemas define how the data from Business Central is mapped to the respective fields of the XML file.
Accessing the XML Schemas
Management of the XML schemas is handled centrally via the NCP Exports Setup page. There you will find the XML Schemas action, which opens the overview of all schemas available in Dynamics 365 Business Central. In this overview, you can add new schemas, edit existing ones, download, import, or export them. This way, you always have an overview of all XML schemas in use and can adapt or update them as needed.
Downloading SEPA XML Schemas
Open the NCP Exports Setup page.
You can access this page via Tell me what you want to do or from the Business Central homepage via the NAVAX Payment menu, Administration, NCP Exports Setup.
For more information, see Setup, Exports, Exports Setup.
On the NCP Exports Setup page, select the XML Schemas action to open the overview of available XML schemas in Dynamics 365 Business Central.
Click the Download action to download the provided SEPA XML schemas.
Note
If no permission has yet been granted to establish an online connection via NAVAX Payment, you will be prompted to do so. An internet connection is required for the download.
Important
If an error occurs during the download, please check the required settings.
For more information, see Appendix, Installation Notes..
The system automatically downloads the SEPA XML schemas from the official source and saves them in Dynamics 365 Business Central. If XML schemas already exist, you will be prompted to decide how to proceed.
Create only new records
Only schemas that do not yet exist in the database will be downloaded. Existing schemas will not be overwritten.
Create new records & overwrite existing records
All downloaded schemas will be created in the database. Existing schemas will be overwritten with the default values. Custom adjustments will be lost.
Create new records & update existing records (keep settings)
All downloaded schemas will be created in the database. Existing schemas will be updated, custom adjustments will remain. Only the fields changed in the downloaded schema will be updated.
Note
If you have questions or problems with the download or the SEPA schemas (e.g., if they are rejected by the processing software), please contact your payment transactions contact person. Please provide us with detailed information so that we can help specifically. If the bank rejects the schema, the exact error message is required for analysis.
After a successful download, a dialog appears with an overview of the downloaded schemas.
Exporting SEPA XML Schemas
Open the NCP Exports Setup page.
You can access this page via Tell me what you want to do or from the Business Central homepage via the NAVAX Payment menu, Administration, NCP Exports Setup.
For more information, see Setup, Exports, Exports Setup.
Select the Export action.
The system exports all schemas to an XML file and saves it in the Download folder on your computer under the name NCPE_XMLSchemas.xml.
Tip
After exporting the XML schemas, you will receive an XML file containing all schemas currently present in your database. You can keep this file as a backup or import it into another Dynamics 365 Business Central environment. After the export, check whether the file is complete and contains all the desired schemas. This ensures that you can always access your configuration or share it when needed. The following section explains how to import these backups into Business Central.
Importing SEPA XML Schemas
Open the NCP Exports Setup page.
You can access this page via Tell me what you want to do or from the Business Central homepage via the NAVAX Payment menu, Administration, NCP Exports Setup.
For more information, see Setup, Exports, Exports Setup.
Select the Import action.
Select the local XML file you want to import.
You can drag & drop a file into the Import XML Schemas dialog or use the Drop file here to upload or click here to browse button to select a file from your computer.
The system checks the file and imports the schema into the database.
The system automatically downloads the SEPA XML schemas from the official source and saves them in Dynamics 365 Business Central. If XML schemas already exist, you will be prompted to decide how to proceed.
Create only new records
Only schemas that do not yet exist in the database will be downloaded. Existing schemas will not be overwritten.
Create new records & overwrite existing records
All downloaded schemas will be created in the database. Existing schemas will be overwritten with the default values. Custom adjustments will be lost.
Create new records & update existing records (keep settings)
All downloaded schemas will be created in the database. Existing schemas will be updated, custom adjustments will remain. Only the fields changed in the downloaded schema will be updated.
Tip
Importing previously exported XML schemas allows you to easily transfer already configured schemas to other Dynamics 365 Business Central environments. This is especially useful if you have made individual adjustments to the schemas, for example to meet specific requirements of your bank. It can also be helpful during upgrades. This saves time and avoids errors, as you do not have to set up the schemas manually again. You can find out how to create a backup of the schemas in the section Exporting SEPA XML Schemas above.
Notes
For smooth payment processing, it is important to always use up-to-date SEPA XML schemas. We ensure that new or changed schemas are made available for download promptly as soon as official adjustments are published.
If you have questions about compatibility or specific formats, please contact support.
Special Notes NON-SEPA Credit Transfers
The continuously increasing regulations to prevent money laundering, terrorist financing, embargo circumvention, etc., usually require the full name of the recipient and the corresponding address to be provided. The recipient's financial institution, which may be subject to additional regulations of the respective country, can refuse acceptance or is obliged to return the transaction if the information provided is insufficient. Although the minimum requirements of the payment systems are low (country code and city), it is still advisable to provide as complete information as possible.
Adding Lines in the XML Schema
On the NCP Exports XML Schema Lines page, you can add new lines to customize the XML schema as needed. This is useful if you want to include additional information or meet specific requirements for your payment files. New lines are always inserted above the currently selected line and can then be edited.
Make sure that the new line receives a position number greater than that of the previous line. After adding new lines, you should use the Update Position Numbers action to re-sort the position numbers so that the order in the schema remains correct.
Fields
Type
Specifies the type of XML schema. Possible values are: SEPA Credit Transfer, SEPA Direct Debit and Non-SEPA Credit Transfer
Code
Specifies the code of the XML schema. This code meets the SEPA standard of the schema. You can find more information on this on Payment Transactions
ISO Country Code
Specifies the countries for which the schema is valid. Some countries have different requirements of the ISO standard.
Description
The field Description is a combination of the abbreviation of the field Type, the ISO country code and the rulebook version of the schema. This only applies to downloaded schemas. If you have created a schema yourself, the Description is assigned by you.
IBAN Only possible
The field IBAN Only possible indicates that the schema also supports transactions without the specification of SWIFT Code.
Dom. IBAN Only
The field IBAN Only possible indicates that the schema also supports transactions without the specification of SWIFT Code. If Dom. IBAN Only is set, domestic transactions are also allowed without SWIFT Code.
Int. IBAN Only
The field IBAN Only possible indicates that the schema also supports transactions without the specification of SWIFT Code. If Int. IBAN Only is set, foreign transactions are also allowed without SWIFT Code.
IBAN or Bank Account No. possible
The field IBAN or Bank Account No. possible indicates that the schema also supports transactions without IBAN.
IBAN or Bank Account No.
The field IBAN or Bank Account No. possible indicates that the schema also supports transactions without IBAN. If IBAN or account number is set, the account number of the recipient bank is written to the payment file if no IBAN exists.
Address Specification possible
Indicates that the schema supports address information.
Originator Address
The field Address Specification possible views whether the scheme supports address data. The field Originator Address specifies whether the address data of the originator, which was stored in the NCP Exports Setup, should be written to the payment file.
Recipient Address
The field Address Specification possible indicates that the scheme supports address data. The field Recipient Address specifies the address data of the recipient that should be written to the payment file.
Batch Booking
The field Batch Booking determines how the transactions are booked by the bank.
By default, this field remains empty, and the indicator () is not written into the payment file.
If you specify Yes or No, the indicator is set in the payment file to indicate whether it is a Batch Booking (Yes) or a Single Booking (No).
Note
Only if there is a corresponding agreement with the bank for single bookings, each transaction will be displayed individually on the client's account statement when specifying No. Otherwise, or by default, it is always a batch booking (default/pre-agreed: Yes).
Extended Character Set
Specifies whether the extended character set will be enabled.
In general, the following characters are allowed:
abcdefghijklmnopqrstuvwxyz
ABCDEFGHIJKLMNOPQRSTUVWXYZ
0123456789
/-?:()., "space".
Until now, the following additional characters were allowed for Austrian bank accounts:
&;
In addition, the following characters were automatically converted:
< became "&lgt;"
> became ">"
& became "&"
" became """
became "'"
If the field is set, the above conversion is performed in this schema.
If the Extended Character Set field is not set, the & character is automatically converted to +, all other characters are replaced by a space.
all other characters are replaced by a space.
You can configure the character set by means of the action Allowed Character Set.
For more information, see SEPA Requirements for an Extended Character Set (UNICODE Subset) - Best Practices
Umlaut Conversion
Specifies whether to use umlaut conversion when creating a payment file. Some banking institutions do not allow the use of umlauts.
The conversion will:
Ä or ä to an Ae or ae
Ü or. ü to an Ue or ue
Ö or ö to an Oe or oe
Charges Selection possible
Indicates that the schema allows the specification of charges.
Shows whether, and if so, when the schema lines were last changed.
In Use
Indicates that the scheme is in use.
NCP Exports XML Schema Lines, Fields
Level
Specifies the level. The level can be understood as the parent XML nodes (e.g., GrpHdr, PmtInf..), within the level the position numbers are assigned per child XML node.
Available options:
A1
B1
C
B2
A2
Position
Specifies the position of the line in the schema. Use the action Update Positions to re-sort the position numbers per Level, this is necessary after inserting a new line.
Indentation
Specifies the indentation, which hierarchically arranges the child XML nodes. The field is not visible on the page, use the actions Indent or Outdent to indent or outdent the XML nodes.
Tag
Specifies the tag name or node name for the XML node.
Tip
By clicking on the field, the text editor opens, which facilitates the editing of the tag. This is especially helpful when the tag is long.
Start Tag
Specifies that the node should be a start tag. By enabling this field, you can indicate that it is an XML node that should contain a start tag. If you activate the field, but not the End Tag field, a parent node is created (e.g., <Tag>). If both fields are activated, a child node is created (thus the XML node is closed in the same line, e.g., <tag>Value</tag>).
End Tag
Specifies that the node should be an end tag. By enabling this field, you can indicate that it is an XML node that should contain an end tag. If you activate the field, but not the Start Tag field, a parent node is created (e.g., <Tag>). If both fields are activated, a child node is created (thus the XML node is closed in the same line, e.g., <tag>Value</tag>).
Value
Specifies the value to be used as the inner text in this XML node. Using the AssitEdit function opens the NCP Exports XML Schema Values page, which provides you with some standard values to choose from, but you can also enter a custom value in the field.
For more information, see Setup, XML Schema Values.
Default Value
Specifies the default value, a default value is understood as a constant. For example, in a SEPA domestic transfer in Austria, the <PmtMtd> node always needs to have the value TRF.
For more information, see Setup, XML Schema Values.
Maximum Character Count
Specifies the maximum number of characters valid for the value of the XML node.
XML
Displays the XML of the tag. This column helps you understand the structure of the XML file.
Attribute
Specifies that the XML node contains an attribute. Enter the attribute name and value in quotation marks.
Skip
Specifies that the XML node should be skipped when a condition is met. The values Yes, If - OR, and If - AND are available. The Skip - If empty and Skip - If not empty fields define the values for the condition.
Skip - If empty
Specifies the value used for the condition to skip. So if the set value for the XML node is empty, it will be skipped.
Skip - If not empty
Specifies the value used for the condition to skip. So if the set value for the XML node is not empty, it will be skipped.
Special notes NON-SEPA Credit Transfers
The continuously growing regulations to mitigate money laundry, terror financing, embargo bypassing a.s.o. in most cases require the presentation of the name and the address of the counter party of the transaction. Moreover, the financial institution of the counter party, that may be additionally regulated by the country of residence, can reject or even is forced to reject the transaction, if the presented information is insufficient. Even if the minimum requirements of the payment systems are low (country code and town name), it is advised to present an at most complete set of address data.
Setup, Actions
Download
Via the action Download you can download or update schemata templates.
Import
With the import function schemas can be imported.
Export
With the export function schemas can be exported.
Init Allowed Characters
With this action, you reset the allowed character set for all XML schemas to the default value. This will overwrite all individual customizations and use the standard character set for all schemas.
XML Schema Card, Actions
Copy from
With Copy from you can create a copy of an existing schema and then edit it.
Allowed Characters
With this action you can configure the allowed characters that are valid for use in payment files. This is necessary if your bank allows a different character set than the SEPA standard.
Reset Allowed Characters
With this action, you reset the allowed characters for the purpose field in the payment file to the default value. The default value includes the following characters: abcdefghijklmnopqrstuvwxyzäüößABCDEFGHIJKLMNOPQRSTUVWXYZÄÜÖ0123456789/-?:().
NCP Exports XML Schema Lines, Actions
Indent
Use this action to indent lines.
Outdent
Use this action to outdent lines.
Update Position Numbers
Use this action to update the position numbers. This is required after you have inserted new line(s).
New Line
Use this action to add a new line to the schema. The new line is inserted above the selected line in the list; the position can then be adjusted using the Update Positions action.
Delete Line
Use this action to delete a line from the schema. The line is removed from the list, and the positions of the other lines are automatically adjusted.
With custom formats, you can import payment files whose structure is not covered by the standard formats.
In the NCP Imports setup, you define for which purposes these formats can be used. When importing a payment file, the Custom Formats option is available, allowing you to select and use your own formats.
Fields
Code
Specifies the code for the custom format.
Description
Specifies a description for the custom format.
Active
Specifies whether the custom format is completely set up and active. Only active formats can be used in NCP Imports.
Bank Account No.
Specifies the bank account number for whom the format is valid.
Bank Account Name
Shows the bank account name.
Note
This field is filled in automatically if you enter the Bank Account No..
Bank Account IBAN
Shows the bank account IBAN.
Note
This field is filled in automatically if you enter the Bank Account Number.
Separator
Specifies the separator symbol for the fields.
Start Delimiter
Specifies the start delimiter for the fields.
End Delimiter
Specifies the end character for the fields.
Decimal Separator
Specifies the decimal separator for the fields.
No. of Fields
Shows the number of existing fields for this format.
Note
If you click in the field you will open the page NCP Imports Custom Format Fields.
No. of Assigned Import Fields
Shows the number of assigned import fields for this format.
Note
If you click in the field you will open the page NCP Imports Custom Format Fields.
File Structure
Shows the file structure with the separators of the import format.
Actions
Fields
Shows the list of the configured fields of the custom format, you can make the settings regarding the fields here.
Suggest Fields
With the function Suggest fields, the fields can be automatically read or suggested from the CSV file (header line). Each field in the file that is to be imported into the NCP Imports must then be assigned to a field number of the import.
Actions, Setup
Import
This action imports a file with a user defined format in CSV format. The file must start with a header line containing the field names. A row or record cannot be longer than 1024 characters. After creating a format and setting up the separators used in the CSV file, the fields of the file and their assignment to the NCP Imports can be set up. These files can be imported from other systems that you have already configured and exported using the export function.
Export
Use this action to export a custom format to a file. This exported file can be used for import into other databases.
With the authorization of your customer, you can collect payments directly from the customer's bank account.
In order to be able to process Direct Debits you set up the customer's payment method. Finally, set up the direct debit mandate that corresponds to your agreement with the customer to collect payments within a certain period of time.
To advise the bank to transfer the payment amount from the customer's bank account to your company's account, create a direct debit posting that contains information about bank accounts, the sales invoices that are affected, and the direct debit payment instruction. You then export an XML file based on the direct debit entry and send it to your bank for processing.
Note
SEPA direct debits can only be executed for documents with the currency EURO.
Before you can create an XML file with the payment data, you must perform the following setup steps:
Set up the bank account to which the collected amounts from your customers should be posted.
For more information, see Setup, Bank Account Setup.
Set up the payment method of the customer.
Set up the direct debit mandate that corresponds to your agreement with the customer to direct debit his payments within a certain period of time.
Fields
The following fields are included on the SEPA Direct Debit Mandates page.
ID
Specifies the unique ID of the direct debit mandate.
If you want to use the mandate ID for multiple bank accounts of different customers, enter the mandate ID and extend it with a separator and a freely definable string (e.g., numbers - LAST00001_1). For this, a mandate must first be created as a reference.
The separator is stored in the NCP Exports setup under SEPA Direct Debit Mandate ID Separator.
NCP Direct Debit Type
Specifies that the mandate is a CORE - basic direct debit, a B2B - company direct debit or a COR1 - basic direct debit with reduced processing time.
NCP Final DD Created
Specifies when the final direct debit was created for this mandate.
NCP First Direct Debit Created
Specifies that the first direct debit was created for this mandate.
NCP Mandate Form Printed
Specifies that the mandate form has been printed for this mandate. This field is set if you called the action Print Mandate Form and you printed the form.
Valid From
Specifies the date when the direct-debit mandate starts.
Valid To
Specifies the date when the direct-debit mandate ends.
NCP Payment Entries Exists
Shows the number of payment entries (regardless of the direct debit sequence) for the mandate.
For more information, see Archive, Exports, Payment Entries.
Customer Bank Account Code
Specifies customer bank account that the direct-debit mandate is activated for. The field is filled automatically.
Date of Signature
Specifies when the direct-debit mandate was signed by the customer.
Payment Type
Specify that the agreement covers several (recurring) or a single (one-off) direct debit.
Blocked
Specifies that the mandate is locked. This is set if, for example, a customer has been declared as insolvent.
Closed
Specifies that the direct-debit mandate is closed, for example because the date in the Valid To field has been exceeded.
Actions
Print Mandate Form
Use this action to print a form that you can then hand over to the customer. It is used to confirm the agreement with the customer to collect his payments within a certain period of time by signing it.
For more information, see Direct Debit Mandate Form.
Before NAVAX Payment Imports can be used, its basic functionality must be set up. In the window NCP Imports Setup the general settings and defaults are defined.
Note
The import must be set up separately for each company.
Note
You can skip individual steps at any time and complete the configuration at a later time in the NCP Imports Setup.
Fields, Page Import Settings
In the area Import you define which files are allowed for import and where the data should be transferred to.
camt.052 - Account Report
Specifies if and where the camt.052 - Account Report files can be imported and transferred
The following options are available:
empty: no import possible, in the import selection dialog the option, camt.52 - Account Report, does not appear
Import Only: it is possible to import a camt.52 file, but not to transfer it to an journal or bank account reconciliation
camt.53 - Statement
Indicates whether, and if so, where the camt.053 - Statement files can be imported and transferred.
The following options are available:
empty: no import possible, in the import selection dialog the option, camt.53 - Statement, does not appear.
Import Only: it is possible to import a camt.53 file, but not to transfer it to an journal or to the bank account reconciliation.
General Journal: it is possible to import a camt.53 file and transfer the imported lines to a General Journal.
Bank Acc. Reconciliation: the import of a camt.53 file is possible and the imported lines can be transferred to the bank account reconciliation
camt.54 - Debit Credit Notification
Specifies if and where the camt.054 - return data files can be imported and transferred.
The following options are available:
empty: no import possible, in the import selection dialog the option, camt.54 - Debit Credit Notification, does not appear.
Import Only: it is possible to import a camt.54 file, but not to transfer it to an journal or to the bank account reconciliation.
General Journal: it is possible to import a camt.54 file and transfer the imported lines to a General Journal.
Custom
Specifies if and where the Custom Files can be imported and transferred.
The following options are available:
empty: no import possible, in the import selection dialog the option, Benutzerdefiniert, does not appear.
General Journal: the import of a custom file is possible and the imported lines can be transferred to a General Journal.
The section Transfer determines the field values in the Journal or the Bank Account Reconciliation. In addition, you can specify here whether Charges should also be transferred or considered.
Trans. Posting Date
Specifies the value with which the entry date is to be filled when it is transferred to an general journal or to the bank account reconciliation.
The following options are available:
Posting Date/Value Date (Import)
Value Date/Posting Date (Import)
Posting Date (Import)
Value Date (Import)
Workdate
Trans. Document Date
Indicates if and with what value the document date should be filled when it is transferred to an General Journal or to the Bank Account Reconciliation.
The following options are available:
Posting Date/Value Date (Import)
Value Date/Posting Date (Import)
Posting Date (Import)
Value Date (Import)
Arbeitsdatum
Trans. Document No.
Specifies if the document number is to be filled in, and if so, with what value when it is transferred to an General Journal or to the Bank Account Reconciliation.
The following options are available:
Statement No.
Trans. External Document No.
Specifies if the External Document No. should be filled, and if so, with which value when it is transferred to an General Journal or to the Bank Account Reconciliation.
The following options are available:
Statement No.
Trans. Description
Specifies if the description is to be filled in, and if so, with which value when it is transferred to an General Journal or to the Bank Account Reconciliation.
The following options are available:
Remittance Info.
Transaction Description
External Account Holder
Trans. Amount
Specifies if the amount should be filled up with a value when it is transferred to an General Journal or to the Bank Account Reconciliation.
The following options are available:
Order Amount/Transaction Amount: Initial amount, if available, otherwise transaction amount
Transaction Amount
Trans. Charges
Specifies if the expenses should also be transferred to the General Journal or to the Bank Account Reconciliation.
Source Code from Import
Shows the settings in the source code setup.
You can click on the AssistEdit button and select an source code in the Trans. Payment Import to Gen. Jnl page.
Source Code from Bank Acc. Reconciliation
Shows the settings in the origin code setup.
Fields, Page Matching/Application Settings
The setting in the section Matching/Application determine the behavior of the matching or application suggestion.
For more information, see Tasks, Imports, Applying Open Entries.
Document No. Alloc. Accuracy
This can have an impact on automatic assignment of the customer ledger entry.
The following options are available:
Sharp (Identical Value) The system searches for the exact value of the document number of the customer ledger entry.
Fuzzy (Incl. values without special characters) The system first searches for the exact value of the customer ledger entry document number. If nothing is found, the system then searches for the document number without special characters.
Fixed Account Allocations Exists
Indicates that fixed allocations to accounts exist.
Note
This indicator is set automatically if allocations exist.
Specifies that the account allocations are to be retained during automatic matching, even if no documents are found for matching.
Show Analysis Window
Specifies whether a window containing detailed information about the matching should pop up. If you close the window with OK, the suggestion is copied to the journal line or the bank account reconciliation.
Note
Use this indicator for information purposes only. To perform a application, this indicator must be deactivated.
If you specify a value here, the automatic bank account reconciliation lines will only suggest bank account entries for which the posting date does not differ further from the transaction date.
Check Application Amount
Specifies whether the action Import Suggest Application in the journal should only suggest open journal lines where the remaining amount matches the amount from the import.
With the fields Application Tolerance % and Max. Application Tolerance Amount you can specify a tolerance for this check.
Application Tolerance %
Tolerance for the application in percent.
The amount of the open entry can differ from the imported amount by the percentage in the field Application Tolerance %, but at most by the amount in the field Max. Application Tolerance Amount.
Seite Import Codes Download
The payments import codes are references to various types of transactions. Depending on the imported file format, different code fields are filled in.
By default, the table of import codes is empty. You can import the latest import codes via download or import codes from a file.
Using the action Download Import Codes the codes and their description can be downloaded or updated.
For more information, see Setup, Imports, Imports Codes.
Finish setup
If you click on Finish the settings will be saved in the table NCP Imports Setup.
To make optimal use of the NAVAX Payment Import, a basic setup is required first. In the NCP Imports Setup window, you configure all central settings and specifications necessary for importing and further processing payment transaction data.
Fields, General
The section General contains the general settings for the import.
LCY Code
Shows the currency code for the local currency. This value has been stored in the General Ledger Setup.
ISO LCY Code
Specifies the ISO LCY Code, this will be pre-filled with EUR when LCY Code is set to EUR or EURO in the General Ledger Setup and the field has not yet been configured.
Fields, Import
In the Import section, you define which files are allowed to be imported and where the data should be transferred to.
camt.052 - Account Report
Specifies if and where the camt.052 - Account Report files can be imported and transferred
The following options are available:
empty: no import possible, in the import selection dialog the option, camt.52 - Account Report, does not appear
Import Only: it is possible to import a camt.52 file, but not to transfer it to an journal or bank account reconciliation
camt.53 - Statement
Indicates whether, and if so, where the camt.053 - Statement files can be imported and transferred.
The following options are available:
empty: no import possible, in the import selection dialog the option, camt.53 - Statement, does not appear.
Import Only: it is possible to import a camt.53 file, but not to transfer it to a journal or to the bank account reconciliation.
General Journal: it is possible to import a camt.53 file and transfer the imported lines to a General Journal.
Bank Acc. Reconciliation: the import of a camt.53 file is possible and the imported lines can be transferred to the bank account reconciliation
camt.54 - Debit Credit Notification
Specifies if and where the camt.054 - return data files can be imported and transferred.
The following options are available:
empty: no import possible, in the import selection dialog the option, camt.54 - Debit Credit Notification, does not appear.
Import Only: it is possible to import a camt.54 file, but not to transfer it to a journal or to the bank account reconciliation.
General Journal: it is possible to import a camt.54 file and transfer the imported lines to a General Journal.
MT940 - Statement
Specifies if and where the MT940 - Statement data files can be imported and transferred.
The following options are available:
empty: no import possible, in the import selection dialog the option, MT940 - Statement, does not appear.
Import Only: it is possible to import a MT940 file, but not to transfer it to a journal or to the bank account reconciliation.
General Journal: it is possible to import a MT940 file and transfer the imported lines to a General Journal.
Custom
Specifies if and where the Custom Files can be imported and transferred.
The following options are available:
empty: no import possible, in the import selection dialog the option, Benutzerdefiniert, does not appear.
General Journal: the import of a custom file is possible and the imported lines can be transferred to a General Journal.
The section Transfer determines the field values in the Journal or the Bank Account Reconciliation. In addition, you can specify here whether Charges should also be transferred or considered.
For more information, see Tasks, Imports, Applying Open Entries.
Trans. Posting Date
Specifies the value with which the entry date is to be filled when it is transferred to a general journal or to the bank account reconciliation.
The following options are available:
Posting Date/Value Date (Import)
Value Date/Posting Date (Import)
Posting Date (Import)
Value Date (Import)
Workdate
Trans. Document Date
Indicates if and with what value the document date should be filled when it is transferred to a General Journal or to the Bank Account Reconciliation.
The following options are available:
Posting Date/Value Date (Import)
Value Date/Posting Date (Import)
Posting Date (Import)
Value Date (Import)
Arbeitsdatum
Trans. Document No.
Specifies if the document number is to be filled in, and if so, with what value when it is transferred to a General Journal or to the Bank Account Reconciliation.
The following options are available:
Statement No.
Trans. External Document No.
Specifies if the External Document No. should be filled, and if so, with which value when it is transferred to a General Journal or to the Bank Account Reconciliation.
The following options are available:
Statement No.
Payment Reference
Trans. Description
Specifies if the description is to be filled in, and if so, with which value when it is transferred to a General Journal or to the Bank Account Reconciliation.
The following options are available:
Remittance Info.
Transaction Description
External Account Holder
Payment Reference
Payment Reference/Remittance Info.
Trans. Amount
Specifies if the amount should be filled up with a value when it is transferred to a General Journal or to the Bank Account Reconciliation.
The following options are available:
Order Amount/Transaction Amount: Initial amount, if available, otherwise transaction amount
Transaction Amount
Trans. Charges
Specifies if the expenses should also be transferred to the General Journal or to the Bank Account Reconciliation.
Source Code from Import
Shows the settings in the source code setup.
You can click on the AssistEdit button and select a source code in the Trans. Payment Import to Gen. Jnl page.
Source Code from Bank Acc. Reconciliation
Shows the settings in the origin code setup.
Fields, Matching/Application
The setting in the section Matching/Application determine the behavior of the matching or application suggestion.
For more information, see Tasks, Imports, Applying Open Entries.
Fixed Account Allocations Exists
Indicates that fixed allocations to accounts exist.
Note
This indicator is set automatically if allocations exist.
Use the AssistEdit function to navigate to the list of Fixed Account Allocations.
This can have an impact on automatic application of the customer ledger entry.
The following options are available:
Sharp (Identical Value) The system searches for the exact value of the document number of the customer ledger entry.
Fuzzy (Incl. values without special characters) The system first searches for the exact value of the customer ledger entry document number. If nothing is found, the system then searches for the document number without special characters.
Separators Ext. Document No.
Shows the separators that will be used for automatic application in the journals for the external document no. field. The external document no. is then subdivided for the search to achieve a better result. If the field remains empty, the external document no. is used as entered for the search.
Caution
This setting can cause incorrect suggestions and should be used with caution.
Excluded Characters Doc. No. Search
Specifies the characters to be excluded during automatic matching in the journal for the Document No. field.
Caution
This setting can cause incorrect suggestions and should be used with caution.
Keep Account Allocations
Specifies that the account allocations should be kept during automatic matching, even if no documents are found for the matching.
Caution
This setting can cause incorrect suggestions and should be used with caution.
Tip
If you notice that some allocations are not correct, enabling the analysis window can help identify the cause.
Show Analysis Window
Specifies whether a window containing detailed information about the matching should pop up. If you close the window with OK, the suggestion is copied to the journal line or the bank account reconciliation.
Note
Use this indicator for information purposes only. To perform an application, this indicator must be deactivated.
If you specify a value here, the automatic bank account reconciliation lines will only suggest bank account entries for which the posting date does not differ further from the transaction date.
Check Application Amount
Specifies whether the action Import Suggest Application in the journal should only suggest open journal lines where the remaining amount matches the amount from the import.
With the fields Application Tolerance % and Max. Application Tolerance Amount you can specify a tolerance for this check.
Application Tolerance %
Tolerance for the application in percent.
The amount of the open entry can differ from the imported amount by the percentage in the field Application Tolerance %, but at most by the amount in the field Max. Application Tolerance Amount.
History, Fields
Delete Data Date Calculation
This allows you to specify the period for deleting the data via NCP Exports - Delete Data. Only data that is at least 6 months old can be deleted. If the field is empty, the minimum period is used.
Last Date Archived Files deleted
Shows the date on which NCP Exports - Delete Data were last executed.
Archived Files deleted until
Specifies the date until which archived files were deleted from the clearing entries.
In the window NCP Bank Account Setup all bank accounts that are required for NAVAX Payment are stored or managed.
For more information, see Setup, General, Bank Account Setup.
Bank Codes
In this window, the Branch Codes and the SWIFT Codes of the banks are defined or managed.
For more information, see Setup, General, Bank Codes.
Setup, Actions
Import Codes
Using this action, the window NCP Import Codes can be opened. When a file is imported, different code fields are filled, depending on the imported file format. Here you can enter a more detailed description for these code fields. Using the action Download the codes and their description can be downloaded or updated.
For more information, see Setup, Imports, Imports Codes.
This allows you to specify the period for deleting the data via NCP Exports - Delete Data. Only data that is at least 6 months old can be deleted. If the field is empty, the minimum period is used.
Last Date Archived Files deleted
Shows the date on which NCP Export - Delete Data were last executed.
Archived Files deleted until
Specifies the date until which archived files were deleted from the clearing entries.
System, Actions
Delete Data
By creating a payment file, an entry is made in the clearing entries. The created payment file is also saved there. If necessary, you can use this action to remove the archived payment files from the clearing items.
Opens the NAVAX License Management which displays the current license status of the NAVAX extensions.
For more information, see Appendix, NAVAX License Management.
The NCP Import Codes are references to various types of transactions. Different code fields are filled depending on the imported file format.
The table of Import Codes is empty by default. You can import the latest Import Codes via download or import the codes from a file.
Go to NCP Payment > Setup > Imports > Setup > Import Codes.
You have the following options:
Click on Download to download the latest import codes.
Click Import to import the file NCP1600_ImportCodes.xml
Click Export to export all records to one file. (You do not have the option to select individual records only).
If import codes already exist, you can choose (during download and import) to create new records only or to overwrite existing records as well.
After the download/import the import codes are displayed:
Fields
Type
Specifies the type of the code.
The following options are available:
SWIFT Transaction
Transaction
Domain Transaction
Family Transaction
Sub-Family Transaction
Return Reason
Code
Specifies a code for the import code. The code must be unique - a code may not be used twice in a table. You can set up as many import codes as you like.
Description
Description of the import code.
Actions, Setup
Download
The Download action can be used to download or update the codes.
Download - Save as
With the action Download - Save as the codes can be downloaded and saved. No changes in the database will be made.
Import
With the Import action, the codes can be imported from a file. These can be codes from older systems that you have already configured and exported using the export function.
Export
With the Export action, the codes can be exported to a file. This exported file can be used for import into other databases.
In the NAVAX Dropzone Setup page the settings and defaults for the different Dropzones are defined.
The NAVAX Dropzone can be used by various extensions. These extensions automatically add further options in the Dropzone field. For example, the NAVAX extension NAVAX Drag & Drop Document Attachments adds the option Document Attachments and the NAVAX extension Finmatics Autonomous Accounting adds the option Incoming Finmatics Documents.
Note
NAVAX Dropzones are suitable for upload sizes up to 120000 KB (120 MB).
If you change the settings, the page that displays the Dropzone may need to be reloaded or refreshed for the new settings to take effect.
Fields
Dropzone
Specifies for which Dropzone the settings apply.
The settings of the Default dropzone apply to all dropzones that do not have their own settings.
Max. Upload Size (KB)
Specifies the maximum total size of all files in KB that may be uploaded at the same time.
The default value that is suggested is 5000 KB (5 MB). The maximum value that can be entered is 120000 KB (120 MB).
Note
When you try to upload large files, your system decides how big those files can be. If the file is larger than what your system allows, you will likely see an error message or the upload will not go through.
Max. No. of Files
Specifies the maximum number of files that may be uploaded at the same time.
Allowed File Extensions
Specifies which file extensions may be uploaded. If the field is empty, all extensions are allowed. If multiple extensions are allowed, they can be specified separated by a comma. Example: pdf,doc*,xls*,png,txt,zip
Tip
If you specify 'doc', only files with .doc file extension may be uploaded. If 'doc*' is specified, files with file extension .docx, .docm etc. may also be uploaded.
Extract zip Files
Specifies whether *.zip files should be automatically decompressed or unzipped during upload.
Timeout (Milliseconds)
Specifies the length of time in milliseconds that a file may take to upload before the process terminates with an error. If you don't set a duration, then a default value is used. The default value is currently 100000 ms (100 seconds).
If a bank account is determined when importing a payment file (Import Payment File), the system first checks whether fixed account allocations exist. If there are any, this bank account is used.
On this page you will find information about setting up these Fixed Account Allocations.
Fields
Search Order No.
Order in which the rows are searched when determining the bank account.
The first line matching the condition will be used.
If an account number is searched for (e.g. with the option Search for = Account No. via Ext. Bank Account) and a unique customer no. or vendor no. is found, this will be applied as a filter to the open entries for any subsequent lines.
Note
You can enter the lines in any order. The next time you open the window, the list is automatically sorted by number.
Search for
Text sequence or value to be searched for in the import file.
Search in
Specifies the area in the import where the search for value is located or where to search:
The following options are available:
Remittance Info
Payment Reference
Transaction Reference (Ordering Party Reference)
Check No.
Ext. Account Holder
Account Type
Specify the account type for the assignment.
The following options are available:
General Ledger
Vendor
Customer
Bank Account
Account No.
Select the account no. from your chart of accounts to be used for the mapping.
Actions
Dimensionen
The Dimensions action allows you to set specific dimensions for fixed account allocations for NAVAX Payment Imports. Dimensions are data categories that can be used for analysis and reporting. They help to track and categorize transactions more accurately.
For more information, see Work with dimensions
This section explains how to set up and use NAVAX konfipay Connector Export/Import in Microsoft Dynamics 365 Business Central. NAVAX konfipay Connector Export/Import enables you to automate payment processes and securely exchange banking data.
With the connector, you can transfer SEPA payments directly from Business Central to konfipay - Online Payment Service. There, the orders are checked and forwarded to the respective banks. At the same time, account information such as balances and transactions are regularly and automatically synchronized (optional) and are always available in Business Central.
This saves you time, avoids errors from manual transfers, and gives you full control over your payment processes.
For bank communication, the connector uses EBICS (Electronic Banking Internet Communication Standard). Depending on the account setup, transmission is handled either through your own EBICS contact or via a service data center connection.
In this setup, EBICS is only the communication layer and not an XML schema for payment files.
Step-by-Step Guide: Setting up konfipay Connector
Check Prerequisites
Please note the role split: NAVAX konfipay Connector is the standalone app for the technical connection to windata GmbH & Co.KG; windata handles transmission to banks and retrieval of account information.
Install the NAVAX konfipay Connector Export/Import extension in your Business Central environment.
Check the technical requirements and firewall permissions.
For more information, see Appendix, Installation Notes.
Set up konfipay Connector
In Business Central, go to the konfipay Connector Setup page.
You can access this page via What would you like to do next? or via Settings, Advanced Settings, Service Connections.
Configure General Settings
Select the desired environment (Test/Production environment).
Enter the API access key (provided by konfipay).
For more information, see API Key
Tip
You can use the AssistEdit function next to the Portal Address field to open the portal URL and obtain the API access key.
Specify the portal address, which can be selected from a dropdown (e.g. https://portal.konfipay.de).
Adjust the timeout if necessary.
The timeout specifies how long to wait for a response from the server when making a request.
Activate the service once all data has been entered correctly.
Configure Data Update and History (optional)
Set up job queues for account balances, payment status entries, and account transaction entries.
Define whether and how log entries should be saved and deleted.
Check Connection (optional)
Use the Check Connection action to check the configuration.
Check Account Data (optional)
Check UUID and customer number (these are displayed after a successful connection test).
Set up Bank Accounts for Use with konfipay
Open the NCP Bank Account Setup page and set up all bank accounts required for payment transactions or for use with konfipay.
For more information, see Setup, General, Bank Account Setup.
Note
You can find more details about each field in the tables further down on this page.
General, Fields
Environment
Specifies whether the konfipay Connector production environment or the konfipay Connector test environment should be used.
Real Data Permission
Indicates whether data may be sent from the current Business Central environment to the konfipay Connector production environment. This additional security level prevents test data from being accidentally interpreted as real data. Click on the field to manage the Permissions.
Connection, Fields
konfipay offers a REST compliant web service as a communication interface, which can be integrated by Microsoft Dynamics Business Central to automate business processes. The received payment transactions in form of SEPA XML files, are first checked and then stored by konfipay prior to acceptance. After submission, the payment transactions are transferred to the respective data centers of the banking institutions at regular intervals. In addition, the konfipay account information database is automatically updated at equally regular intervals. These can then be retrieved via the web service. The data is retained by konfipay, i.e. you can retrieve it at any time if required.
API Key
Specifies the access key required for communication between the konfipay Connector and the konfipay API.
Portal Address
Specifies the base URL of the konfipay portal. This is required for calling the API interfaces.
Tip
If you click on the button next to the field with the three dots, you will be taken to the respective portal.
Timeout (Milliseconds)
Specifies the length of time in milliseconds that the service is allowed to use, before aborting with an error. If you don't set a duration, then a default value is used. The default value is currently 100000 ms (100 seconds).
konfipay Connector Active
Specifies whether konfipay is enabled and ready for submission. If you want to use konfipay for direct communication with your bank, this option must be enabled.
Account, Fields
RID
Shows the konfipay UUID. This corresponds to the UUID field in the konfipay portal configuration.
Customer No.
Shows the konfipay Customer No.. This corresponds to the Customer No. field in the konfipay portal configuration.
Financial Institutions supported by konfipay
Opens a website with a list of credit institutions that are already connected to konfipay.
Data Update, Fields
Bank Acc. Amounts
Shows whether a job queue is set up to automatically synchronize the bank account amounts from konfipay. If a job queue exists, its current status is displayed.
Click on the field to set up, manage or view the Job Queue.
Payment Status Entries
Indicates whether a job queue is set up to automatically synchronize status entries from konfipay. If a job queue exists, its current status is displayed.
Click on the field to set up, manage or view the Job Queue.
Account Transaction Entries
Shows whether a job queue has been set up to automatically synchronize the account transaction items via the konfipay Connector. If a job queue exists, its current status is shown.
Click on the field to set up, manage or show the task queue.
History, Fields
Delete Log Entries Date Calculation
Specifies the time period for deleting log entries. If the field is empty, the period is assumed to be 1M (1 month).
Log Service Requests
Specifies whether to store the data sent to the service.
Log Service Responses
Specifies whether the data returned by the service should be stored.
Actions
Check Connection
Tests the connection to konfipay with the specified settings.
Service Log
Opens the list of konfipay log entries.
Web Frontend
The action opens a new browser window with the selected konfipay portal. Here you can set up konfipay directly.
Setup, Actions
Bank Account Setup
In the window ''Bank Account Setup'', all bank accounts that are required for payment transactions are stored or managed.
Import Setup
Before the NCPI Payment Import can be used, its basic functionality must be set up. In the NAVAX Imports Setup window, you define the general settings and defaults.
Export Setup
Before the NAVAX Payment Exports can be used, its basic functionality must be set up. In the NCP Exports Setup window, you define the general settings and defaults.
Bank Codes
This action opens the page where bank data can be managed or set up per SWIFT code and bank branch number.
Currency Exchange Rate Services
View or edit the setup of the services that are set up to fetch updated currency exchange rates when you choose the Update Exchange Rates action.
System, Actions
NAVAX License Management
Opens the NAVAX License Management which displays the current license status of the NAVAX extensions.
Docs / App / NAVAX Payment / Setup / konfipay Connector Real Data Permissions
Real Data Permissions add an additional level of security to actions and processes. This is to prevent test data from being accidentally interpreted as real data. Particularly critical actions and processes (e.g. sending data to an external service) can therefore only be executed if a real data permission has been granted for the current environment.
Practical example
You create a new test database in an on-premises environment by copying the real database, which contains the fully set up fiskaltrust extension. The service of the fiskaltrust extension has the function to sign documents that are subject to the cash register obligation and to protect them against manipulation. Without an additional security level, data from the test database would also be forwarded to fiskaltrust, where it would be interpreted as real data and reported to the tax office. However, this is prevented by the real data permissions function.
Manage Real Data Permissions
The real data permissions of an extension can be viewed or managed via the setup page of the extension in the system area. In the setup of the real data permissions, an environment is defined by the company name, the database name and the server name.
Fields
Company Name
Specifies the company name of the permitted environment.
Database Name
Specifies the database name of the permitted environment.
Server Name
Specifies the server name of the permitted environment.
Current Environment
Specifies whether the permitted environment is the current environment.
Date and Time
Specifies the date and time when the environment was permitted.
User ID
Specifies the ID of the user who permitted the environment.
User Name
Specifies the name of the User ID.
Actions
Permit Current Environment
Grants a real data permission for the current environment.
Warning
Do not permit your current environment unless you are absolutely sure.
Once the environment is permitted, the secured action or process can be called or executed by all users. Although real data permissions can be deleted or removed at any time, this does not undo actions that have already been performed.
To enable automatic data updates with the NAVAX Konfipay Connector Export/Import in Microsoft Dynamics 365 Business Central, you must set up the job queue correctly.
The job queue allows you to perform regular data updates without manual intervention. This is especially useful for synchronizing the balances of individual bank accounts, the payment status of transferred transactions, and account transactions.
This guide describes the steps to configure the job queue for data updates using the NAVAX Konfipay Connector setup.
Step-by-Step Guide: Setting up Automatic Data Updates using the Konfipay Connector
Here’s how to set up automatic data updates with the NAVAX Konfipay Connector in Microsoft Dynamics 365 Business Central:
Set up Konfipay Connector
In Business Central, go to the Konfipay Connector Setup page.
You can access this page either via What would you like to do next? or via Settings, Advanced Settings, Service Connections.
For more information, see Setup, konfipay Connector, konfipay Connector Setup.
Configure Data Update
To activate updates for Account Balances, Account Transaction Entries, or Payment Status Entries, click on the value Not Set Up in one of the corresponding fields. A dialog box will appear indicating that no job queue is set up yet. Confirm the message with Yes, and a job queue with default values will be created automatically and the window will close. The field value changes to Ready and the data update is activated.
If you click again on the value in one of the fields Account Balances, Account Transaction Entries, or Payment Status Entries, the Job Queue Entries page will open. There you can view and, if necessary, adjust the settings of the respective job queue. Select the desired entry to open the detail view.
Monitoring and Troubleshooting
Regularly check the job queue logs for errors.
If you encounter problems, check the configuration and credentials in the Konfipay Connector setup. You can use the Service Log for this purpose; all service requests are logged here.
For more information, see Archive, konfipay Connector, Service Log.
NAVAX konfipay Connector Export/Import operates exclusively in conjunction with a validated konfipay - Online Payment Service account. Please note that additional costs will be incurred when using konfipay.
How do I request my konfipay - Online Payment Service access?
To create a new account with konfipay - Online Payment Service, it is necessary for you to fill out the Contact form on the konfipay - Online Payment Service website. konfipay - Online Payment Service will promptly get in touch with you, providing your account details and guiding you through the initial steps in the interface.
Docs / App / NAVAX Payment / Tasks / Exports Make Payment or Direct Debit Suggestions
NAVAX Payment Exports allows you to create payments to vendors via a SEPA payment file from the payment journal. Similarly, you can create a payment file for direct debits to customers via the cash receipt journal.
In both cases, the payment suggestion assists in automatically identifying and suggesting open entries, which can then be exported into a SEPA payment file.
For more information, see Tasks, Exports, Create Payment File.
You can use various options to customize the suggestions according to your requirements. These options are described in detail later in this chapter.
This section describes how to create a payment suggestion step by step. The guide walks you through the necessary steps to identify open entries, set the desired options, and transfer the results to the journal.
Follow the steps below to create a payment suggestion:
Select Journal
Select the desired journal to open it.
Open Payment Suggestion
Click on the action Vendor Payment Suggestion in the NCP Exports group to suggest payments to vendors, or Employee Payment Suggestion to suggest payments to employees.
Start Payment Suggestion
The page NCP Exports Payment Suggestion - Vendors or NCP Exports Payment Suggestion - Employees opens.
Adjust Options
Enter the desired options. A description of the options can be found later in the chapter.
Confirm Suggestion
Click OK. The open entries are identified and written to the journal.
Step-by-Step Instructions: Creating Direct Debit Suggestion
This section describes how to create a direct debit suggestion step by step. The guide walks you through the necessary steps to identify open entries, set the desired options, and transfer the results to the journal.
Follow the steps below to create a direct debit suggestion:
Select Journal
Select the desired journal to open it.
Open Direct Debit Suggestion
Click on the action Customer Direct Debit Suggestion in the NCP Exports group to suggest direct debits for your customers.
Start Suggestion
The page NCP Exports Direct Debit Suggestion - Customers opens.
Adjust Options
Enter the desired options. A description of the options can be found later in the chapter.
Confirm Suggestions
Click OK. The open entries are identified and written to the journal.
Note
In the payment journal, you initiate payments to vendors and customers (e.g., credit memos).
In the cash receipt journal, you initiate the collection of payments from customers.
The options determine how the open entries for the payment suggestion are identified, how they are summarized by customers or vendors, and which data is written to the journal lines.
The following section describes the available options:
Find Payments, Options
Last Payment Date
Specifies the latest payment date up to which open entries are included in the payment suggestion. Only entries whose due date or cash discount date (if the Find Cash Discount field is activated) is on or before this date and where the On Hold field is empty are considered. If the payment date is earlier than the current system date, a warning is issued.
Find Payment Discounts
Specifies that the payment discount date is considered when searching for possible payments. Instead of the field Last Due Date, the field Last Cash Discount Date is used.
Last Payment Discount Date
If the Find Payment Discount checkbox is selected, this field (and not the Last Due Date field) is used for filtering by cash discount date. If the field is empty, the Last Due Date field is used to find the entries.
Use Vendor Priority
Indicates that the Priority field on the vendor card determines the order in which vendor ledger entries are suggested for payment.
Note
This field is only available for vendor payment suggestions and in payment journals. Payments are made until the amount in the Available Amount (LCY) field is exhausted.
Available Amount (LCY)
Specifies a maximum amount (in LCY) that is available for payments. Payments to vendors are made (sorted by vendor priority) until the amount is exhausted.
Note
This field is only available for vendor payment suggestions and in payment journals.
Include Reducing Entries
Specifies how reducing entries, such as credit memos, are handled in the payment suggestion.
The following options are available:
Up tp Due Date: Reducing entries are considered up to the selected due date.
Regardless Due Date: Reducing entries are considered regardless of the due date.
Exclude: Reducing entries are not considered in the payment suggestion.
Incl. Customers with Credit - Balance
Indicates that vendors with a credit balance or customers with a credit balance are included in the payment suggestion. Normally, these would not appear in the payment suggestion. However, with this additional option, they can be explicitly included.
Summarize Results, Options
Summarize per Vendor/Customer
Indicates that the lines are summarized per vendor/customer (and currency).
Note
Lines cannot be summarized if, for example, different bank accounts (Preferred Bank Account Code), external document numbers, or payment references are specified. In such cases, a separate line is created and exported for each entry.
By Dimension
Select the dimensions by which you want to group the payment suggestions. It is possible to create a line for each unique combination of
Customer/Vendor
Combination of dimension values
and Currency
Note
This field is only available if the Summarize per Vendor or Summarize per Customer checkbox is selected.
Fill in Journal Lines, Options
Posting Date
Specifies the posting date for the journal lines. By default, the working date is entered, but you can change it. This field is transferred to the journal lines.
Consider Payment Discount Tolerance
If this checkbox is selected, the Payment Discount Tolerance Date of the entries is taken into account when calculating the balance, provided that the Block Payment Tolerance field is not set on the vendor/customer card. If the Find Cash Discount field is also selected, the search for possible (future) payments will filter not only by the payment discount date but also by the payment discount tolerance date.
Starting Document No.
Specifies the next available number in the number series for the journal batch associated with these journals. When you execute the payment suggestion, this is the document number that appears in the first line of the journal. You can also fill in this field manually.
Note
If the New Document No. per Line checkbox is not selected, this number is carried over to every line in the journal.
Tip
You can set up the number series on the General Journal Names page. This eliminates the need to manually enter document numbers, saving time and reducing errors.
New Doc. No. per Line
Specifies that the journal lines are numbered sequentially, starting from the number in the Starting Document No. field.
Gegenkontoart
Specifies the type of balancing account to which the posting should be made. It should either be a bank account or a general ledger account in connection with the NAVAX payment transactions.
Note
The value is derived from the settings for the journal and pre-filled. This field is carried over to all journal lines.
Bal. Account No.
Specifies the balancing account number that payments are posted to.
You can enter the account number or select it from a drop-down list.
Note
The value is derived from the settings for the journal and pre-filled. This field is carried over to all journal lines.
Zahlungsart
Payment type of the journal lines.
The following options are available:
Direct Debit Suggestion (only for cash receipt journals)
Non-SEPA Transfer
SEPA Transfer
SEPA Direct Debit (only for cash receipt journals)
Note
If the field is left empty, you must specify the payment type manually for each line in the journal.
For the payment types SEPA Credit Transfer and SEPA Direct Debit, only lines with the ISO currency code "empty" or "EUR" are considered in the payment suggestion.
If you select the option Credit Transfer Suggestion, the system attempts to create a transfer in the following order:
SEPA Credit Transfer (if the rules for external bank account lookup are met (IBAN, Country/Region Code, SWIFT Code available) and the own bank account contains a SEPA Credit Transfer schema.
For more information, see Bank Account Setup.
Non-SEPA Credit Transfer, if the own bank account contains a Non-SEPA Credit Transfer schema.
If you select the option Direct Debit Suggestion, existing transactions of the customer with this currency code are searched. The system attempts to create a Direct Debit in the following order:
SEPA Direct Debit (if the rules for external bank account lookup are met and the own bank account contains a SEPA Direct Debit schema.
For more information, see Bank Account Setup.
If a transaction is found, the payment type and the external bank account code of the transaction are suggested. If no transaction is found, the system attempts to determine the external bank account and payment type based on the rules for external bank account lookup.
The external bank account lookup, especially with the option Last Transaction/Main Bank Connection, in combination with Direct Debit/Transfer Suggestion, should provide optimal results in most cases.
For more information, see NCP Exports Setup.
Foreign Currency Filter
Indicates that entries with ISO currency codes not equal to "empty" or "EUR" are filtered. For the payment type bank transfer suggestion and non-SEPA bank transfer, it is possible to set this field.
Vendor/Customer
In this filter area, you can narrow down the results of the payment suggestion by applying filters to the Customer/Vendor tables.
Tip
For example, if you want to create a payment suggestion for credit balances with your customers, you can set the filter on the customer card and select only those customers with credit balances.
To do this, add the field Balance to the filter fields and set the filter to -10000..-1.
In this filter area, you can narrow down the results of the payment suggestion by applying filters to the Vendor/Customer Ledger Entry tables.
For more information, see Sorting, Searching, and Filtering
Notes on Creating a Payment Suggestion
The following notes help you avoid typical pitfalls when working with payment suggestions.
Summarization and payment references
If the option Copy Invoice No. To Payment Reference is activated in the Purchases & Payables Setup, the invoice number is automatically transferred to the payment reference. As a result, lines in the payment suggestion cannot be summarized if Summarize per Vendor/Customer or By Dimension is activated, because the payment references vary per invoice.
Summarization is not always possible
Even with Summarize per Vendor/Customer enabled, lines cannot be summarized if, for example, different bank accounts (Preferred Bank Account Code), external document numbers, or payment references are involved.
Understand date logic (Due date vs. discount date)
If Find Payment Discounts is enabled, entries are filtered by Last Payment Discount Date (if filled); otherwise Last Payment Date is used. A date that is set too narrowly is a common reason for “no results”.
On Hold can exclude entries
Entries are only considered if the On Hold field is empty. Check this field if specific entries are not suggested.
Payment type and currency
For SEPA Transfer and SEPA Direct Debit, only lines with an empty ISO currency code or EUR are considered. For other currencies, use Non-SEPA Transfer and review the Foreign Currency Filter.
Vendor priority and available amount (LCY)
If Use Vendor Priority is enabled, payments are suggested only until the Available Amount (LCY) is exhausted. Missing entries may simply indicate that the limit has already been reached.
Reasons Why a Payment Suggestion Returns No Results
If the payment suggestion remains empty, it is usually caused by filters, date limits, or blocks. The following points cover the most common root causes.
No open entries available
There are no open vendor/customer ledger entries that match the criteria of the payment suggestion.
Date limits exclude entries
Last Payment Date, Last Payment Discount Date (when Find Payment Discounts is enabled) and Consider Payment Discount Tolerance can result in entries falling outside the selected period.
On Hold is set
Entries are not suggested when On Hold contains a value.
Filters are too restrictive
Filters such as vendor/customer, currency, amount, or posting date can exclude all entries. Also check filters in Vendor/Cust. Ledger Entry.
Blocks / restrictions
An entry may be excluded due to payment blocks, document blocks, workflow status, or similar restrictions.
Master data is blocked or incomplete
If the vendor/customer or the bank account details are blocked/inactive, entries may not be suggested.
Missing or invalid bank account details
The vendor/customer does not have a valid IBAN/BIC or bank account details suitable for the selected export/payment type.
Unsupported payment method
The payment method on the entry does not support electronic payment suggestions.
Entry already used in a journal / suggestion
The entry has already been transferred to a journal line or otherwise prepared for payment.
Available Amount (LCY) is exhausted
When Use Vendor Priority is enabled, entries are suggested only until Available Amount (LCY) is exhausted.
Currency or foreign currency filter
The Foreign Currency Filter can exclude entries with ISO currency codes other than empty/EUR. In addition, the selected payment type may not support the currency.
Wrong mode (vendor/customer)
Running a vendor suggestion where a customer suggestion is required (or vice versa) can result in no matching entries.
Missing mandate (SEPA Direct Debit)
For SEPA Direct Debit, only entries are suggested where a valid mandate exists.
This chapter describes how to create a payment file. Typically, the payment file must then be manually downloaded to be uploaded into your banking software.
Here, the NAVAX konfipay Connector Export extension can assist you by sending the file directly to your bank via the konfipay Online Payment Services.
For more information, see the chapter Automatic Sending via konfipay (optional).
Step-by-Step Instructions: Creating a Payment File
Make Basic Settings
Ensure that the basic settings have been configured in the NCP Exports Setup.
For more information, see Setup, Exports, Exports Setup.
Create Journal Lines
Use one of the following functions to create journal lines for exporting to the payment file:
Suggest Vendor Payments: Creates journal lines based on open vendor ledger entries.
Suggest Customer Payments: Creates journal lines based on open customer ledger entries.
Suggest Employee Payments: Creates journal lines for employee payments.
Alternatively, you can manually create the journal lines. In this case, ensure that a valid value is entered in the NCP Payment Type field to correctly generate the payment file.
For more information, see Tasks, Exports, Make Payment or Direct Debit Suggestions.
Check Lines
Check the field NCP Payment File Status:
🗸 Ready: The required data is complete, and the payment file can be created.
✗ Check: The data is incomplete. Add the missing information.
Clicking the button ✗ Check opens the page NCP Exports Payment Journal - Error Text, where possible errors are listed. This page can help you to quickly identify missing information.
Tip
The Payment Suggestion List can assist you in obtaining a clear overview of the suggested payment or direct debit lines. In the Payment Suggestion List, the individual journal lines and possible errors are listed, it can also be used for an approval process.
Important
In some scenarios, it is possible that the journal lines have the status ✗ Check, but a payment file can still be created.
Create Payment File
Proceed as follows:
In the journal, click the action Create Payment File.
On the page that opens, adjust the desired options.
You can adjust the following data, among others:
Execution Date: The date on which the bank should execute the payments.
Direct Debit Type and Execution Date for One-Time/First Direct Debit (only for SEPA direct debits).
Charges> (only available if the XML schema of the bank account supports fees).
Urgent Payment: Activate this option if you want to set the execution date to today.
Instant Payment: Activate this option if you want to create a payment file with transfers that are immediately credited to the recipient's bank account.
Show Summary: Activate this option if you want to see a summary of the created payment file. Here, the payment file can subsequently be exported or sent.
Send After Creation: Activate this option if you want to send the payment file to your bank via the konfipay Connector after creation.
Confirm Creation
Click the OK button to create the payment file.
The payment file is created, and the Payment Status field is automatically set to File Created.
Export Payment File (optional)
After creating the payment file, the page NCP Exports Payment File - Summary opens, provided it has been configured this way. Here, you can review the payment file and view the details.
Click the button Export Payment File to export the payment file. This starts the download of the file to your computer, allowing you to import it into your bank's software.
Note
The payment file is created in XML format and can usually be directly imported into the bank's software.
Alternatively, the payment file can also be sent directly to the bank if you have installed the NAVAX konfipay Connector Export extension. For more information, see the next chapter Automatic Sending via konfipay (optional).
Automatic Sending via konfipay (optional)
If you have installed and activated the NAVAX konfipay Connector Export extension in your Business Central, you can automatically send the payment file to your bank.
For more information, see Tasks, konfipay Connector Export, Send Payment File.
Options - Enable Urgent Payment (optional)
Activate the Urgent Payment flag to set the execution date to the current day.
Without activation, the date is set to the next day (or for SEPA direct debits with the direct debit type "CORE - Basic Direct Debit" to the current day + 2 days).
Options - Instant Payment (optional)
Activate the flag if you want to create a payment file with transfers that are immediately credited to the recipient's bank account.
A SEPA instant payment (also called Instant Payment) is a type of transfer where the amount is available in the recipient's account within a few seconds, 24/7, including weekends and holidays.
This option is available if the XML schema of the bank account supports instant payments for the selected payment type.
Important
For more detailed information on whether your bank supports instant payments and the associated costs, please contact your bank.
Options - Show Summary (optional)
Activate the flag if you want to see a summary of the created payment file.
Note
The option can be preconfigured in the NCP Exports Setup with the option Summary after Creation.
Note
If the Collective Transaction option is enabled in the NCP Exports Setup window, the system consolidates journal lines for each vendor, customer, or employee into a single entry in the payment file. This allows refunds or credit memos in the journal to be offset against invoices with a higher absolute value, resulting in a single transaction in the payment file. Despite this consolidation in the payment file, the individual amounts are still posted as separate entries in the journal, ensuring detailed accounting records.
For more information, see Setup, Exports, Exports Setup.
Possible Errors in Payment File Status
The following overview lists possible errors that may occur when attempting to create a payment file. These errors are usually due to missing data or incorrect configurations.
The value for the field 'Document Type' in journal line no. 10000 must be Payment.
The value for the field Document Type in the journal line is invalid. Ensure that the field is set to Payment unless the Collective Transaction option is enabled in the NCP Exports Setup under Payment File. When Collective Transaction is activated, payments and refunds are combined into a single line in the payment file. If this option is not enabled, each transaction must have Document Type set to Payment to avoid errors.
The field 'Account No.', in journal line no. 1000 must not be empty.
The line appears to be incorrectly filled out or no account number has been provided. Check the line and ensure that all required fields are completed.
Journal line no. 0 must be applied.
The line appears to have no entry applied. You can manually add this via the action Home, Apply Entries.
The field 'Recipient Bank Account', in journal line no. 0 must not be empty.
In the line, no recipient bank account was provided. Check the line and ensure that all required fields are completed.
'SEPA Direct Debit/SEPA Transfer/Non-SEPA Transfer' must have a value in 'NCP Bank Account Setup': 'Bank Account No.=BANK'. The value must not be null or empty
The bank account setup is missing a value for one or more of the following fields: SEPA Direct Debit, SEPA Transfer, or Non-SEPA Transfer. To resolve this issue, open the bank account setup and ensure that all required fields are properly filled out. These fields are essential for generating the payment file and must not be empty.
Missing Information in Vendor/Customer Bank Account. Please check the Vendor/Customer Bank Account for completeness.
If this error occurs, the bank account must be checked for completeness.
Check the following fields:
IBAN
SWIFT Code
Not required in all countries, but necessary in most cases.
Bank Account Number
Not required in all countries, mainly for international payments.
Bank Code
Not required in all countries, mainly for international payments.
Country/Region Code
Check the customer's bank details and ensure that all required fields are filled out.
The field 'Direct Debit Mandate ID', in journal line no. 0 must not be empty.
No SEPA Direct Debit Mandate ID was provided in the line, possibly no valid SEPA direct debit mandate is assigned. Check the customer's SEPA direct debit mandates and ensure that all required fields are filled out and the validity has not expired.
For more information, see Setup, Exports, SEPA-Direct Debit-Mandates.
The field 'NCP Direct Debit Type', in journal line no. 0 must not be empty.
No direct debit type was provided in the line. Check the SEPA direct debit mandate and ensure that all required fields are filled out.
For more information, see Setup, Exports, SEPA-Direct Debit-Mandates.
The field 'NCP Direct Debit Sequence', in journal line no. 0 must not be empty.
No direct debit sequence was provided in the line. Check the SEPA direct debit mandate and ensure that all required fields are filled out.
For more information, see Setup, Exports, SEPA-Direct Debit-Mandates.
Important
Each of these errors either prevents posting the journal or creating a payment file and should be resolved.
Options, Options
The following describes the options available when creating the payment file in detail.
Bank Account No.
Enter the bank account number for which you want to create payment suggestions. This bank account will then be transferred to the payment journal lines.
Payment Type
Select the payment type for which you want to create the payment file. For all payment types that should be available or are in use, the settings must be defined in NCP Exports Setup under the Payment File section.
Execution Date
The execution date is calculated as follows: For urgent payments or instant transfers, the date is set to today. Otherwise, the date is set to the next day, except in the case of a SEPA direct debit with the direct debit type CORE - Basic Direct Debit, where the date is set to today + 2 days.
Direct Debit Type
Select from the list the type of direct debit: CORE - Basic Direct Debit, B2B - Business-to-Business Direct Debit, or COR1 - Basic Direct Debit with shortened lead time.
Execution Date for One-Time/First Direct Debit
This date is only available for SEPA direct debits with the direct debit type CORE - Basic Direct Debit and is calculated as follows: Today + 5 days.
Charges
This option is available if the XML schema of the bank account supports charges for the selected payment type.
The following options are available:
SLEV - Standard option (usually like SHAR)
SHAR - Charges are shared between sender and recipient
DEBT - All charges are borne by the sender
CRED - All charges are borne by the recipient
Note
If no specification is made, the standard agreed upon will be applied.
CRED is only possible in limited cases and only applicable if the payment either leaves the EU+EFTA area or remains within the EU+EFTA area but is ordered in a currency other than EUR or the IN currency.
(EFTA = European Free Trade Association)
Urgent Payment
This option is available if the XML schema of the bank account supports urgent payments for the selected payment type.
Note
Urgent payments must be agreed upon with the bank.
Instant Transfer
This option is available if the XML schema of the bank account supports instant transfers for the selected payment type. Unlike traditional transfers, which can take up to one banking day, the amount is immediately available with an instant transfer.
The amount is transferred to the recipient's account within a maximum of 10 seconds. This function is available 24/7, including weekends and holidays.
Note
As of January 1, 2025, all banks in the European Union are required to offer the receipt of instant transfers in euros without additional costs. Contact your bank for more information.
Show Summary
Indicates whether a summary should be displayed after creating the payment file. For more information, see the chapter Payment File Summary.
Note
The option can be preconfigured in the NCP Exports Setup with the option Summary after Creation.
Send After Creation
Indicates whether the payment file should be sent to the bank via the konfipay Connector after creation.
Note
The option can be preconfigured in the Bank Account Setup with the option Automatic Sending with konfipay.
Payment File Summary
After successfully creating a Payment File using the Create Payment File action, the page NCP Exports Payment File - Summary automatically opens. If this does not happen, you can enable the option Summary after Creation. This option can also be preconfigured in the NCP Exports Setup.
The page NCP Exports Payment File - Summary displays all important information about the created file, such as settings, amounts, and the number of created payment notifications. You can also check whether the notifications have been printed or sent.
For more information, see Tasks, Exports, Payment Notification E-Mail Suggestion.
NCP Exports Payment File - Summary, Fields
Entry No.
Displays the entry number assigned to the clearing entry. The application assigns a unique number to each clearing entry.
Creation Date
Displays the creation date of the payment file.
Payment Type
Displays the payment type of the payment file.
Bank Account Number
Displays the bank account number for which the payment file was created.
File Reference (Message Reference)
Displays the reference of the payment file.
Note
The reference is generated from the current date and time when the payment file is created.
Amount
Displays the total amount from the payment entries.
Amount (LCY)
Displays the total amount in local currency from the payment entries.
Number of Payment Entries
Number of all payment entries related to this clearing entry.
Number of Notifications
Number of all payment notifications related to this clearing entry.
Notifications Not Printed/Sent
Number of notifications not printed or sent related to this clearing entry.
Number of Bank Entries
Number of all bank entries related to this clearing entry.
NCP Exports Payment File - Summary, Actions
Export Payment File
Use this action to export the previously created payment file. This starts the download of the file to your computer, allowing you to import it into your bank's software.
View Payment File
This action allows you to view the payment file created in the Payment Journal using the Create Payment File action in a XML Viewer. The file is read-only and cannot be edited.
Cancel Payment File
This action allows you to cancel a created Payment File. The status of the associated Clearing Entry is set to canceled.
Payment Entries
Opens the overview of Payment Entries that reference this Clearing Entry.
For more information, see Archive, Payment Entries.
Bank Entries
Opens the overview of Bank Entries that reference this Clearing Entry.
For more information, see Bank Entries.
Clearing List
This list provides information about the created Clearing Entry.
The notification is helpful for the recipient to facilitate the allocation of the payment(s). This is especially useful in the case of a collective transfer. It is possible to send this notification via email. After the Payment File has been created, you can print the Notification or send it via email.
For more information, see Tasks, Exports, Payment Notification E-Mail Suggestion.
With a one-time transfer, you can perform a transfer ad hoc without having to manage vendors/customers and external bank accounts. In the journals, it can be defined per line whether it is a one-time instruction.
One-time Transfer are made in the Cash Receipt Journals and Payment Journals. To create a one-time transfer, click on the field NCP One-Time Transfer in the desired journal line (if no one-time payment has been defined yet, the value of the field is No), the page NCP Exports One-Time Transfer opens, and you can set up the bank account for this transfer.
How to create the payment file can be found under Tasks, Exports, Create Payment File
Field, External Bank Account
IBAN
Specifies the bank account information of the customer/vendor. Using the External Bank Account Card action in the journal pages, you can now also create a one-time payment transaction if no external bank account code is specified.
SWIFT Code
Specifies the bank account information of the customer/vendor.
Bank Account No.
Specifies the bank account number.
Bank Branch No.
Specifies the Bank Branch No.
Bank Name
Specifies the name of the bank.
Bank Address
Specifies the address of the bank.
Bank Address 2
Specifies an addition to the address of the bank.
Bank Post Code
Specifies the post code of the bank.
Bank City
Specifies the city of the bank.
Bank Country/Region Code
Specifies the country/region code of the bank.
Fields, Recipient Data
Recipient Name
Specifies the name of the recipient.
If nothing is specified, the data from vendor/customer will be written to the payment file.
Recipient Name 2
Specifies an addition to the name of the recipient.
If nothing is specified, the data from vendor/customer will be written to the payment file.
Recipient Address
Specifies the address of the recipient.
If nothing is specified, the data from vendor/customer will be written to the payment file.
Recipient Address 2
Specifies an addition to the address of the recipient.
If nothing is specified, the data from vendor/customer will be written to the payment file.
Recipient Post Code
Specifies the post code of the recipient.
If nothing is specified, the data from vendor/customer will be written to the payment file.
Recipient City
Specifies the city of the recipient.
If nothing is specified, the data from vendor/customer will be written to the payment file.
Recipient Country/Region Code
Specifies the country/region code of the recipient.
If nothing is specified, the data from vendor/customer will be written to the payment file.
Actions
Suggest Data
Using the action Suggest Data, the data of the last one-time transaction (with the same account type/account number) can be suggested.
The action only brings values if a Payment File has already been created for the combination of account type and account number.
E.g.:
If, for example, a one-time payment transaction is defined for a line of the type G/L account and a payment file is created, this data can be suggested for the same G/L account in the next one-time payment transaction.
Docs / App / NAVAX Payment / Tasks / Exports Fast Payments: Urgent & Instant Transfer
NAVAX Payment Exports offers the possibility to make urgent payments or instant payments. These payment types allow you to process payments particularly quickly, which can be advantageous in urgent cases.
Differences between Urgent Payments and Instant Payments
Urgent payments are special transfers that are processed with high priority, while instant payments are executed immediately and within a few seconds. Both options offer advantages depending on the urgency and requirements of the payment.
Differences Between Payment Types
SEPA Standard Transfer
EURO Urgent Payment
SEPA Instant Payment
Credited to recipient
at the latest after one banking day
on the same day
after a few seconds (approx. 10 seconds)
Availability
on business days
on business days
around the clock, 365 days a year
Maximum amount
no limit
up to 50,000 EUR
up to 100,000 EUR (depending on the bank)
Instant Payments
The SEPA instant payment is a payment instrument that, unlike standard SEPA credit transfers which currently take up to one banking day, makes the amount available in the recipient's account within a few seconds. This applies not only on banking days, but around the clock, seven days a week, 365 days a year. From October 2025, banks will be required to be able to send and receive instant payments.
Step-by-step guide: Set up and use instant payments
To make instant payments in NAVAX Payment Exports, follow these steps:
Open the NCP Exports Setup page.
You can access this page via "Tell me what you want to do" or from the Business Central homepage via the NAVAX Payment Exports menu, Administration, NCP Exports Setup.
For more information, see Setup, Exports, Exports Setup.
On the NCP Exports Setup page, select the action Setup, XML Schemas to open the overview of available XML schemas.
Click the Download action to download the provided SEPA XML schemas.
For more information, see Setup, Exports, XML Schemas.
Check in the schema list:
Whether the column Instant Payment possible shows the value Yes - only then does the schema support instant payments.
Optional: Note which schema is intended for urgent or instant payments.
Open the NCP Bank Account Setup of the bank account you want to use for instant payments.
For more information, see Setup, General, Bank Account Setup.
In the SEPA Credit Transfer Schema field, select the schema suitable for instant payments.
Optional: Enter the desired limit in the Max. Amount Instant Payment field.
If no amount is entered, the default is 100,000 EUR.
In the payment or cash receipt journals, create a payment suggestion as usual via the NCP Exports action, Payment Suggestion, Vendor/Customer or Employee Payment Suggestion.
For more information, see Tasks, Exports, Make Payment or Direct Debit Suggestions.
Export the payment file via the NCP Exports action, Payment File, Create Payment File.
Additionally, activate the Instant Payment option.
For more information, see Tasks, Exports, Create Payment File.
Note
If the Instant Payment checkbox is deactivated, the XML schema is not suitable for instant payments. You must therefore select another schema that supports instant payments.
Urgent Payments
Urgent payments are credit transfers that are processed with high priority to ensure that the amount is credited to the recipient's account on the same day. From October 2025, banks will be required to offer instant payments. Urgent payments may then be replaced by instant payments.
Step-by-step guide: Set up and use urgent payments
To make urgent payments in NAVAX Payment Exports, follow these steps:
Open the NCP Exports Setup page.
You can access this page via "Tell me what you want to do" or from the Business Central homepage via the NAVAX Payment Exports menu, Administration, NCP Exports Setup.
For more information, see Setup, Exports, Exports Setup.
On the NCP Exports Setup page, select the action Setup, XML Schemas to open the overview of available XML schemas.
Click the Download action to download the provided SEPA XML schemas.
For more information, see Setup, Exports, XML Schemas.
Check in the schema list:
Whether the column Urgent Payment possible shows the value Yes - only then does the schema support urgent payments.
Optional: Note which schema is intended for urgent payments.
Open the NCP Bank Account Setup of the bank account you want to use for urgent payments.
For more information, see Setup, General, Bank Account Setup.
In the SEPA Credit Transfer Schema field, select the schema suitable for urgent payments.
In the payment or cash receipt journals, create a payment suggestion as usual via the NCP Exports action, Payment Suggestion, Vendor/Customer or Employee Payment Suggestion.
For more information, see Tasks, Exports, Make Payment or Direct Debit Suggestions.
Export the payment file via the NCP Exports action, Payment File, Create Payment File.
Additionally, activate the Urgent Payment option to create a payment file for urgent payments.
For more information, see Tasks, Exports, Create Payment File.
Note
If the Urgent Payment checkbox is deactivated, the XML schema is not suitable for urgent payments. You must therefore select another schema that supports urgent payments.
A payment notification is a message to the payment recipient that contains details about the payments transferred or collected via a payment file. A payment notification is particularly useful for batch payments, as it helps the recipient correctly allocate the payments. By default, a payment notification is created when the purpose exceeds 140 characters.
Setting Up Payment Notification
In the NCP Exports Setup in the Payment File section, it can be defined that a payment notification is always created regardless of the length of the purpose.
For more information, see Setup, Exports, Exports Setup.
The contents and texts of the payment notification can be individually customized in the Language Setup by editing the corresponding fields.
For more information, see Setup, Exports, Language Setup.
Send Payment Notification E-Mail
To send a payment notification suggestion via e-mail, the following steps must be done:
Click on the action Notification E-Mail Suggestion - you will find the action in the Payment File - Summary, which opens after creating the Payment File. Alternatively, the page can also be opened via the Clearing Entries.
Select the checkbox Include Accounts without Pmt. Notification E-Mail if you also want to include customers and vendors without payment notification e-mail in the report.
Set the required filters.
Confirm your selection with OK.
In the window that opens, you can review and, if necessary, correct the data.
If all lines are correct, you can send the notifications using the Send All action. Alternatively, you can send only the selected notifications using the Send action.
Tip
If you have activated the option Edit before sending in the NCP Exports Setup in the area Pmt. Notification E-Mail, then you have the possibility to edit and format the Notification E-Mail in a text editor. This editor will appear as soon as you click on the Send action on the NCP Exports Pmt. Notification Email Suggestion page.
Print Payment Notification
To print the payment notification e-mail suggestion:
Click on the action Notification E-Mail Suggestion - you will find the action in the Payment File - Summary, which opens after creating the Payment File. Alternatively, the page can also be opened via the Clearing Entries.
Select the checkbox Include Accounts without Pmt. Notification E-Mail if you also want to include customers and vendors without payment notification e-mail in the report.
Set the required filters.
Click the Preview button to check the result of the filtering.
Click the Print button to print the report or save it to a file.
The description on this help page applies to the Cash Receipt- and the Payment Journal and explains the extensions that NAVAX Payment Imports provides.
Fields
The table contains the following fields or columns from NAVAX Payment Imports:
NCP Imports Source Type
Specifies the source from where the record was created either from a transaction, charges, or indirectly through a bank account reconciliation line.
NCP Imports Order Amount
Specifies the order amount of the transaction from the NAVAX Payment Imports.
NCP Imports Order ISO Currency Code
Specifies the ISO currency code for the order amount of the transaction from NAVAX Payment Imports.
NCP Imports Transaction Amount
Specifies the posting amount of the transaction from the NAVAX Payment Imports.
NCP Imports Transaction ISO Currency Code
Specifies the ISO currency code for the posting amount of the transaction from the NAVAX Payment Imports.
NCP Imports Payment Reference
Specifies the payment reference from the NAVAX Payment Imports.
NCP Imports Remittance Info.
Specifies the remittance info from the NAVAX Payment Imports. Depending on the data format imported or how the remittance info was formatted in the imported file, only a part of the remittance info is displayed in this here. Click the field to display the full remittance info.
NCP Imports Additional Info.
Displays additional information from the NAVAX Payment Imports. Click on the field to display the full additional information.
Aktions, NCP Imports
Import Suggest Application - All Lines
Use this function to create balance suggestions for all lines in this journal that have not been balanced already.
If the option Display analysis window is set in the NCP Imports Setup, a page with the information of the preselection is displayed. If the window is closed with OK, the suggestion is copied to the journal.
Note
It is generally recommended to activate the window for analysis tasks.
The reason for this is that at the time of confirmation with OK it is no longer possible to guarantee that all entries are still available and open for balancing. An error message or a notice may be shown that another user has changed data or that balancing can no longer set.
Imports Suggest Application - Line
Use this function to suggest a application for the selected line.
If the option >Display analysis window is set in the NCP Imports Setup, a page with the information of the preselection is displayed. If the window is closed with OK, the suggestion is copied to the journal.
Note
It is generally recommended to activate the window for analysis tasks.
The reason for this is that at the time of confirmation with OK it is no longer possible to guarantee that all entries are still available and open for balancing. An error message or a notice may be shown that another user has changed data or that balancing can no longer set.
Imports Fixed Account Allocations
If the balance suggestion should always assign specific transactions to a fixed G/L account, customer, vendor or bank account, you can set up fixed account allocations for this. Fixed account allocations are maintained or created in the NCP Imports Setup window, but can also be accessed via the journal or bank account reconciliation.
Imports Deviation - Set Filter
This action sets filters on the journal lines for which full adjustment is not possible.
Imports Deviation - Remove Filter
This action deletes the filters on the journal lines for which full adjustment is not possible.
Imports Deviation - Print
This list will show all journal lines for which the allocations has not been completely set.
Imports Transaction Card
Opens the import transaction card in which all important information about the Transaction from the NCP Imports is clearly displayed.
This chapter describes the import functionality for bank statements in Business Central. This import functionality is integrated into the modules NAVAX Payment Imports and NAVAX konfipay Connector Import. Typically, bank statements are exported from banking software in a standard format and then manually imported into Business Central.
The NAVAX konfipay Connector Import extension can assist you in automating this manual step and preventing errors by importing bank statements directly into Business Central via the konfipay Online Payment Services.
NAVAX Payment Transactions Imports supports the following formats:
camt.52
camt.53
camt.54
MT940
Custom
Step-by-Step Instructions: Importing a Bank Statement File
This section describes how to import a bank statement file.
Make Basic Settings
Ensure that the basic settings in the NCP Imports Setup have been configured.
It is important to define how to handle the individual file types.
For more information, see Setup, Imports, Imports Setup.
Open the Imports Page
On the homepage of your Microsoft Business Central, click on the action group NAVAX Payment, on the action Imports, or ☰ > NAVAX Payment > Imports if you are not in the Accountant role.
Import File
Click on the action Import.
Tip
Files can also be imported via the drop zone for bank files using Drag & Drop. Simply drag the file into the Dropzone for Bank Files area (found in the fact boxes on the right side), and the import will start automatically.
For more information, see Tasks, Imports, Dropzone for Bank Files.
Assign Bank Accounts (if necessary)
The import is performed, loads the data into Business Central, and automatically assigns the bank account. Correct setup is required for this.
For more information, see Setup, General, Bank Account Setup.
If not all bank accounts were automatically identified, click on Data and manually select the Bank Account No. or use the action Suggest Bank Account. To do this, click on the action Data and select the Bank Account No. on the page that opens.
Review Imported Lines
As long as no Journal Line/Matching Line exists for an import line, you can still delete the line or change the bank account. To re-import deleted data, repeat all steps and perform the Import again.
Use the action Data to view the bank statement data. All relevant data is clearly listed here.
With the action Transactions, you can call up an overview of the individual posting lines. This overview shows you all posting lines linked to the bank statement and can help with analysis or provide an overview of the bank statement positions.
Note
If a file has already been imported or a file with the same Message Reference is imported, a warning will be displayed. This warning can be ignored if you want to re-import the file. If you do not want to re-import the file, click No.
Step-by-Step Instructions: Automated Import with the NAVAX konfipay Connector
This section describes how to import a bank statement file using the NAVAX konfipay Connector Import. The NAVAX konfipay Connector Import extension is integrated into the NAVAX Payment Imports and allows you to import bank statements directly via the konfipay Online Payment Services.
Make Basic Settings
Ensure that the basic settings in the NCP Imports Setup and konfipay Connector Setup have been configured.
It is important that the konfipay Online Payment Services are correctly set up and the connection to the banking data centers works. It is also important to define how to handle the individual file types.
For more information, see Setup, konfipay Connector, konfipay Connector Setup.
Open the Imports Page
On the homepage of your Microsoft Business Central, click on the action group NAVAX Payment, on the action Imports, or ☰ > NAVAX Payment > Imports if you are not in the Accountant role.
Retrieve Account Transaction Entries
If the account transaction entries are already available in Business Central, open the Account Transaction Entries page.
If no account transaction entries have been imported yet, open the submenu of the Import action and select Retrieve Account Transaction Entries.
A window will open where you can select the desired bank connection. Click OK to start the import. After the download is complete, the Account Transaction Entries page will automatically open, displaying all imported account transaction entries.
Docs / App / NAVAX Payment / Tasks / Imports Dropzone for Bank Files
This chapter describes the functionality of the Dropzone for bank files in Business Central. The Dropzone is a feature that allows bank files to be imported quickly and easily via Drag & Drop. The file is automatically checked for validity and imported into Business Central.
The settings and defaults for the Bank Files Dropzone are defined on the NAVAX Dropzone Setup page.
For more information, see Setup, Import, NAVAX Dropzone Setup.
Functionality
The functionality of the dropzone for bank files is shown by importing a camt.053 account statement file.
You can find the dropzone on the right side in the NCP Imports page, in the factbox Dropzone for Bank Files.:
Files can be imported over the Dropzone for Bank Files by Drag & Drop. NCP Imports checks the imported file whether it is a bank file (camt.052, camt.053, camt.054, mt940, etc.). This happens independently of which file type (xml, txt, etc.) is imported.
Note
It is also possible to click on the Dropzone. In this case a file selector appears where you can select a single file.
After the files have been checked and loaded by the Dropzone, it is necessary to confirm the import of files:
The added files will then appear on the left side in the NCP Imports page, as a new record:
Note
After a successful import, a new record is created for each file. The information from the imported file is written to the respective fields in the database.
With the journals, you can efficiently reconcile and close open entries based on the imported data. NAVAX Payment Imports supports you with the automatic application suggestion, which determines the best possible match based on defined criteria.
On the Imports page, click the Transfer action to transfer the imported data to the journal or bank reconciliation.
Instructions on how to transfer bank transactions can be found in the chapter Tasks, Imports, Import Payment File.
If the Trans. Charges field in the NCP Imports Setup is enabled, a line for the total charges per transaction will also be transferred.
You can transfer the entire file, individual NCP Imports Data, or only specific NCP Imports Transactions.
Select Journal
Select the desired journal to open it.
Process Imported Data
In the journal, click
NCP Imports > Application Suggestions > Imports Suggest Application - All Lines to create an automatic application suggestion for all lines.
NCP Imports > Application Suggestions > Imports Suggest Application - Line to create an automatic application suggestion for the selected line.
The system attempts to determine the account number and the associated open entries based on various criteria.
Lines already marked as Applied are skipped.
Priority for automatic Application
The following order is used to determine an account number or application entries for each line:
Fixed Account Allocation
If a Fixed Account Allocation is defined, it will be used. (+2000 points)
Example:
Account 241203 is automatically assigned if the remittance info or payment reference contains "Tax Office".
For more information, see Setup, Fixed Account Allocations.
Note
For G/L accounts, it may happen that the description is not written into the journal line. This is due to the Omit Default Description in Journal setting on the G/L account. This option specifies whether the default description is automatically entered into the Description field of the journal lines created for this G/L account.
Document Number or External Document Number
If a Document Number or External Document Number is found in the remittance info or payment reference, it is matched with open entries. (+600 points)
Example:
A document number in the remittance info is assigned to an entry, and the line is applied.
Customer/Vendor or Employee Number
If a number matching a customer, vendor or employee is found, it is assigned. (+100 points)
If a bank account is also found, it is assigned and increases the score. (+100 points)
Note
Application with open entries is not possible if no document number is present. If the Retain Account Allocations option is enabled in the NCP Imports Setup, the customer/vendor will be suggested for the line even if no document is found. However, this option may negatively affect the results of the automatic allocation.
Other Criteria
Amount matches exactly (+100 points)
Payment tolerance or discount considered (+50 points)
Filter Lines (Optional)
Click the NCP Imports > Deviation > Import Deviation - Set Filter button to display only lines that have not been fully applied or that do not have a G/L account entered in the Account No. field.
Use the NCP Imports > Deviation > Import Deviation - Print action to print the filtered lines.
Use Analysis Window (Optional)
The analysis window provides a detailed overview of the applied criteria and the scores achieved. It shows the matches found and the evaluation of each criterion. To use the analysis window, enable the Show Analysis Window option in the NCP Import Setup. After completing the application suggestion, the window will open automatically and can help to better understand the system's decision logic. However, the window should only be used for analysis purposes.
For more information, see Reports and Analysis, Imports, Imports Allocation Analysis.
Delete Lines
You can delete lines at any time as long as they have not been posted.
Entries cannot be uniquely assigned, e.g., if multiple entries exist.
Remaining amount does not match the amount from transaction.
Note
In this case, it may help to increase the Max. Application Tolerance Amount or to disable the option Check Application Amount in the NCP Imports Setup.
Manual Applications
: If no suitable suggestion is found, you can manually enter the account number or perform the application.
Criteria and Scoring for the Application Suggestion
The criteria and scoring for the application suggestion are stored in the NCP Imports Setup. The criteria are listed in the order in which they are processed. The higher the score, the better the match with the imported data. The suggestion with the highest score is transferred to the journal line.
A Fixed Account Allocation is found ➟ +2000 points
Searches the value of the payment reference from the imported transaction in the Payment Reference of the entries ➟ +1000 points
Searches the value of the payment reference from the imported transaction in Document Numbers or External Document Numbers ➟ +600 points
Searches the value of the remittance info in the Payment Reference, Document Numbers, and External Document Numbers of the entries ➟ +600 points based on the degree of match (Only if it does not have a payment reference)
Searches account number in Customers/Vendors ➟ +100 points
Searches external account holder in Customers/Vendors ➟ +100 points
Searches payment reference in Customers/Vendors ➟ +300 points based on the degree of match
Searches remittance info in Customers/Vendors ➟ +300 points based on the degree of match (Only if it does not have a payment reference)
Found Customers/Vendors are blocked ➟ Not considered.
Found entry has a future posting date ➟ Not considered.
Found entry has the correct amount ➟ +100 points
Found entry has payment tolerance/discount on the amount ➟ +50 points
You must regularly reconcile your bank, receivables, and payables accounts by applying payments recorded in the bank to their related open (unpaid) invoices and credit memos or other open entries in Business Central.
You can perform this task on the Payment Reconciliation Journal page, for example, by importing a bank statement file or feed to quickly register the payments. Payments are applied to open customer or vendor ledger entries based on matches between payment text and entry information. You can review and change automatic applications before you post the journal. You can choose to close any open bank account ledger entries related to the applied ledger entries when you post the journal. The bank account is automatically reconciled when all payments are applied.
You can use the Bank Account Reconciliation to reconcile your Business Central bank account with the imported statement data:
Go to Tasks > Bank Account Reconciliation or enter the term in What do you want to do?
Create a new Bank Account Reconciliation using the + icon at the top center of the page.
Select the Bank Account Number of your own bank account.
If no number is generated automatically, enter a Statement No..
Click on Process > Suggest Lines
In the window that opens, enter the period in the field Start Date or End Date and click on OK. The imported lines are displayed on the left, the bank account ledger entries on the right.
You have the following options.
Click Match Automatically to perform an automatic match of the two sides.
Select two lines and click Match Manually to match two lines.
Click Remove Match to remove the link.
Note
If statement lines cannot be completely reconciled with the bank account ledger entries (automatically or manually), it is possible that the corresponding payments have not yet been posted. Use the function Transfer to General Journal to transfer the unreconciled amount displayed in the field Difference to a journal for posting.
Troubleshooting
Difference
Reason
Resolution
A transaction in the internal bank account is not on the bank statement.
The bank transaction did not occur although a posting was made in Business Central.
Make the missing money transaction (or prompt a debitor to make it), and then reimport the bank statement file or enter the transaction manually.
A transaction on the bank statement does not exist as a document or journal line in Business Central.
A bank transaction was made without a corresponding posting in Business Central, for example a journal line posting for an expense.
A transaction in the internal bank account corresponds to a bank transaction but some information is too different to give a match.
Information, such as the amount or the customer name, was entered differently in connection with the bank transaction or the internal posting.
Review the information, and then manually match the two. Optionally, correct the information mismatch.
You must resolve the differences, for example by creating missing entries and correcting non-matching information, or by making missing money transactions, until the bank account reconciliation is completed and posted.
You can fill in the Bank Statement Lines pane on the Bank Acc. Reconciliation page in the following ways:
Automatically, by using the Import Bank Statement function to fill in the Bank Statement Lines pane with bank transactions according to an imported file or stream provided by the bank.
Manually, by using the Suggest Lines function to fill in the Bank Statement Lines pane according to invoices in Business Central that have outstanding payments.
You can find more information at, reconcile bank accounts in the Business Central Online Help.
Fields
The table contains the following fields or columns:
Bank Account No.
Specifies the number of the bank account that you want to reconcile with the bank's statement.
Statement No.
Specifies the number of the bank account statement.
Statement Date
Specifies the date on the bank account statement.
Import Additional Info.
Specifies additional information from the NCP Imports. Click on the field to display all additional information.
Balance Last Statement
Specifies the ending balance shown on the last bank statement, which was used in the last posted bank reconciliation for this bank account.
Statement Ending Balance
Specifies the ending balance shown on the bank's statement that you want to reconcile with the bank account.
NCP Imports
This field indicates whether an import has already been performed and data are available.
Bank Statement Lines
Open Journal Lines
Specifies the number of journal lines for this bank account reconciliation.
Balance (Bank Statement Lines)
Specifies a balance, consisting of the Balance Last Statement field, plus the balance that has accumulated in the Statement Amount field.
Total Balance (Bank Statement Lines)
Specifies the accumulated balance of the bank reconciliation, which consists of the Balance Last Statement field, plus the balance in the Statement Amount field.
Total Difference (Bank Statement Lines)
Specifies the total amount of the Difference field for all the lines on the bank reconciliation.
Balance (Bank Account Ledger Entries)
Specifies the balance of the bank account since the last posting, including any amount in the Total on Outstanding Checks field.
Total on Outstanding Checks (Bank Account Ledger Entries)
Specifies the part of the bank account balance that consists of posted check ledger entries. The amount in this field is a subset of the amount in the Balance field under the right pane in the Bank Acc. Reconciliation window.
Balance To Reconcile (Bank Account Ledger Entries)
Specifies the balance of the bank account since the last posting, excluding any amount in the Total on Outstanding Checks field.
Actions, Process
Suggest Lines
Create bank account ledger entries suggestions and enter them automatically.
Import Data Card
The Data from the NCP Imports is displayed here. Each row in the NCP Imports window can contain multiple data lines, which can contain multiple Transactions. The Transactions, themselves, can contain multiple Payment Remittance Lines and Charges.
Actions, Matching
Match Automatically
Automatically search for and match bank statement lines.
Match Manually
Manually match selected lines in both panes to link each bank statement line to one or more related bank account ledger entries.
Remove Match
Remove selection of matched bank statement lines.
Import Fixed Account Allocations
If the applied amount should always assign certain transactions to a fixed G/L account, customer, vendor or bank account, you can set up fixed account allocations. Fixed account allocations are generally managed or created in the Payment Import Setup window, but can also be configured via the journal or bank account reconciliation.
For more information, see Setup, Imports, Fixed Account Allocations.
Actions, Posting
Transfer to General Journal
Transfer the lines from the current window to the general journal.
Post
Finalize the document or journal by posting the amounts and quantities to the related accounts in your company books.
Post & Print
Finalize and prepare to print the document or journal. The values and quantities are posted to the related accounts. A report request window where you can specify what to include on the print-out.
The description on this help page applies to the Cash Receipt- and the Payment Journal and explains the extensions that NAVAX Payment Imports provides.
Fields
The table contains the following fields or columns from NAVAX Payment Imports:
NCP Imports Source Type
Specifies the source from where the record was created either from a transaction, charges, or indirectly through a bank account reconciliation line.
NCP Imports Order Amount
Specifies the order amount of the transaction from the NAVAX Payment Imports.
NCP Imports Order ISO Currency Code
Specifies the ISO currency code for the order amount of the transaction from NAVAX Payment Imports.
NCP Imports Transaction Amount
Specifies the posting amount of the transaction from the NAVAX Payment Imports.
NCP Imports Transaction ISO Currency Code
Specifies the ISO currency code for the posting amount of the transaction from the NAVAX Payment Imports.
NCP Imports Payment Reference
Specifies the payment reference from the NAVAX Payment Imports.
NCP Imports Remittance Info.
Specifies the remittance info from the NAVAX Payment Imports. Depending on the data format imported or how the remittance info was formatted in the imported file, only a part of the remittance info is displayed in this here. Click the field to display the full remittance info.
NCP Imports Additional Info.
Displays additional information from the NAVAX Payment Imports. Click on the field to display the full additional information.
Aktions, NCP Imports
Import Suggest Application - All Lines
Use this function to create balance suggestions for all lines in this journal that have not been balanced already.
If the option Display analysis window is set in the NCP Imports Setup, a page with the information of the preselection is displayed. If the window is closed with OK, the suggestion is copied to the journal.
Note
It is generally recommended to activate the window for analysis tasks.
The reason for this is that at the time of confirmation with OK it is no longer possible to guarantee that all entries are still available and open for balancing. An error message or a notice may be shown that another user has changed data or that balancing can no longer set.
Imports Suggest Application - Line
Use this function to suggest a application for the selected line.
If the option >Display analysis window is set in the NCP Imports Setup, a page with the information of the preselection is displayed. If the window is closed with OK, the suggestion is copied to the journal.
Note
It is generally recommended to activate the window for analysis tasks.
The reason for this is that at the time of confirmation with OK it is no longer possible to guarantee that all entries are still available and open for balancing. An error message or a notice may be shown that another user has changed data or that balancing can no longer set.
Imports Fixed Account Allocations
If the balance suggestion should always assign specific transactions to a fixed G/L account, customer, vendor or bank account, you can set up fixed account allocations for this. Fixed account allocations are maintained or created in the NCP Imports Setup window, but can also be accessed via the journal or bank account reconciliation.
Imports Deviation - Set Filter
This action sets filters on the journal lines for which full adjustment is not possible.
Imports Deviation - Remove Filter
This action deletes the filters on the journal lines for which full adjustment is not possible.
Imports Deviation - Print
This list will show all journal lines for which the allocations has not been completely set.
Imports Transaction Card
Opens the import transaction card in which all important information about the Transaction from the NCP Imports is clearly displayed.
With the NAVAX konfipay Connector Export, you can transmit payment files created with NAVAX Payment Exports directly and securely to your bank. The transfer is automated via the konfipay Online Payment Service, so you do not need to export the file manually or upload it in the bank portal.
Step-by-step guide: Sending a payment file
With the NAVAX konfipay Connector Export, you can easily and securely send payment files to your bank. Follow these steps:
Your bank account must be set up and enabled for synchronization with konfipay.
To do this, activate the Synchronize option under Bank Account Setup in Connection to Bank.
If you also activate the Auto. send with konfipay option, the payment file will be automatically transferred to konfipay immediately after creation. The rest is handled by the konfipay Online Payment Service.
For more information, see Setup, General, Bank Account Setup.
To send the payment file, select NCP Exports, Payment File, Transmit payment file action in the journal. Alternatively, you can activate the Send after creation option when creating the payment file, so the transfer takes place immediately afterwards.
For more information, see Tasks, Exports, Create Payment File.
If the Auto. send with konfipay option is activated in the bank account setup, the payment file will be automatically transferred to konfipay after creation.
The transmission is securely handled via the konfipay Connector to the Online Payment Service.
After you have transmitted a payment file via the konfipay Online Payment Service, it is first checked and processed. konfipay then forwards the file to the bank. Please note that there may be delays in updating the payment status, as banks do not always check and process incoming data immediately. In such cases, it may be necessary to retrieve the transmitted status manually.
For more information, see Archive, konfipay Connector, Payment Status Entries.
Alternatively, you can automate the status query by activating the Data Update. If this function is set up in the konfipay Connector Setup, the status will be updated automatically without your intervention.
For more information, see Setup, konfipay Connector, Data Update Setup.
Step-by-step guide: Check payment status
This section explains how to check the current status of your transmitted payment files in konfipay.
Open payment status entries
A Clearing Entry is automatically created from the payment journal or cash receipt journals. At the same time, the konfipay Payment Status field is updated.
Click the value in the konfipay payment status field to go to the Payment Status Entries page. There you can see the current status of the transfer.
Alternatively, you can also access the Payment Status Entries via the Bank Account Setup. Under Entries, Payment Status Entries you will find an overview of all sent payment files for the selected bank. Here you can see the current status and any feedback from the bank.
Automatic status query (optional)
The status query can also be automated via a job queue. The status is then updated regularly; leave the journal lines as they are and check later to see if the status has been updated.
For more information, see Setup, konfipay Connector, Data Update Setup.
Errors and feedback
Errors or feedback are displayed either in the payment status entries or in the service log. In the Payment Status Entries overview, you can open the detail card to get more information about the transfer status. Here you can also see any error messages if a transfer was not successful.
In the General tab, you will find the Status field. AssistEdit provides a detailed description of the status.
In the Information tab, you can use AssistEdit in the Additional Information field to view further details about the status.
In the Error tab, Error Code and Error Message are displayed if available (also via AssistEdit).
This information helps you to identify the reason for a failed transfer and take appropriate action.
You can find the Service Log in the konfipay Connector Setup under Test Connection, Service Log.
For more information, see Archive, konfipay Connector, Service Log.
Afterwards, the payment file does not need to and cannot be exported manually or uploaded in the bank portal anymore.
With the NAVAX konfipay Connector Import, you can import account transaction files (e.g., camt.052, camt.053, camt.054, MT940) directly from the konfipay Online Payment Service into Microsoft Dynamics 365 Business Central.
The extension enables you to automatically and securely retrieve account transactions from konfipay and further process them in Business Central.
NAVAX konfipay Connector Import extends the functionality of NAVAX Payment Imports by allowing direct import of account transactions via konfipay and seamless further processing.
The bank accounts for which you want to import transactions are activated for synchronization with konfipay in the NCP Bank Account Setup.
For more information, see Setup, General, Bank Account Setup.
Download Account Transaction Entries
Open the NCP Imports page in Business Central.
Click on the Import action and select Download Acc. Transaction Entries.
Select the desired bank account and confirm with OK.
The account transaction entries will now be retrieved from konfipay - Online Payment Service and displayed in Business Central.
In the konfipay - Online Payment Service portal, the account transaction entry is marked as retrieved and will not be retrieved again in the next run.
For more information, see API acknowledgement status of files
Tip
If this was done unintentionally, you can reset the status in the konfipay Online Payment Service portal.
Transfer Account Transaction File
Select the desired account transaction entries in the overview.
Click on Transfer Account Transaction File to import the file into the system and further process the transactions. A new entry is created in Imports and can then be further processed using NAVAX Payment Transactions Imports.
For more information, see Tasks, Imports, Applying Open Entries.
Check Imported Transactions
After a successful import, you will find the transactions in the NCP Imports overview and can process them as usual (e.g., reconciliation, clearing, posting).
Docs / App / NAVAX Payment / Tasks / Pay With QR Code Create invoices with QR code
With the Pay with QR Code function, you can print a standardized EPC QR code on your invoices that contains all relevant payment data such as payee, IBAN, BIC, amount, and payment reference. Your customers can scan this QR code with their banking app, allowing them to make the transfer quickly, conveniently, and without errors, eliminating the need to manually enter payment data. This makes it easier to allocate payments in any system that processes incoming payments.
The QR code generation is directly integrated into Microsoft Dynamics 365 Business Central and can be used for sales invoices, service invoices, and other documents.
The QR code complies with the European EPC standard and is supported by most banking apps.
The function can be used for sales invoices, service invoices, and other documents.
The bank account used and the payment reference can be controlled individually.
The allocation of the payment to the open item is facilitated by the unique reference and can be automated with NAVAX Payment Transactions Import.
The function offers your customers a modern, convenient payment method and reduces errors in payment processing.
The payment method Pay with QR Code must be set up in Business Central.
In the bank account setup of the desired bank account, the option Pay with QR Code must be activated.
For more information, see Setup, General, Bank Account Setup.
Create invoice with QR code
Create a sales or service invoice as usual.
Select the customer for whom the invoice is intended.
Select the payment method where xPay with QR Code is activated.
In the Company Bank Account Code field, select the bank account to be used for the QR code.
Tip
You can also set a default bank account for QR code payments. To do this, open the Bank Account Setup and activate the Pay with QR Code field for the desired account.
Fill in one of the fields Your Reference or External Document Number. This will generate a unique reference for the QR code and make it easier to allocate the payment later.
Post the invoice. If Pay with QR Code active is enabled in the QR code setup, a QR code for the document data will be generated automatically and the reference will be stored in the customer ledger entry.
Check data
Open the posted invoice and select the action NCP QR Code Document Data in the card of the posted document.
Check whether a QR code is present. If the code is present, it should match the payment data you entered in the invoice.
This FAQ page helps you resolve common questions and issues in NAVAX Payment more quickly. The content is structured as short checklists: if something is “not considered”, you can verify step by step which prerequisite is missing.
Exports
In this section you will find common questions and typical root causes related to NCP Exports (creating and exporting payment files).
How does konfipay communicate with banks?
The banking interface uses the EBICS (Electronic Banking Internet Communication Standard) protocol. If your own fully initialized EBICS contact is available, it is used directly. Otherwise, communication is handled via a service data center connection.
Is EBICS a payment file schema?
No. In NAVAX Payment, EBICS is only the communication layer to the bank. The payment file structure is defined separately by the configured XML schemas (for example pain.001/pain.008).
What is the role of NAVAX konfipay Connector?
NAVAX konfipay Connector is a standalone app extension for technical communication with windata GmbH & Co.KG. As the service provider, windata then handles transmission to banks and retrieval of account information.
How to enable or disable batch booking?
With Batch Booking you control whether payments are grouped in the payment file (batch booking) or shown as individual payments. How your bank processes this setting depends on the selected format and the bank’s requirements.
Setup
Open NCP Exports Setup.
Open the XML schemas using the XML Schemas action.
Select the schema you want and choose Edit.
In the General section you will find the Batchbooking option.
Select the required value in the dropdown and save.
Note
If the bank creates individual transactions despite batch booking being enabled (or vice versa), also check the bank’s requirements and the XML/payment format being used.
How do I set up “Structured Address” in the XML schema?
For newer SEPA payment files it can be required to provide addresses in a structured way. To do so, structured address output must be enabled in the XML schema.
Setup
Open NCP Exports Setup.
Open the XML schemas using the XML Schemas action.
Select the schema you want and choose Edit.
In the schema, set the fields Originator Address and/or Recipient Address to Yes - Structured.
When Yes - Structured is enabled, the schema creates additional lines/elements for the structured address, for example:
StreetNm (street)
TwnNm (city/town)
Ctry (country code)
Note
Make sure the address data in the master data (street, city, and country/region code) is maintained—otherwise the structured fields may be empty.
Payment Suggestion returns no results
If the Payment Suggestion is empty—or if specific entries are missing—this is usually caused by filters, date limits, or blocks/restrictions.
Checklist
Clear all filters: In the Payment Suggestion, use Clear Filter to remove unintended restrictions.
Verify journal/mode: Run the correct suggestion (e.g., Vendor Payment Suggestion in the Payment Journal, Customer Direct Debit Suggestion in the Cash Receipt Journal).
Check date fields: Review Last Payment Date or (when Find Payment Discounts is enabled) Last Payment Discount Date. Increase the date temporarily to rule out borderline cases.
Verify open entries: Open the vendor/customer Open Entries and validate due date, amount, currency, and status “Open”.
Check blocks/restrictions: Review entry flags like payment/document blocks and any workflow-related restrictions.
Check On Hold: Entries are only considered if On Hold is empty.
Check payment type/currency/payment method: SEPA only considers empty ISO currency code or EUR. Also review the Foreign Currency Filter and the payment method on the entry.
Check bank account details: Verify IBAN/BIC and that the own bank account supports the required schema (SEPA/Non-SEPA).
Check existing journal lines: Verify whether the entry is already tied to existing journal lines (and therefore not suggested again).
Check limits: When Use Vendor Priority is enabled, verify whether Available Amount (LCY) is already exhausted.
SEPA Direct Debit: A valid mandate must exist.
Payment Discounts
Payment discounts are only applied automatically if the related entry and the payment meet the payment discount conditions.
Checklist: Why is the payment discount not applied?
Entry is open: Payment discounts are only relevant for open entries. If the entry is already applied/closed, no payment discount will be applied.
Payment within the discount date: Check on the entry whether the payment date is within the discount period. You can also verify this on the Apply Customer Entries / Apply Vendor Entries pages.
Remaining discount available: A payment discount is only applied if the entry has an amount greater than 0.00 in Remaining Pmt. Disc. Possible.
Discount date / discount period: Payment discounts are only applied within the discount period; the relevant date is shown on the entry in Pmt. Discount Date.
Typical verification steps
Open the affected customer/vendor ledger entry and verify that it is still open.
Check Pmt. Discount Date, Remaining Pmt. Disc. Possible, and whether the payment date is within the discount period.
Apply the entry again and validate the calculated amounts on the apply/journal lines.
Payment Discount Tolerance
Payment discount tolerance allows payment discounts to be considered even if the payment is slightly outside the payment discount date—provided the tolerance is configured in the setup.
Why is payment discount tolerance not applied?
Entry is open: Payment discount tolerance is only relevant for open entries. If the entry is already applied/closed, no tolerance can be applied.
Payment within tolerance: Tolerance is only considered if the payment date falls within the allowed tolerance. Verify this on the entry or on the Apply Customer Entries / Apply Vendor Entries pages.
Tolerance period is set: In General Ledger Setup, the Pmt. Disc. Tolerance Period field must contain a value.
Note
If you want to use payment discount tolerance, make sure the definition in General Ledger Setup is intentionally configured and appropriate for your company.
Imports
In this section you will find common questions and typical issues related to NCP Imports (importing bank statements and matching/reconciling entries).
First steps when something isn’t working
Correct format: Verify that the imported file matches the expected format (e.g., camt.052/053/054, MT940).
For more information, see Setup, General, Bank Account Setup.
Bank account mapping: Verify that the bank account is set up correctly and that the file is assigned to the correct account.
For more information, see Setup, General, Bank Account Setup.
Matching result: If transactions are imported but no automatic matching happens, check open entries, amounts, and remittance information/references.
This report provides a complete overview of all bank files imported using NAVAX Payment Imports and their contents.
Displays import date, file name, file format, message reference, and other metadata for each import.
Lists for each import the associated account statement data, balances, transactions, remittance information, additional info, and charges.
Using the options in the report, you can control which additional information (e.g., transaction description, return reason, payment reference, charges) is also output.
Helps with the control, documentation, and post-processing of payment imports.
Note
Use this report to clearly display and review all details of your imported bank files.
Print
Additional Info.
Specifies if additional informations in the list should also be printed.
Transaction Description
Specifies if transaction descriptions in the list should also be printed.
Return Reason
Specifies if return reasons in the list should also be printed.
Payment Reference
Specifies if payment references in the list should also be printed.
External Account Holder
Specifies if the external bank account holder in the list should also be printed.
Order Amount Deviation
Specifies if order amount deviations in the list should also be printed.
Charges
Specifies if charges in the list should also be printed.
Remittance Info.
Specifies if remittance informations in the list should also be printed.
If the indicator Show Analysis Window is set in the NCP Imports Setup, the system does not carry out a comparison of the Remittance Info when you execute the function Apply Entries in the journal. Instead, this window shows how the application is performed.
Important
Use this indicator for information purposes only (analysis). To perform and post a application, this indicator must be deactivated.
.
Fields
Position ID
Used to identify the line. Position IDs are used in the field Reason (No Assignment) to indicate conflicts or reasons related to other lines.
Line Information
Shows the information from the NCP import record for this allocation suggestion.
The structure of the value is as follows:
IMPORT ENTRY NO.|DATA ENTRY NO.|TRANSACTION ENTRY NO.
Account Type
Views the account type.
Account No.
Shows the account number.
Account Name
Shoes the account name.
Ledger Entry No.
Views the ledger entry number of the current allocation entry.
Deleted
Shows that no allocation was created.
Delete Reason (no assignment)
Shows why no allocation was made.
Possible reasons:
Posting Date
The posting date of the entry is in the future.
No entry with Positive = yes/no
No entry could be found that is suitable for the allocation.
Rating of Position ID X is higher
The entry with Position ID X has a higher rating and has already been allocated.
Rating of Account No. X is higher
The entry with Position ID X has a higher rating and has already been allocated.
Identical Rating exist
There are multiple entries with the same rating.
Entry with higher Rating exists
There is an entry with a higher rating.
Entry with higher Amount Rating exists
There is an entry with a higher amount rating.
No clear result
No clear result could be determined.
Amount/Remaining Amount: XX.XX/XX.XX
The amount or remaining amount of the entry is not identical.
Vendor/Customer blocked
The vendor/customer is blocked.
Posting Date
Shows the posting date.
Amount
Shows the amount.
Remaining Amount
Shows the remaining amount.
Search Parameter
Shows the search parameter.
Amount Rating
Shows the rating for the search for the amount.
For more information, see Bewertungsschema.
Shows if external account information was found based on the transaction details.
Document Found in
Shows where the searched value was found.
Possible values:
' '
Payment Reference
Transaction Reference
Remittance Info.
Ext. Bank Account
Document Rating
The rating for the search for the document number.
For more information, see Bewertungsschema.
Account Search or
Shows which value was searched for.
Account Found in
Shows where the searched value was found.
External IBAN (Account Number)
Shows the IBAN or account number of the transaction.
External SWIFT Code (BLZ)
Shows the SWIFT code or BLZ of the transaction.
External Account Holder
Shows the name of the account holder of the transaction.
Ext. Account Info found
Shows whether a bank account was found based on the account information of the transaction.
Ext. Account Info found in
Shows where an account was found based on the information of the transaction.
Possible values:
' '
Payment Reference
Transaction Reference
Remittance Info.
Ext. Bank Account
Account Rating
Shows the rating for the search for the amount.
Rating
Shows the total rating for the assignment.
For more information, see Bewertungsschema.
Evaluation Scheme
A Fixed Account Allocation is found ➟ +2000 points
Searches the value of the payment reference from the import in the Payment Reference of the entries ➟ +1000 points
Searches the value of the payment reference from the import in Document Numbers or External Document Numbers ➟ +600 points
Searches the value of the purpose in the Payment Reference, Document Numbers and External Document Numbers of the entries ➟ +600 points according to the degree of match (Only if it has no payment reference)
Searches account number in Customers/Vendors ➟ +100 points
Searches external account holder in Customers/Vendors ➟ +100 points
Searches payment reference in Customers/Vendors ➟ +300 points according to the degree of match
Searches purpose in Customers/Vendors ➟ +300 points according to the degree of match (Only if it has no payment reference)
Found Customers/Vendors are blocked ➟ Not considered.
Found entry has a future date of the posting ➟ Not considered.
Found entry has correct amount ➟ +100 points
Found entry has payment tolerance/discount from the amount ➟ +50 points
Actions
Transaction Card
Opens the import transaction card in which all important information about the Transaction from the NCP Imports is clearly displayed.
Account Card
View or change detailed information about the record on the document or journal line.
Actions, Navigate
Fixed Account Allocations
If the applying suggestion should always assign certain transactions to a fixed G/L account, customer, vendor or bank account, you can set up fixed account allocations for this.
For more information, see Setup, Imports, Fixed Account Allocations.
Docs / App / NAVAX Payment / Reports and Analysis / Imports Import General Journal Deviation
This report provides an overview of all lines in the general journal that are related to a payment import and where deviations such as remaining amounts, cash discounts, or tolerances exist.
Displays all relevant fields such as posting date, document number, account, amount, remaining amount after payment, cash discount, and tolerances.
By default, filters for lines related to a bank import.
With the option Include lines without deviation, you can also display fully balanced lines.
Helps with the review and post-processing of payment imports as well as the clearing of open items.
Note
Use this report to quickly identify deviations after a payment import and to process them specifically.
Options
Include lines without deviation
Indicates whether lines without deviation should also be printed in the report.
Docs / App / NAVAX Payment / Archive / Exports Vendor/Customer and Bank Ledger Entries
On the pages Vendor- and Customer-Ledger Entries the following NAVAX Payment fields are added:
Fields
Payment Reference
Specifies a payment reference which is suggested for the payment suggestion in the payment journal. You can change or delete the contents of the field.
Bank Account Ledger Entries
When you post the journal after checking the payments, a Bank Account Ledger Entry will be created. Using the action Bank Account Ledger Entries on the page Clearing Entries you can view this entry.
The page has been extended with the following NAVAX Payment Exports functions and fields:
Bank Account Ledger Entries, Fields
NCP No. of Payment Entries
Number of payment entries relating to this bank account ledger entry are listet here.
Bank Account Ledger Entries, Actions
Payment Entries
Opens the overview of the Payment Entries with reference to this Bank Account Ledger Entry.
For more information, see Archive, Exports, Payment Entries.
Clearing Entries
Opens the overview of the Clearing Entries with reference to this Bank Account Ledger Entry.
For more information, see Archive, Exports, Clearing Entries.
In the window NCP Clearing Entries the history of all created payment files are listed.
The action Create Payment File in the payment journals and cash recipient journals creates a Clearing Entry with status Created, which contains information about the file. Additionally, a Payment Entry is created for each individual transaction.
For more information, see Appendix, Data Structure.
If the journal is posted, the status is set to Posted and the corresponding bank account ledger entry can be displayed using the action Bank Account Ledger Entries.
If the file is cancelled, the status is set to Cancelled.
Fields
Status
Shows the status for the Clearing Entry.
Options:
Created - Indicates that the payment file was created.
Voided - Indicates that the payment file was canceled.
Posted - Indicates that the journal was posted.
Payment Type
Shows the payment type of the payment type.
Bank Account No.
View the bank account number for which the payment file was created.
Archived Payment File exists
Specifies if an archived payment file is available.
Creation Date
View the date when the payment file was created.
No. of Payment Entries
Number of all Payment Entries that refer to this Clearing Entries.
No. of Pmnt. Notifications
Number of all payment notification e-mails that refer to this Clearing Entries.
Pmt. Notifications not Printed/Sent
Views how many Payment Notifications remain to be printed or sent by e-mail.
No. of Bank Account Ledger Entries
Shows the number of Bank Account Ledger Entries that refere to this Clearing Entry
Amount
Shows the total amount from the Payment Entries that refer to this Clearing Entry.
Amount (LCY)
Shows the total amount in local currency from the Payment Entries that refer to this Clearing Entry.
File Reference (Message Reference)
View the reference of the payment file. The reference is generated from the current date and time when the payment file is created.
konfipay Payment Status
Shows the status of the payment file that has been sent to konfipay. Use Lookup to go to the NAVAX konfipay Connector Payment File Status entry where more detailed information is available.
Pmnt. Status Entry No.
Specifies the value of the Payment Status Entry No. field.
Entry No.
Views the entry number assigned to the Clearing Entry. The application assigns a unique number to each Clearing Entry.
Actions, Payment File
Export Payment File
The action Create Payment File in the payment journal creates a Payment File and a Clearing Entry with status Created, which contains information about the file. With the action Export payment File, this Payment File can be exported at a later time.
In the summary, all information on the created clearing item is displayed. The payment file can be made available for the bank software via Export payment file. The payment file can also be exported at a later time from the Clearing Entries.
For more information, see Tasks, Exports, Create Payment File.
Show Payment File
This action can be used to show the payment file that you have created in the payment journal with the action Create Payment File in a text editor. The file cannot be edited.
Void Payment File
With this action a created Payment File can be voided. The status of the related Clearing Entries is set to Voided.
Send Payment File
With this action, you can send the payment file that you created before via Create Payment File. The payment file will be send to konfipay which will check and transmit the file to the bank.
Check Payment Status
With this action, you can retrieve the status of a sent payment file.
Actions, Reports
Clearing List
This List contains information about the Clearing Entries.
Actions, Notification
Notification E-Mail Suggestion
This list shows information on the payment suggestion created, or the current situation (clearing etc.) in the journal page.
Notification
The payment notification is useful to help the recipient to assign the payment(s). This is especially important in the case of a Collective Transfer. It is also possible to send this notification by e-mail. After the payment file has been created, you can print the Notification or send it by e-mail.
The action Create Payment File in the Payment Journals creates a NCP Clearing Entry with status Created, which contains information about the payment file.
Furthermore, a Payment Entry is created for each individual transaction.
For more information, see Appendix, Data Structure.
If the journal is posted, the status is set to Posted and the corresponding bank account ledger entry can be displayed using the action Bank Account Ledger Entries.
If the file is cancelled, the status is set to Cancelled.
Fields
Status
Shows the status for the payment entry.
Options:
Created - Indicates that the payment file was created.
Voided - Indicates that the payment file was canceled.
Posted - Indicates that the journal was posted.
Payment Type
Views the payment type of the created payment file.
Bank Account No.
View the bank account number for which the payment file was created.
No. of Payment Posting Entries
Shows the number of payment posting entries for the current payment entry.
Posted with Document No.
Shows the first value of the payment posting entries.
Note
If Navigate is called directly from the payment entry and there are several payment posting entries for the payment entry, Navigate is called with the first data record found.
Posted with Posting Date
Shows the first value of the payment posting entries.
Note
If Navigate is called directly from the payment entry and there are several payment posting entries for the payment entry, Navigate is called with the first data record found.
No. of Bank Account Entries
Views the number of Bank Account Ledger Entries for the current entry.
Description
View the description from the journal.
Execution Date
Views the desired execution date for the transaction.
Urgent Payment
Views information indicating whether the payment file was created with the Urgent Payment option.
//TODO instant payment
Pmt. Notification
After a payment file has been created, this field views if a payment notification exists for the NCP Payment Entry.
If the Payment Remittance cannot be transferred completely when the payment file is created, a payment notification is created. You can also use additional parameters to set up the system to create a payment notification every time you create a payment file.
Note
The payment notification is useful to help the recipient to assign the payment(s). This is particularly relevant in the case of a collective transfer. It is possible to send the payment notification via e-mail.
Payment Notification No.
After a payment file has been created, the number of the payment notifications is displayed in this field, in case a payment notification exists for the created Payment Entry.
Pmt. Notification Printed
Views that a payment notification is printed.
Pmt. Notification E-Mail Sent
Shows that the notification was sent by e-mail
Pmt. Notification E-Mail Sent To
Shows the recipient E-Mail address of the notification e-mail.
Pmt. Notification E-Mail Date
Shows when the notification was sent by e-mail.
Pmt. Notification E-Mail Time
Shows when the notification was sent by e-mail.
No. of Payment Remittance Entries
Shows the number of Payment Remittance Entries for the current entry.
Currency Code
Views the currency code of the transaction.
Amount
Shows the amount for the transaction.
Amount (LCY)
Shows the amount for the transaction in LCY.
Account Type
Shows the type of account for the transaction.
Options:
Customer
Vendor
Bank Account
Account No.
Shows the account number used for the transaction.
External Bank Account Code
Shows which bank account of customer/vendor is used for the transaction.
External Account Holder
Shows which account holder is used for the transaction.
One-Time Transfer
Indicate that the payment entry was a one-time transfer.
External IBAN
Shows the IBAN used by the customer/vendor.
External SWIFT Code
Shows the SWIFT-Code used by the customer/vendor.
External Bank Account No.
Shows the bank account of customer/vendor used for the transaction.
External Bank Branch No.
Shows the Bank Branch No. used by the customer/vendor.
Direct Debit Type
Shows which settings for the direct debit type were used to create the payment file.
Direct Debit Sequence
Shows which settings for the direct debit type were used to create the payment file.
Das Feld Spesen ist nur dann verfügbar, wenn die Zahlungsart und/oder das XML-Schema des Bankkontos Spesen unterstützt.
For more information, see Setup, Exports, XML Schemas.
//TODO: en:,
Actions
Navigate
Sucht alle Posten und Belege, die für die Belegnummer und das Buchungsdatum laut dem ausgewählten Posten oder Beleg vorhanden sind.
Payment Remittance Entries
Opens the overview of the Payment Remittance Entries with reference to this NCP Payment Entry.
Bank Account Ledger Entries
Opens the overview of all Bank Account Ledger Entries with reference to this NCP Payment Entry.
Clearing Entries
Opens the overview of the NCP Clearing Entries with reference to this NCP Payment Entry.
For more information, see Archive, Exports, Clearing Entries.
Payment Remittance Entries
The action Create Payment File in the payment journals creates a Clearing Entry with status Created. This entry contains information about the file. In addition, a Payment Entry and a Payment Remittance Entry are created for every single transaction. These contain information about which entries were cleared by the payment.
Payment Remittance Entries, Fields
Document Type
Views the document type of the remittance entry.
Document No.
Views the document number ot the remittance entry.
Posting Date
Date on which the document was posted.
External Document No.
Specifies an additional document number. This usually refers to the numbering system by the customer or vendor.
Remittance Info.
Views the remittance info (which was stored in the NCP Exports Setup).
Currency Code
Views the currency code used when posting the entry.
Amount
Views the posted amount for the entry.
Discount
Views the discount of the entry that has been discounted.
Entry No.
Views the entry number that was assigned to the payment remittance entry. The application assigns a unique number to each payment remittance entry.
Payment Remittance Entries, Actions
Navigate
Finds all entries and documents that exist for the document number and posting date of the selected entry or document.
On this page you can see the overview of the imported bank files. For each of the imported files a Import line is created, these in turn can have several transaction lines and remittance info lines.
Depending on the imported file format, different fields are populated or used.
For more information, see Appendix, Data Structure.
Note
As long as a row has not been posted yet, you can delete it in the journal or reconciliation at any time. Click Transfer if you want to retransfer the deleted line.
In the NCP Imports window you can perform the following actions:
Import a payment file into Dynamics 365 Business Central and transfer it to a journal.
Shows you if an archived import file already exists.
No. of Data
Shows the number of imported data entries.
No. of Data without Bank Allocation
Shows the amount of data without bank assignment.
Note
If the bank allocation does not match during import, the bank allocation can be entered manually.
To do this, open the NCP Imports Data either by clicking in the field or by selecting the action Navigate > Data.
Bank Account No.
If the NCP Imports data all have the same bank account, the bank account number is displayed here. If the accounts are different, no value is displayed.
Note
If a bank account is detected when importing a payment file, the system first checks whether fixed account allocations exist.
Bank Account Name
If the NCP Imports data all have the same bank account, the bank account name is displayed here. If the accounts are different, no value is displayed.
Bank Account IBAN
If the NCP Imports data all have the same bank account, the bank account name is displayed here. If the accounts are different, no value is displayed.
No. of Transactions
Shows the number of imported transactions.
Open Journal Lines
Shows if data has been transferred to an general journal and if there are open general journal lines.
Note
Depending on the setting used in the NCP Imports Setup, under the respective file format setting, this field may or may not be displayed.
Shows when the file was created (File info: CreDtTm).
Message Time
Shows when the file was created (File info: CreDtTm).
Message Recipient Name
Shows the name of the recipient of the file (file info: MsgRcpt Nm).
Additional Info.
Shows additional information (file info: AddtlInf).
Entry No.
Specifies the number of the entry that was assigned to it when it was created from the specified number series.
Actions, Process
Import
Click Import to import the file provided by your bank. As long as there are no journal lines or reconciliations for the imported entry, the line can be deleted at any time.
Click on Import if you want to re-import the deleted data.
Export Archived Import File
Starts the download of the archived import file.
Actions, Transfer
Transfer
With this option, entries from the NCP Imports can be transferred to a journal. During the transfer, a corresponding entry is created for each NCP Imports transaction in the Journal or in the Bank Account Reconciliation. If the field Trans. Charges is set to Yes in the NCP Imports Setup, an entry is also created for the total charges per transaction. You can either transfer the entire imported file, or individual NCP Imports Data, or just individual NCP Imports Transactions.
Actions, Report
Import List
This list shows information about the imported file.
Actions, Navigate
Data
Here the Data from the NCP Imports are listed. Each line in the NCP Imports window can contain several data lines, which in turn can contain several transactions. The transactions, in turn, can contain several remittance lines and charges.
Transactions
Here the Transactions from the NCP Imports are listed. Each line in the NCP Imports window can contain several data lines, which in turn can contain several transactions. The transactions, in turn, can contain several remittance lines and charges.
Open Reconciliations
Shows the list with Open Reconciliations if such exist. In the lines you can see the number of open reconciliations in the field Open Reconciliation Lines.
Note
This action is only available if the option Bank Acc. Reconciliation has been set up in the NCP Imports Setup, in the field camt.053 - Statement or MT940 - Account Statement.
Open Journal Lines
Opens the open journal lines. In the journal it is possible to clear and close open entries based on the imported data.
Note
This action is only available if the option General Journal has been set up in the NCP Imports Setup, in the field camt.053 - Statement or MT940 - Account Statement.
Posted Statement
In this overview, the posted statements are listed.
Note
This action is only available if the option Bank Acc. Reconciliation has been set in the NCP Imports Setup, in the fields camt.053 - Account Statement, camt.054 - Debit Credit Notification, MT940 - Account Statement or Custom.
Additional Info.
Opens the card with the additional information from the Group Header (GrpHdr) of the import.
Import Data
On this page you can see the overview of the data entries of the imported bank file. Depending on the imported file format, different fields are filled or used.
Note
As long as a row has not been posted yet, you can delete it in the journal or reconciliation at any time. Click on Transfer if you want to retransfer the deleted row.
Fields
Statement No.
Shows the bank statement number (file info: LglSeqNb).
The lookup function opens the NCP Imports Data Card page, this provides a better overview of the bank statement.
Statement Date
Shows the date of the bank statement (file info: CreDtTm).
Statement from
Shows the statement period (file info: FrToDt FrDtTm).
Statement to
Shows the statement period (file info: FrToDt FrDtTm).
Bank Account No.
The import tries to determine a bank account for each data row based on various criteria. If not all bank accounts were suggested automatically, select the bank account number manually. The next time you import a file with the same criteria, the bank account is suggested.
Bank Account Name
If the NCP Imports data all have the same bank account, the bank account name is displayed here. If the accounts are different, no value is displayed.
Bank Account IBAN
If the NCP Imports data all have the same bank account, the IBAN is displayed here. If the accounts are different, no value is displayed.
No. of Balances
Shows the number of imported balances in the bank statement.
The lookup function opens the NCPI Payment Import Balances page.
No. of Transactions
Specifies the number of imported transactions.
The Lookup function opens the NCPI Payment Import Transactions page.
Open Journal Lines
Shows that data has been transferred to a journal and that there are open journal lines.
The lookup function opens the corresponding journal.
Note
Depending on the setting used in the NCP Imports Setup, under the respective file format setting, this field may or may not be shown.
Shows if data has been transferred to a bank account reconciliation and open reconciliations exist.
The lookup function opens the corresponding reconciliation.
Note
Depending on the setting used in the NCP Imports Setup, under the respective file format setting, this field may or may not be shown.
Shows the IBAN or account number of the imported data (file info: Acct Id IBAN (Acct Id Othr Id)).
SWIFT-Code (Bank Branch No.)
Shows the SWIFT code or the bank branch code of the imported data (file info: Acct Svcr FinInstnId BIC (Acct Svcr FinInstnId Othr Id)).
ISO Bank Currency Code
Shows the ISO bank currency code of the imported data (file info: Acct Ccy).
Additional Information
Shows additional information of the bank statement (file info: AddtlInf).
The lookup function opens the NCP Imports Additional Information page.
Closing Booked last Statement
Shows the closing balance of the last booked account statement.
Sum Transaction Amount
Shows the total of the booking amounts from the imported bank file.
Closing Booked
Shows the current closing balance, reduced by the booking amounts from the imported bank file.
Entry No.
Shows the number assigned to the record. The application assigns a unique number to each record.
Import Entry No.
This field contains the number of the import.
Import Data, Actions
Suggest Bank Account
In some cases, it may happen that no bank account number can be automatically suggested. The action Suggest Bank Account then attempts to find a bank account based on the IBAN and SWIFT combination. If no bank account is found, the combination of bank account number and bank code is checked. If this is also unsuccessful, NCP Payment Imports takes the bank account from a previous import.
Transfer
With this option, entries from the NCP Imports can be transferred to a journal. During the transfer, a corresponding entry is created for each NCP Imports Transaction in the Journal or in the Bank Account Reconciliation. If the field Trans. Charges is set to Yes in the NCP Imports Setup, an entry is also created for the total charges per transaction. You can either transfer the entire imported file, or individual NCP Imports Data, or just individual NCP Imports Transactions.
Balances
The balances from the NCP Imports are listed here.
Transactions
The transactions from the NCP Imports are listed here. Each row in the NCP Imports window can contain multiple data rows, which in turn can contain multiple transactions. The transactions, in turn, can contain multiple payment remittance entries and expenses.
Additional Info.
Öffnet die Karte mit den Zusatzinformationen aus dem Group Header (GrpHdr) des Imports.
Open Reconciliations
This action opens the page Bank Account Reconciliations, where the transferred entries from import are listed, if any exist.
Posted Statements
This action opens the page Bank Account Statement that shows the posted statements that previously was imported and posted.
Import Balances
This page views the balances from the NCP Imports.
Import Balances, Fields
Type
Shows the type of balance (file info: Tp CdOrPrtry Cd).
Amount
Shows the amount (file info: Amt).
ISO Currency Code
Shows the ISO Currency Code of the balance (file info: Ccy)
Positive
Shows whether the balance is positive or negative (file info: CdtDbtInd).
Date
Shows the date of the balance (file info: Dt Dt).
Import Transactions
The Import Transactions page lists the transaction of the imported bank file.
Fields
External Account Holder
Shows the name of the account holder of the imported transaction (file info: RltdPties Dbtr Nm/RltdPties Cdtr Nm).
External Account Holder Address
Shows the address of the account holder of the imported transaction (file info: RltdPties Dbtr PstlAdr AdrLine/RltdPties Cdtr PstlAdr AdrLine).
External IBAN (Bank Account No.)
Shows the IBAN or account number of the imported transaction (file info: RltdPties DbtrAcct Id IBAN/RltdPties CdtrAcct Id IBAN (RltdPties DbtrAcct Id Othr Id/RltdPties CdtrAcct Id Othr Id)).
External SWIFT-Code (Bank Branch No.)
Shows the SWIFT code or bank branch no. of the imported transaction (file info: RltdAgts DbtrAgt FinInstnId BIC/RltdAgts CdtrAgt FinInstnId BIC (RltdAgts DbtrAgt FinInstnId Othr Id/RltdAgts CdtrAgt FinInstnId Othr Id)).
Order Amount
Shows the order amount of the imported transaction (file info: AmtDtls InstdAmt Amt).
Order ISO Currency Code
Shows the ISO currency code of the order amount of the imported transaction (file info: AmtDtls InstdAmt Ccy).
Currency Factor
Shows the currency factor of the imported transaction. When the transaction entry is transferred to an journal, the amount of the order is converted with the currency factor in case of foreign currency (file Info: Ccy/AmtDtls TxAmt CcyXchg XchgRate).
Positive
Shows if the imported transaction is positive or negative (file info: CdtDbtInd).
Reversal Posting
Specifies if the imported transaction is a chargeback (return-credit/direct debit and reversal) (file info: RvslInd).
Posting Status
Shows the posting status of the transaction (file info: Sts).
Posting Date
Shows the posting date of the imported transaction (file info: BookgDt Dt).
Note
Depending on the settings used in the NCP Imports Setup, under Transfer, this field is filled with the appropriate values
For more information, see Setup, Imports, Imports Setup.
Value Date
Shows the value date of the imported transaction (file info: ValDt Dt).
Note
Depending on the settings used in the NCP Imports Setup, under Transfer, this field is filled with the appropriate values
For more information, see Setup, Imports, Imports Setup.
Open Journal Line Exists
Shows if the data has been transferred to an journal and if there is an open journal line.
Journal Line Posted
Shows if the data has been transferred to an journal and the journal line row has been posted.
Open Recon. Line Exists
Shows if the data has been transferred to an reconciliation and if there is an open reconciliation line.
Posted Statement Lines Exists
Specifies if the data has been transferred to a bank account reconciliation and a posted statement line exists.
No. of Charges
Shows the number of charges.
Open Charge Journal Line Exists
Shows if the charges have been transferred to an journal and if there is an open journal line.
Open Charge Reconciliation Line Exists
Shows if the charges have been transferred to an reconciliation and if there is an open reconciliation line.
Posted Charge Journal Line Exists
Shows if the charges have been transferred to an journal and if the journal line has been posted.
Posted Charge Reconciliation Line Exists
Shows if the charges have been transferred to an reconciliation and if the reconciliation line has been posted.
No. of Remittance Info. Lines
Specifies the number of remittance information lines.
Remittance Info.
Shows a part of the remittance info (file info: RmtInf Ustrd).
Payment Reference
Shows the payment reference of the imported transaction (file info: RmtInf Strd CdtrRefInf Ref).
Transaction Reference (Sender Reference)
Shows the Transaction Reference (Client Reference) of the imported transaction (file info: Refs EndToEndId >>> [TransactionReference]).
Order Reference (Batch Control No.)
Specifies the order reference (payment info id) of the imported transaction (file info: Refs PmtInfId >>> [OrderReference]).
File Reference (Message Reference)
Displays the file reference (message reference) of the imported transaction. (file info: Refs MsgId >>> [FileReference]).
Transaction Code
Displays the transaction code (file info: BkTxCd Prtry Cd).
These are import codes for transaction types that may appear in the import files. These should be set up before you start with importing.
For more information, see Setup, Imports, Imports Codes.
Transaction Code Description
Shows the transaction code Description of the corresponding import code.
For more information, see Setup, Imports, Imports Codes.
SWIFT Transaktion Code
Shows the SWIFT transaction code (file info: BkTxCd Prtry Cd).
These are import codes for transaction types that may appear in the import files. These should be set up before you start with importing.
For more information, see Setup, Imports, Imports Codes.
SWIFT Transaction Code Description
Shows the SWIFT transaction code description of the corresponding import code.
For more information, see Setup, Imports, Imports Codes.
Primanota No.
Shows the primanota number of the imported transaction.
Additional Info.
Shows additional information about the imported transaction.
Return Reason Code
Shows the return reason code of the imported transaction (file info: RtrInf Rsn Cd).
These are import codes for transaction types that may appear in the import files. These should be set up before you start with importing.
For more information, see Setup, Imports, Imports Codes.
Return Reason Description
Shows the Return Reason Description of the imported transaction.
These are import codes for transaction types that may appear in the import files. These should be set up before you start with importing.
For more information, see Setup, Imports, Imports Codes.
Shows the check number of the imported transaction (file info: Refs ChqNb).
Entry No.
Shows the entry number assigned to the record. The application assigns a unique number to each record.
Data Entry No.
This field contains the entry number of the data record.
Import Entry No.
This field contains the entry number of the import.
Import Transactions, Actions
Transfer Line
Allows lines from the NCP Imports to be transferred to an journal. During the transfer, for each payment transaction import, a corresponding line is created in the journal or in the reconciliation. If the option Transfer Charges in the NCP Imports Setup is set to Yes, an entry is also created in the journal or in the reconciliation for the total charges by each transaction. You can either transfer the entire imported file, or individual NCP Imports Data, or just individual NCP Imports Transactions.
Remittance Info.
Opens the overview of the Remittance Info lines for this Transaction. Each row in the NCP Imports window can contain several data entries, which in turn can contain several transactions. The transactions in turn can contain several remittance info. lines and charges.
Charges
Opens the overview of charges for this Transaction. Each row in the NCP Imports window can contain several data entries, which in turn can contain several transactions. The transactions in turn can contain several remittance info. lines and charges.
Additional Info.
Opens the overview with the Additional Information for the selected transaction. (Stm/Rpt/Ntfctn)
Import Charges
This page views the charges from the NCP Imports.
Import Charges, Fields
Code
Shows the code of the charges (file info: Tp Prtry Id).
Amount
Shows the amount (file info: Amt).
ISO Country Code
Shows the ISO Currency Code of the balance (file info: Ccy)
Positive
Shows whether the balance is positive or negative ( file info: CdtDbtInd).
Total Charges
Shows the total charges amount of the transaction.
Open Journal Line exist
Indicates that data has been transferred to a journal and that there is an open journal entry.
Posted Journal Line exist
Indicates that data has been transferred to a journal and the journal entry has been posted.
Open Reconciliation Line exist
Indicates that data has been transferred to a bank account reconciliation journal and there is an open journal entry.
Posted Reconciliation Line exist
Indicates that data has been transferred to a bank account reconciliation journal and the journal entry has been posted.
Import Remittance Infos
The remittance info. of the NCP Imports is viewed here.
Import Remittance Infos, Fields
Remittance Info.
Shows a part of the intended use.
Import Additional Infos
This page lists the additional information from the NCP Imports Data or NCP Imports Transactions.
Import Additional Infos, Fields
Additional Info.
Specifies the additional information from the NCP Imports.
An account transaction file is a file that contains all the transactions of a bank account, including the resulting balance. A special variant is the electronic account statement, where the account statement data, for example in online banking, is provided in file format.
With the konfipay Connector, it is possible to import account transaction files into your Business Central for further processing, once the setup is completed. The import creates the account turnover entries, which correspond to the listing of new account turnovers in the konfipay portal.
Important
The interface retrieves all account turnovers marked as New, and already retrieved turnovers are no longer imported.
Note
Account turnovers are historically provided by the respective EBICS data centers for a limited period of time. This period is usually between 2 and 4 weeks, depending on the data center.
Note
The obligation of credit institutions is derived from Article 248 § 8 of the German Civil Code (EGBGB), which states that the credit institution must immediately inform the account holder of the details of each executed payment transaction. Therefore, credit institutions must provide account statements to enable customers to control their transactions and have an overview of their account balance. Deviating from Article 248 § 8 EGBGB, the information about account turnovers can also be provided monthly (Article 248 § 10 EGBGB). This applies equally to loan or custody accounts.
Fields
Acc. Transaction Date
Shows the date when the account transaction was downloaded into konfipay.
Acc. Transaction Time
Shows the time when the account transaction was downloaded into konfipay.
Download Date
Shows the date when the account transaction was downloaded into Business Central.
Download Time
Shows the time when the account transaction was downloaded into Business Central.
Imported
Indicates whether the account transaction file was imported to NCPI Import.
Import Date
Shows the date when the account transaction file was imported.
Import Time
Shows the time when the account transaction file was imported.
Acknowledged
Specifies whether the account transaction entry has been confirmed in konfipay.
Acknowledge Date
Shows the date when the account transaction file was acknowledged.
Account Transaction available
Indicates whether or not the Account Turnover Document has been imported from konfipay to Dynamics 365 Business Central.
Bank Account Name
Specifies the name of the bank account to which this account transaction file is assigned.
rId
Specifies the rId, this is a unique identifier and assigned by konfipay.
URL
Specifies the URL that applies to the import of the Account Turnover Document from konfipay.
IBAN
Specifies the Bank Account No. to which this account transaction file is assigned.
Bank Account No.
Specifies the bank account no. to which this account transaction file is assigned.
Order Type (EBICS)
Specifies the Order Type (EBICS).
File Name
Specifies the file name of the Account Turnover Document.
Import User ID
Shows from which user the data was imported.
Acknowledged Time
Shows the time when the account transaction file was acknowledged.
Acknowledged User ID
Shows from which user the account transaction was acknowledged.
Download User ID
Shows from which user the data was downloaded.
Process, Actions
Transfer Account Transaction File
The action loads the account transaction File. If the Automatic Import after Download setting is enabled in NCP Imports Setup, the file is immediately imported into NCPI Import.
Acknowledge Account Transaction File
The action acknowledges the account transaction file. Acknowledged account transaction entries can only be deleted through the konfipay portal.
Delete Acknowledged Account Transaction Entry
The action allows you to delete acknowledged account transaction entries. Acknowledged account transaction entries can only be restored through the konfipay portal. You can delete either all or selected records.
Related, Actions
Imports
In the NCP Imports window, you can import files, transfer data to journals or bank account reconciliations, and manage the associated journals and reconciliations. Different actions and fields are displayed, depending on the setup.
After a payment file is created, it can be directly transmitted to the bank using the konfipay Connector Export extension. During this process, a payment status entry is created to reflect the status from konfipay in Business Central.
Since there can often be delays in status feedback, it is necessary to regularly update these payment status entries to keep the status synchronized. To address this, NAVAX Payment has introduced the capability to use an automatically configured job queue that updates the status of open and pending payment status entries.
Important
For some German banks, the status feedback can take up to 14 business days. Therefore, please note that some payment status entries may remain open for a longer period.
Page Payment Status Entries
Fields
Status
Shows the processing status of the file.
Status values with the prefix KON specify the status of the file within konfipay.
Status values with the prefix FIN represent the status of the file within the financial institution.
Bank Account No.
Specifies the bank account number for which the payment file was created.
Bank Account Name
Specifies the name of the bank account for which the payment file was created.
Order Id. Fin. Institute
Shows the Order number assigned by the financial institution to the file. The Order ID is a unique identifier assigned by the financial institution to the payment file. It helps track and reference the file in communications with the bank.
This element is only available if the file possesses one of the following status values:
FIN_UPLOAD_SUCCEEDED
FIN_VEU_FORWARDED
FIN_VEU_CANCELED
FIN_ACCEPTED
FIN_CONFIRMED
FIN_PARTIALLY_ACCEPTED
FIN_REJECTED
Last Sync on
Shows the Date when the payment file was saved in konfipay.
The last synchronization date shows when the payment file status was most recently updated from konfipay. This helps track the currency of the status information.
Last Sync at
Shows the Time when the payment file was saved in konfipay.
Reason Code
Shows the ISO reason code that further describes the processing status of the file within the financial institution. The reason code provides a standardized way to describe the processing status of the payment file within the financial institution. It helps identify specific issues or states during processing.
This element is only available if the file possesses one of the following status values:
FIN_VEU_FORWARDED
FIN_VEU_CANCELED
FIN_ACCEPTED
FIN_PARTIALLY_ACCEPTED
FIN_REJECTED
Uploaded Fin. Inst. on
Shows the date of the successful transmission of the file to the financial institution. The uploaded date indicates when the payment file was successfully transmitted to the financial institution. This timestamp confirms that the file has been sent and is being processed by the bank.
This element is only available if the file possesses one of the following status values:
FIN_UPLOAD_SUCCEEDED
FIN_VEU_FORWARDED
FIN_VEU_CANCELED
FIN_ACCEPTED
FIN_CONFIRMED
FIN_PARTIALLY_ACCEPTED
FIN_REJECTED
Uploaded Fin. Inst. at
Shows the time of the successful transmission of the file to the financial institution.
This element is only available if the file possesses one of the following status values:
FIN_UPLOAD_SUCCEEDED
FIN_VEU_FORWARDED
FIN_VEU_CANCELED
FIN_ACCEPTED
FIN_CONFIRMED
FIN_PARTIALLY_ACCEPTED
FIN_REJECTED
Clearing Entry No.
Shows the entry number of the related clearing entry.
Entry No.
Specifies the entry number assigned to the NAVAX konfipay Connector Payment File Status entry.
Page Payment Status Entry Card
On the page Payment Status Entry Card, more detailed data about the selected Payment Status Entry can be viewed.
General, Fields
Clearing Entry No.
Shows the entry number of the related clearing entry.
Payment File Type
Shows what type of payment file it is.
Possible values:
pain - SEPA payment order file (ISO pain format)
dtazv - Foreign trade payment file (DTAZV format)
Bank Account No.
Specifies the bank account number for which the payment file was created.
Bank Account Name
Specifies the name of the bank account for which the payment file was created.
konfipay rId
Shows the unique reference ID of the payment file in konfipay. The konfipay rId is a unique identifier assigned by konfipay for each payment file. It serves to identify and track the file within the konfipay system.
Processing Status, Fields
Status
Shows the processing status of the file.
Status values with the prefix KON specify the status of the file within konfipay.
Status values with the prefix FIN represent the status of the file within the financial institution.
Last Sync on
Shows the Date when the payment file was saved in konfipay.
The last synchronization date shows when the payment file status was most recently updated from konfipay. This helps track the currency of the status information.
Last Sync at
Shows the Time when the payment file was saved in konfipay.
Canceled by
Specifies the ID of the user who canceled the payment file.
Canceled at
Specifies the date when the payment file was canceled.
Information, Fields
Order Id. Fin. Institute
Shows the Order number assigned by the financial institution to the file. The Order ID is a unique identifier assigned by the financial institution to the payment file. It helps track and reference the file in communications with the bank.
This element is only available if the file possesses one of the following status values:
FIN_UPLOAD_SUCCEEDED
FIN_VEU_FORWARDED
FIN_VEU_CANCELED
FIN_ACCEPTED
FIN_CONFIRMED
FIN_PARTIALLY_ACCEPTED
FIN_REJECTED
Reason Code
Shows the ISO reason code that further describes the processing status of the file within the financial institution. The reason code provides a standardized way to describe the processing status of the payment file within the financial institution. It helps identify specific issues or states during processing.
This element is only available if the file possesses one of the following status values:
FIN_VEU_FORWARDED
FIN_VEU_CANCELED
FIN_ACCEPTED
FIN_PARTIALLY_ACCEPTED
FIN_REJECTED
Additional Information
Shows additional information about the status of file within the financial institution as free text. The additional information field provides free-text details about the status of the payment file within the financial institution. It may include explanations, notes, or other relevant information that supplements the reason code and helps while troubleshooting.
Uploaded Fin. Inst. on
Shows the date of the successful transmission of the file to the financial institution. The uploaded date indicates when the payment file was successfully transmitted to the financial institution. This timestamp confirms that the file has been sent and is being processed by the bank.
This element is only available if the file possesses one of the following status values:
FIN_UPLOAD_SUCCEEDED
FIN_VEU_FORWARDED
FIN_VEU_CANCELED
FIN_ACCEPTED
FIN_CONFIRMED
FIN_PARTIALLY_ACCEPTED
FIN_REJECTED
Uploaded Fin. Inst. at
Shows the time of the successful transmission of the file to the financial institution.
This element is only available if the file possesses one of the following status values:
FIN_UPLOAD_SUCCEEDED
FIN_VEU_FORWARDED
FIN_VEU_CANCELED
FIN_ACCEPTED
FIN_CONFIRMED
FIN_PARTIALLY_ACCEPTED
FIN_REJECTED
Error, Fields
Error Code
Shows the error code for clear identification of the error that has occurred.
Structure of the error codes: ERR-{Category}-{Number}
ERR - Fixed prefix for all error codes
{Category} - Category of the error
{Number} - Number of the error
The number is unique within its category.
For more information, see Information for Developers, konfipay.
Error Message
Show the textual description of the error.
Error Message on
Shows the date of the occurrence of the error.
Error Message at
Shows the time of the occurrence of the error.
Actions
Update Payment Status
This action is used to update the status of the selected data record.
Show Payment File
This action shows the payment file sent to konfipay.
Show in konfipay
This action is used to show the payment details of the selected data record online.
Cancel Processing
This action can be used to cancel the processing of incorrectly sent payment files. This is possible as long as the payment file has not yet been validated by the financial institution or has already been accepted.
Important
When canceling the processing, the link to the konfipay payment instruction is removed. Therefore, use this action only if the file should not be processed further.
On the konfipay Connector Service Log page, you can see all web service requests and responses with time, status, data, and any error messages.
For support requests, it is recommended to carefully review the log entries and provide relevant details. To do this, select the desired log entry and use the Show Request/Response action to view all related information for a specific web service request in detail. This will help you identify sources of errors more quickly and assist technical support more effectively.
Fields
Request Date
Specifies the date when the request was sent to konfipay API.
Request Time
Specifies the time when the request was sent to konfipay API.
Test Environment
Specifies whether the data has been sent to the konfipay Test Environment.
API Function
Shows the function that was called in konfipay.
Service Status
Shows the Web Service Call Status.
HTTP Status Code
Shows the Http status code of the web request.
HTTP Status Message
Show the Http Status message. An Http Status message is only shown when an error is sent back in the web response.
Archived Request Exists
Specifies whether data has been sent to the service and stored in the log.
Archived Response Exists
Specifies whether data was returned from the service and stored in the log.
API Endpoint
Shows the konfipay endpoint where the web request was sent.
Request Duration
Specifies the response time from the service.
URL
Shows the Url that was called in konfipay.
Note
By default, the field is hidden. To display it, click on Customize and add the field.
Clearing Entry No.
Displays the Entry No. of the Clearing Entry.
konfipay-rId
Shows the konfipay rId. This Id. is the unique identification assigned by konfipay.
Note
By default, the field is hidden. To display it, click on Customize and add the field.
User-ID
Specifies the ID of the user who created the entry.
Note
By default, the field is hidden. To display it, click on Customize and add the field.
User Name
Specifies the user name who created the entry.
Note
By default, the field is hidden. To display it, click on Customize and add the field.
HTTP Method
Shows the HTTP method that was used in the web request.
By default, the field is hidden. To display it, click on Customize and add the field.
Actions
Show Request/Response
View detailed information about what has been sent to and returned from the service. The information can be useful for technical support.
Delete entries older than
Deletes log entries that are older than the period specified in the Delete Log Entries Date Calculation field in the konfipay Connector Setup.
For more information, see Setup, konfipay Connector, konfipay Connector Setup.
Delete all entries
Deletes all log entries.
Docs / App / NAVAX Payment / Information for Developers Exports
Auf der folgenden Seite sind Events aufgelistet die Ihnen dabei helfen sollen, Integrationen in NAVAX Zahlungsverkehr Exports einzubinden.
Table - NCPE Payment File Setup
The events are used to integrate custom logic when creating remittance information and, if necessary, to change the texts.
OnAfterCreateRemitInfoText
This event is used to integrate custom logic when creating remittance information and, if necessary, to change the texts.
[IntegrationEvent(false, false)]
local procedure OnAfterCreateRemitInfoText(NCPPaymentRemittanceEntry: Record "NCP Payment Remittance Entry"; GenJournalLine: Record "Gen. Journal Line"; var TempRmtInfo: Text[140])
begin
end;
Type
Name
Description
Record "NCP Payment Remittance Entry"
NCPPaymentRemittanceEntry
The payment remittance entry that contains the information from imported file.
Record "Gen. Journal Line"
GenJournalLine
The general journal line that is used to create the payment remittance entry.
Text[140]
TempRmtInfo
[Pass by Reference] The generated remittance text that can be customized. This text is the result of the function.
OnAfterConvertPNSubject
This event is used to integrate custom logic when converting the payment notification email subject.
[IntegrationEvent(false, false)]
local procedure OnAfterConvertPNSubject(var SubjectText: Text[1024]; var NewSubjectText: Text[250]; NCPPaymentEntry: Record "NCP Payment Entry");
begin
end;
Type
Name
Description
Text[1024]
SubjectText
[Pass by Reference] The original subject text that is used to create the payment notification email.
Text[250]
NewSubjectText
[Pass by Reference] The new subject text that is used to create the payment notification email.
Record "NCP Payment Entry"
NCPPaymentEntry
The payment entry that is used to create the payment notification email.
Tableextension - NCPE Language Setup
The events are used to integrate custom logic when creating language records.
OnAfterConvertPNFileText
This event is used to integrate custom logic when converting the payment notification file text.
[IntegrationEvent(false, false)]
local procedure OnAfterConvertPNFileText(var FileText: Text; var NewFileText: Text);
begin
end;
Type
Name
Description
Text
FileText
[Pass by Reference] The original file text that is used to create the payment notification file.
Text
NewFileText
[Pass by Reference] The new file text that is used to create the payment notification file.
Codeunit - NCPE Entry Calculation
The events are executed during the calculation of the vendor and customer ledger entries. They help to intervene in the calculation of the ledger entries.
This event is triggered before checking the old vendor ledger entry in the procedure CalcVendLedgEntryStep1.
[IntegrationEvent(false, false)]
local procedure OnBeforeCalcVendLedgEntryStep1CheckOldVendLedgerEntry(GenJournalLine: Record "Gen. Journal Line"; var TempOldVendorLedgerEntry: Record "Vendor Ledger Entry" temporary)
begin
end;
Type
Name
Description
Record "Gen. Journal Line"
GenJournalLine
The general journal line that is used to create the vendor ledger entry.
Record "Vendor Ledger Entry" temporary
TempOldVendorLedgerEntry
[Temporary][Pass by Reference] The old vendor ledger entry that is used to calculate the new vendor ledger entry.
This event is triggered before finding the vendor ledger entry in the CalcVendLedgEntryStep1 procedure.
[IntegrationEvent(false, false)]
local procedure OnBeforeCalcVendLedgEntryStep1OnBeforeFindVendLedgerEntry(var GenJournalLine: Record "Gen. Journal Line"; var ApplyingDate: Date; var TempOldVendorLedgerEntry: Record "Vendor Ledger Entry" temporary; var Result: Boolean; var IsHandled: Boolean)
begin
end;
Type
Name
Description
Record "Gen. Journal Line"
GenJournalLine
[Pass by Reference] The general journal line that is used to create the vendor ledger entry.
Date
ApplyingDate
[Pass by Reference] The applying date that is used to calculate the vendor ledger entry.
Record "Vendor Ledger Entry" temporary
TempOldVendorLedgerEntry
[Temporary][Pass by Reference] The old vendor ledger entry that is used to calculate the new vendor ledger entry.
Boolean
Result
[Pass by Reference] The result of the function that determines if the vendor ledger entry is found.
Boolean
IsHandled
[Pass by Reference] Indicates if the vendor ledger entry is handled by custom code. The standard behavior will be skipped.
OnBeforeCalcVendLedgEntryStep2
This event is triggered before step 2 of the vendor ledger entry calculation is performed. It allows for the adjustment or verification of data before the actual calculation takes place. The event can be used to execute custom logic before step 2 of the vendor ledger entry calculation is performed.
[IntegrationEvent(false, false)]
local procedure OnBeforeCalcVendLedgEntryStep2(var GenJournalLine: Record "Gen. Journal Line"; var AmountToApply: Decimal; var PmtTolAmtToBeApplied: Decimal; var RemainingAmount: Decimal; var LineAmount: Decimal; var LineDiscount: Decimal; var AppliedAmount: Decimal; var TempOldVendorLedgerEntry: Record "Vendor Ledger Entry" temporary; var OldVendorLedgerEntry: Record "Vendor Ledger Entry" temporary; Vendor: Record Vendor; var Completed: Boolean; var IsHandled: Boolean)
begin
end;
Type
Name
Description
Record "Gen. Journal Line"
GenJournalLine
[Pass by Reference] The general journal line that is used to create the vendor ledger entry.
Decimal
AmountToApply
[Pass by Reference] The amount that is applied to the vendor ledger entry.
Decimal
PmtTolAmtToBeApplied
[Pass by Reference] The payment tolerance amount that is applied to the vendor ledger entry.
Decimal
RemainingAmount
[Pass by Reference] The remaining amount that is applied to the vendor ledger entry.
Decimal
LineAmount
[Pass by Reference] The line amount that is applied to the vendor ledger entry.
Decimal
LineDiscount
[Pass by Reference] The line discount that is applied to the vendor ledger entry.
Decimal
AppliedAmount
[Pass by Reference] The applied amount that is applied to the vendor ledger entry.
Record "Vendor Ledger Entry" temporary
TempOldVendorLedgerEntry
[Temporary][Pass by Reference] The old vendor ledger entry that is used to calculate the new vendor ledger entry.
Record "Vendor Ledger Entry" temporary
OldVendorLedgerEntry
[Temporary][Pass by Reference] The vendor ledger entry that is used to calculate the new vendor ledger entry.
Record Vendor
Vendor
The vendor that is used to create the vendor ledger entry.
Boolean
Completed
[Pass by Reference] Indicates if the calculation is completed.
Boolean
IsHandled
[Pass by Reference] Indicates if the vendor ledger entry is handled by custom code. The standard behavior will be skipped.
This event is triggered before checking the old customer ledger entry in the CalcCustLedgEntryStep1 procedure.
[IntegrationEvent(false, false)]
local procedure OnBeforeCalcCustLedgEntryStep1CheckOldCustLedgerEntry(GenJournalLine: Record "Gen. Journal Line"; var TempOldCustLedgerEntry: Record "Cust. Ledger Entry" temporary)
begin
end;
Type
Name
Description
Record "Gen. Journal Line"
GenJournalLine
The general journal line that is used to create the customer ledger entry.
Record "Cust. Ledger Entry" temporary
TempOldCustLedgerEntry
[Temporary][Pass by Reference] The old customer ledger entry that is used to calculate the new customer ledger entry.
This event is triggered before finding the customer ledger entry in the CalcCustLedgEntryStep1 procedure.
[IntegrationEvent(false, false)]
local procedure OnBeforeCalcCustLedgEntryStep1OnBeforeFindCustLedgerEntry(var GenJournalLine: Record "Gen. Journal Line"; var ApplyingDate: Date; var TempOldCustLedgerEntry: Record "Cust. Ledger Entry" temporary; var Result: Boolean; var IsHandled: Boolean)
begin
end;
Type
Name
Description
Record "Gen. Journal Line"
GenJournalLine
[Pass by Reference] The general journal line that is used to create the customer ledger entry.
Date
ApplyingDate
[Pass by Reference] The applying date that is used to calculate the customer ledger entry.
Record "Cust. Ledger Entry" temporary
TempOldCustLedgerEntry
[Temporary][Pass by Reference] The old customer ledger entry that is used to calculate the new customer ledger entry.
Boolean
Result
[Pass by Reference] The result of the function that determines if the customer ledger entry is found.
Boolean
IsHandled
[Pass by Reference] Indicates if the customer ledger entry is handled by custom code. The standard behavior will be skipped.
OnBeforeCalcCustLedgEntryStep2
This event is triggered before step 2 of the customer ledger entry calculation is performed. It allows for the adjustment or verification of data before the actual calculation takes place. The event can be used to execute custom logic before step 2 of the customer ledger entry calculation is performed.
[IntegrationEvent(false, false)]
local procedure OnBeforeCalcCustLedgEntryStep2(var GenJournalLine: Record "Gen. Journal Line"; var AmountToApply: Decimal; var PmtTolAmtToBeApplied: Decimal; var RemainingAmount: Decimal; var LineAmount: Decimal; var LineDiscount: Decimal; var AppliedAmount: Decimal; var OldCustLedgerEntry: Record "Cust. Ledger Entry" temporary; Customer: Record Customer; var Completed: Boolean; var IsHandled: Boolean)
begin
end;
Type
Name
Description
Record "Gen. Journal Line"
GenJournalLine
[Pass by Reference] The general journal line that is used to create the customer ledger entry.
Decimal
AmountToApply
[Pass by Reference] The amount that is applied to the customer ledger entry.
Decimal
PmtTolAmtToBeApplied
[Pass by Reference] The payment tolerance amount that is applied to the customer ledger entry.
Decimal
RemainingAmount
[Pass by Reference] The remaining amount that is applied to the customer ledger entry.
Decimal
LineAmount
[Pass by Reference] The line amount that is applied to the customer ledger entry.
Decimal
LineDiscount
[Pass by Reference] The line discount that is applied to the customer ledger entry.
Decimal
AppliedAmount
[Pass by Reference] The applied amount that is applied to the customer ledger entry.
Record "Cust. Ledger Entry" temporary
OldCustLedgerEntry
[Temporary][Pass by Reference] The old customer ledger entry that is used to calculate the new customer ledger entry.
Record Customer
Customer
The customer that is used to create the customer ledger entry.
Boolean
Completed
[Pass by Reference] Indicates if the calculation is completed.
Boolean
IsHandled
[Pass by Reference] Indicates if the customer ledger entry is handled by custom code. The standard behavior will be skipped.
Codeunit - NCPE Install
The events are executed during the installation of NCPE Payment Transactions. They help to intervene in the creation of the necessary parameters for execution.
OnBeforeInitLanguageRecords
This event is executed before the initialization of the NCP language setup.
[IntegrationEvent(false, false)]
local procedure OnBeforeInitLanguageRecords(var NCPLanguageSetup: Record "NCP Language Setup"; var IsHandled: Boolean)
begin
end;
Type
Name
Description
Record "NCP Language Setup"
NCPLanguageSetup
[Pass by Reference] The NCP language setup that is used to initialize the language records.
Boolean
IsHandled
[Pass by Reference] Indicates if the language records are handled by custom code. The standard behavior will be skipped.
OnAfterInitLanguageRecords
This event is executed after the initialization of the NCP language setup.
[IntegrationEvent(false, false)]
local procedure OnAfterInitLanguageRecords(var NCPLanguageSetup: Record "NCP Language Setup")
begin
end;
Type
Name
Description
Record "NCP Language Setup"
NCPLanguageSetup
[Pass by Reference] The NCP language setup that is used to initialize the language records.
OnAfterInitSEPACountriesList
This event is executed after the initialization of the SEPA countries/regions.
[IntegrationEvent(false, false)]
local procedure OnAfterInitSEPACountries(var TempCountryRegion: Record "Country/Region")
begin
end;
Type
Name
Description
Record "Country/Region"
TempCountryRegion
The country/region that is used to initialize the SEPA countries/regions.
Report - NCPE Suggest Vendor Payments
The report is used to suggest vendor payments based on the open vendor ledger entries. The events are executed during the suggestion of vendor payments. They help to intervene in the creation of the payment suggestion.
Protected Variables
Variable Name
Datatype
Values
Global2GenJournalLine
Record "Gen. Journal Line"
-
UsePaymentDisc
Boolean
true / false
InclVendorsWithCredit
Boolean
true / false
GlobalSummarizePerVend
Boolean
true / false
UsePriority
Boolean
true / false
WithoutReduction
Boolean
true / false
ForeignCurrencyFilter
Boolean
true / false
ConsiderPmtDiscTol
Boolean
true / false
DocNoPerLine
Boolean
true / false
LastDueDateToPayReq
Date
eg. 2024-06-01
LastPmtDiscDateToPayReq
Date
eg. 2024-06-01
GlobalPostingDate
Date
eg. 2024-06-01
AmountAvailable
Decimal
eg. 1234.56
SummarizePerDimText
Text[250]
eg. "Sum by Dimension"
NextDocNo
Code[20]
eg. "DOC0001"
NCPEPmtType
Option
" ", "Direct Debit Suggestion", "Credit Transfer Suggestion", "Non-SEPA Credit Transfer", "", "SEPA Credit Transfer", "SEPA Direct Debit"
Events
OnBeforeOnPreReportEvent
This event is triggered before the execution of the OnPreReport trigger.
[IntegrationEvent(false, false)]
local procedure OnBeforeOnPreReportEvent(Vendor: Record Vendor; VendorLedgerEntry: Record "Vendor Ledger Entry")
begin
end;
Type
Name
Description
Record Vendor
Vendor
The vendor that is used to create the payment suggestion.
Record "Vendor Ledger Entry"
VendorLedgerEntry
The vendor ledger entry that is used to create the payment suggestion.
OnAfterPreReport
This event is triggered after the execution of the OnPreReport trigger.
[IntegrationEvent(false, false)]
local procedure OnAfterPreReport(var Vendor: Record Vendor; var VendorLedgerEntry: Record "Vendor Ledger Entry")
begin
end;
Type
Name
Description
Record Vendor
Vendor
[Pass by Reference] The vendor that is used to create the payment suggestion.
Record "Vendor Ledger Entry"
VendorLedgerEntry
[Pass by Reference] The vendor ledger entry that is used to create the payment suggestion.
OnAfterIncludeVendor
This event is triggered after a vendor is included in the payment suggestion. It allows customization or validation of the data after the vendor and its balance are considered.
[IntegrationEvent(false, false)]
local procedure OnAfterIncludeVendor(Vendor: Record Vendor; VendorBalance: Decimal; var Result: Boolean)
begin
end;
Type
Name
Description
Record Vendor
Vendor
The vendor that is used to create the payment suggestion.
Decimal
VendorBalance
The balance of the vendor that is used to create the payment suggestion.
Boolean
Result
[Pass by Reference] The result of the function that determines if the vendor is included in the payment suggestion.
OnGetVendLedgEntriesOnBeforeLoop
The event is triggered before the loop to process the vendor ledger entries begins. It allows customization or validation of the data before the actual processing of the entries starts.
[IntegrationEvent(false, false)]
local procedure OnGetVendLedgEntriesOnBeforeLoop(var VendorLedgerEntry: Record "Vendor Ledger Entry"; PostingDate: Date; LastDueDateToPayReq: Date; Future: Boolean; var IsHandled: Boolean)
begin
end;
Type
Name
Description
Record "Vendor Ledger Entry"
VendorLedgerEntry
The vendor ledger entry that is used to create the payment suggestion.
Date
PostingDate
The posting date that is used to create the payment suggestion.
Date
LastDueDateToPayReq
The last due date that is used to create the payment suggestion.
Boolean
Future
Indicates if the vendor ledger entry is in the future.
Boolean
IsHandled
[Pass by Reference] Indicates if the vendor ledger entry is handled by custom code. The standard behavior will be skipped.
OnBeforeHandledVendorLedgerEntry
This event is triggered before the vendor ledger entry is processed. It allows customization or validation of the data before the actual processing of the entry starts.
local procedure OnBeforeHandledVendorLedgerEntry(VendorLedgerEntry: Record "Vendor Ledger Entry"; LocGenJournalLine: Record "Gen. Journal Line"; var HandledEntry: Boolean)
begin
end;
Type
Name
Description
Record "Vendor Ledger Entry"
VendorLedgerEntry
The vendor ledger entry that is used to create the payment suggestion.
Record "Gen. Journal Line"
LocGenJournalLine
The general journal line that is used to create the vendor ledger entry.
Boolean
HandledEntry
[Pass by Reference] Indicates if the vendor ledger entry is handled by custom code. The standard behavior will be skipped.
OnAfterGetVendLedgEntries
This event is triggered after the vendor ledger entries are processed. It allows customization or validation of the data after the actual processing of the entries is completed.
[IntegrationEvent(false, false)]
local procedure OnAfterGetVendLedgEntries(var VendorLedgerEntry: Record "Vendor Ledger Entry"; Vendor: Record Vendor; PostingDate: Date; LastDueDateToPayReq: Date; UsePriority: Boolean; UseDueDateAsPostingDate: Boolean; DueDateOffset: DateFormula; Positive: Boolean; Future: Boolean; PayableVendorLedgerEntry: Record "Payable Vendor Ledger Entry"; NextEntryNo: Integer)
begin
end;
Type
Name
Description
Record "Vendor Ledger Entry"
VendorLedgerEntry
The vendor ledger entry that is used to create the payment suggestion.
Record Vendor
Vendor
The vendor that is used to create the payment suggestion.
Date
PostingDate
The posting date that is used to create the payment suggestion.
Date
LastDueDateToPayReq
The last due date that is used to create the payment suggestion.
Boolean
UsePriority
Indicates if the priority is used to create the payment suggestion.
Boolean
UseDueDateAsPostingDate
Indicates if the due date is used as the posting date to create the payment suggestion.
DateFormula
DueDateOffset
The due date offset that is used to create the payment suggestion.
Boolean
Positive
Indicates if the vendor ledger entry is positive.
Boolean
Future
Indicates if the vendor ledger entry is in the future.
Record "Payable Vendor Ledger Entry"
PayableVendorLedgerEntry
The payable vendor ledger entry that is used to create the payment suggestion.
Integer
NextEntryNo
The next entry number that is used to create the payment suggestion.
OnBeforeLoopPayableVendorLedgerEntry
This event is triggered before the loop to process the payable vendor ledger entries begins. It allows customization or validation of the data before the actual processing of the entries starts.
[IntegrationEvent(false, false)]
local procedure OnBeforeLoopPayableVendorLedgerEntry(var PayableVendorLedgerEntry: Record "Payable Vendor Ledger Entry"; var SummarizePerVend: Boolean);
begin
end;
Type
Name
Description
Record "Payable Vendor Ledger Entry"
PayableVendorLedgerEntry
The payable vendor ledger entry that is used to create the payment suggestion.
Boolean
SummarizePerVend
[Pass by Reference] Indicates if the vendor ledger entries are summarized per vendor.
OnBeforePayableVendorLedgerEntryLoop
This event is triggered before the loop to process the payable vendor ledger entries begins. It allows customization or validation of the data before the actual processing of the entries starts.
[IntegrationEvent(false, false)]
local procedure OnBeforePayableVendorLedgerEntryLoop(var PayableVendorLedgerEntry: Record "Payable Vendor Ledger Entry"; var OriginalAmountAvailable: Decimal; var AmountAvailable: Decimal; var StopPayments: Boolean; Future: Boolean; Vendor: Record Vendor; SummarizePerVendor: Boolean; var IsHandled: Boolean)
begin
end;
Type
Name
Description
Record "Payable Vendor Ledger Entry"
PayableVendorLedgerEntry
The payable vendor ledger entry that is used to create the payment suggestion.
Decimal
OriginalAmountAvailable
[Pass by Reference] The original amount that is available for payment.
Decimal
AmountAvailable
[Pass by Reference] The amount that is available for payment.
Boolean
StopPayments
[Pass by Reference] Indicates if the payments are stopped.
Boolean
Future
Indicates if the vendor ledger entry is in the future.
Record Vendor
Vendor
The vendor that is used to create the payment suggestion.
Boolean
SummarizePerVendor
Indicates if the vendor ledger entries are summarized per vendor.
Boolean
IsHandled
[Pass by Reference] Indicates if the vendor ledger entry is handled by custom code. The standard behavior will be skipped.
OnCopyPayVendorLedgerEntryFromVendorLedgerEntry
This event is triggered when the payable vendor ledger entry is copied from the vendor ledger entry. It allows customization or validation of the data before the actual copying takes place.
[IntegrationEvent(false, false)]
procedure OnCopyPayVendorLedgerEntryFromVendorLedgerEntry(var PayableVendorLedgerEntry: Record "Payable Vendor Ledger Entry"; VendorLedgerEntry: Record "Vendor Ledger Entry");
begin
end;
Type
Name
Description
Record "Payable Vendor Ledger Entry"
PayableVendorLedgerEntry
The payable vendor ledger entry that is used to create the payment suggestion.
Record "Vendor Ledger Entry"
VendorLedgerEntry
The vendor ledger entry that is used to create the payment suggestion.
OnUpdateTempBufferFromVendorLedgerEntry
This event is triggered when the temporary buffer is updated from the vendor ledger entry. It allows customization or validation of the data before the actual update takes place.
[IntegrationEvent(false, false)]
local procedure OnUpdateTempNCPEPaymentBufferFromVendorLedgerEntry(var TempNCPEPaymentBuffer: Record "NCPE Payment Buffer" temporary; VendorLedgerEntry: Record "Vendor Ledger Entry")
begin
end;
Type
Name
Description
Record "NCPE Payment Buffer" temporary
TempNCPEPaymentBuffer
[Temporary] The temporary buffer that is used to create the payment suggestion.
Record "Vendor Ledger Entry"
VendorLedgerEntry
The vendor ledger entry that is used to create the payment suggestion.
OnAfterLoopPayableVendorLedgerEntry
This event is triggered after the loop to process the payable vendor ledger entries is completed. It allows customization or validation of the data after the actual processing of the entries is completed.
[IntegrationEvent(false, false)]
local procedure OnAfterLoopPayableVendorLedgerEntry(var Vendor: Record Vendor; var CurrencyBalance: Decimal; GlobalLastDueDateToPay: Date; PostingDate: Date; UsePaymentDisc: Boolean; LastPmtDiscDateToPay: Date; NCPPaymentType: Option)
begin
end;
Type
Name
Description
Record Vendor
Vendor
[Pass by Reference] The vendor that is used to create the payment suggestion.
Decimal
CurrencyBalance
[Pass by Reference] The currency balance that is used to create the payment suggestion.
Date
GlobalLastDueDateToPay
The global last due date that is used to create the payment suggestion.
Date
PostingDate
The posting date that is used to create the payment suggestion.
Boolean
UsePaymentDisc
Indicates if the payment discount is used to create the payment suggestion.
Date
LastPmtDiscDateToPay
The last payment discount date that is used to create the payment suggestion.
Option
NCPPaymentType
The payment type that is used to create the payment suggestion.
OnAfterOnPostVendorDataItem
This event is triggered after the vendor data item is posted. It allows customization or validation of the data after the actual posting of the data item is completed.
[IntegrationEvent(true, false)]
local procedure OnAfterOnPostVendorDataItem(var Vendor: Record Vendor;
                                            GenJournalLine: Record "Gen. Journal Line";
                                            GenJournalBatch: Record "Gen. Journal Batch";
                                            GenJournalTemplate: Record "Gen. Journal Template";
                                            BankPmtType: Enum "Bank Payment Type";
                                            NCPEPmtType: Option;
                                            PostingDate: Date;
                                            LastDueDateToPay: Date;
                                            UsePaymentDisc: Boolean;
                                            LastPmtDiscDateToPay: Date;
                                            GenJournalLineInserted: Boolean;
                                            LastLineNo: Integer;
                                            NextDocNo: Code[20];
                                            var Dialog: Dialog;
                                            BalAccountType: Enum "Gen. Journal Account Type";
                                            BalAccountNo: Code[20])
begin
end;
Type
Name
Description
Record Vendor
Vendor
[Pass by Reference] The vendor that is used to create the payment suggestion.
Record "Gen. Journal Line"
GenJournalLine
The general journal line that is used to create the vendor ledger entry.
Record "Gen. Journal Batch"
GenJournalBatch
The general journal batch that is used to create the vendor ledger entry.
Record "Gen. Journal Template"
GenJournalTemplate
The general journal template that is used to create the vendor ledger entry.
Enum "Bank Payment Type"
BankPmtType
The bank payment type that is used to create the payment suggestion.
Option
NCPEPmtType
The NCPE payment type that is used to create the payment suggestion.
Date
PostingDate
The posting date that is used to create the payment suggestion.
Date
LastDueDateToPay
The last due date that is used to create the payment suggestion.
Boolean
UsePaymentDisc
Indicates if the payment discount is used to create the payment suggestion.
Date
LastPmtDiscDateToPay
The last payment discount date that is used to create the payment suggestion.
Boolean
GenJournalLineInserted
[Pass by Reference] Indicates if the general journal line is inserted.
Integer
LastLineNo
The last line number that is used to create the payment suggestion.
Code[20]
NextDocNo
The next document number that is used to create the payment suggestion.
Dialog
Dialog
[Pass by Reference] The dialog that is used to create the payment suggestion.
Enum "Gen. Journal Account Type"
BalAccountType
The general journal account type that is used to create the payment suggestion.
Code[20]
BalAccountNo
The general journal account number that is used to create the payment suggestion.
OnBeforeOnCheckBalance
This event is triggered before the balance is checked. It allows customization or validation of the balance before the actual check takes place.
[IntegrationEvent(false, false)]
local procedure OnBeforeOnCheckBalance(Vendor: Record Vendor; Result: Boolean; var IsHandled: Boolean)
begin
end;
Type
Name
Description
Record Vendor
Vendor
The vendor that is used to create the payment suggestion.
Boolean
Result
[Pass by Reference] The result of the function that determines if the balance is checked.
Boolean
IsHandled
[Pass by Reference] Indicates if the balance is handled by custom code. The standard behavior will be skipped.
OnBeforeOnSetRecipientBankAccount
This event is triggered before the external bank account is retrieved. It allows customization or validation of the external bank account before the actual retrieval takes place.
[IntegrationEvent(false, false)]
local procedure OnBeforeOnSetRecipientBankAccount(var GenJournalLine: Record "Gen. Journal Line";
                                                    TempNCPEPaymentBuffer: Record "NCPE Payment Buffer";
                                                    NCPEPmtType: Option " ","Direct Debit Suggestion","Credit Transfer Suggestion","Non-SEPA Credit Transfer",,"SEPA Credit Transfer","SEPA Direct Debit";
                                                    CountryRegion: Record "Country/Region";
                                                    NCPBankAccountSetup: Record "NCP Bank Account Setup";
                                                    NCPESetup: Record "NCPE Setup";
                                                    ExternalBankAccountCode: Code[20];
                                                    var IsHandled: Boolean);
begin
end;
Type
Name
Description
Record "Gen. Journal Line"
GenJournalLine
The general journal line that is used to create the payment suggestion.
Record "NCPE Payment Buffer"
TempNCPEPaymentBuffer
The temporary buffer that is used to create the payment suggestion.
Option
NCPEPmtType
The NCPE payment type that is used to create the payment suggestion.
Record "Country/Region"
CountryRegion
The country/region that is used to create the payment suggestion.
Record "NCP Bank Account Setup"
NCPBankAccountSetup
The NCP bank account setup that is used to create the payment suggestion.
Record "NCPE Setup"
NCPESetup
The NCPE setup that is used to create the payment suggestion.
Code[20]
ExternalBankAccountCode
The external bank account code that is used to create the payment suggestion.
Boolean
IsHandled
[Pass by Reference] Indicates if the external bank account is handled by custom code. The standard behavior will be skipped.
This event is triggered before the general journal line dimensions are updated from the temporary NCPE payment buffer. It allows customization or validation of the dimensions before the actual update takes place.
[IntegrationEvent(false, false)]
local procedure OnBeforeUpdateGnlJnlLineDimensionsFromTempNCPEPaymentBuffer(var GenJournalLine: Record "Gen. Journal Line"; TempNCPEPaymentBuffer: Record "NCPE Payment Buffer" temporary; SummarizePerVend: Boolean)
begin
end;
Type
Name
Description
Record "Gen. Journal Line"
GenJournalLine
The general journal line that is used to create the payment suggestion.
Record "NCPE Payment Buffer" temporary
TempNCPEPaymentBuffer
[Temporary] The temporary buffer that is used to create the payment suggestion.
Boolean
SummarizePerVend
Indicates if the vendor ledger entries are summarized per vendor.
This event is triggered before the general journal lines are created from the temporary NCPE payment buffer. It allows customization or validation of the general journal lines before the actual creation takes place.
[IntegrationEvent(false, false)]
local procedure OnMakeGenJnlLinesOnBeforeTempNCPEPaymentBufferInsertNonSummarize(var TempNCPEPaymentBuffer: Record "NCPE Payment Buffer" temporary; VendorLedgerEntry: Record "Vendor Ledger Entry"; SummarizePerVend: Boolean; NextDocNo: Code[20])
begin
end;
Type
Name
Description
Record "NCPE Payment Buffer" temporary
TempNCPEPaymentBuffer
[Temporary] The temporary buffer that is used to create the payment suggestion.
Record "Vendor Ledger Entry"
VendorLedgerEntry
The vendor ledger entry that is used to create the payment suggestion.
Boolean
SummarizePerVend
Indicates if the vendor ledger entries are summarized per vendor.
Code[20]
NextDocNo
The next document number that is used to create the payment suggestion.
This event is triggered before the general journal lines are created from the temporary NCPE payment buffer. It allows customization or validation of the general journal lines before the actual creation takes place.
[IntegrationEvent(false, false)]
local procedure OnMakeGenJnlLinesOnBeforeUpdateTempNCPEPaymentBufferAmounts(var TempNCPEPaymentBuffer: Record "NCPE Payment Buffer" temporary; VendorLedgerEntry: Record "Vendor Ledger Entry"; SummarizePerVend: Boolean)
begin
end;
Type
Name
Description
Record "NCPE Payment Buffer" temporary
TempNCPEPaymentBuffer
[Temporary] The temporary buffer that is used to create the payment suggestion.
Record "Vendor Ledger Entry"
VendorLedgerEntry
The vendor ledger entry that is used to create the payment suggestion.
Boolean
SummarizePerVend
Indicates if the vendor ledger entries are summarized per vendor.
OnBeforeRunIncrementDocumentNo
This event is triggered before the document number is incremented. It allows customization or validation of the document number before the actual increment takes place.
[IntegrationEvent(false, false)]
local procedure OnBeforeRunIncrementDocumentNo(var GenJnlLine: Record "Gen. Journal Line"; GenJnlBatch: Record "Gen. Journal Batch"; PrepareBuffer: Boolean; DocNoPerLine: Boolean; BalAccNo: Code[20]; var IsHandled: Boolean)
begin
end;
Type
Name
Description
Record "Gen. Journal Line"
GenJnlLine
The general journal line that is used to create the payment suggestion.
Record "Gen. Journal Batch"
GenJnlBatch
The general journal batch that is used to create the payment suggestion.
Boolean
PrepareBuffer
Indicates if the buffer is prepared to create the payment suggestion.
Boolean
DocNoPerLine
Indicates if the document number is per line to create the payment suggestion.
Code[20]
BalAccNo
The general journal account number that is used to create the payment suggestion.
Boolean
IsHandled
[Pass by Reference] Indicates if the document number increment is handled by custom code. The standard behavior will be skipped.
Report - NCPE Suggest Customer Payments
The report is used to suggest customer payments based on the customer ledger entries. The report is used to create payment suggestions for customers.
Protected Variables
Variable Name
Datatype
Values
Global2GenJournalLine
Record "Gen. Journal Line"
-
AmountAvailable
Decimal
eg. 1234.56
GlobalPostingDate
Date
eg. 2024-06-01
LastDueDateToPayReq
Date
eg. 2024-06-01
LastPmtDiscDateToPayReq
Date
eg. 2024-06-01
SummarizePerDimText
Text[250]
eg. "Sum by Dimension"
NextDocNo
Code[20]
eg. "DOC0001"
NCPEPmtType
Option
" ", "Direct Debit Suggestion", "Credit Transfer Suggestion", "Non-SEPA Credit Transfer", "", "SEPA Credit Transfer", "SEPA Direct Debit"
UsePriority
Boolean
true / false
UsePaymentDisc
Boolean
true / false
WithoutReduction
Boolean
true / false
InclCustomersWithCredit
Boolean
true / false
GlobalSummarizePerCust
Boolean
true / false
DocNoPerLine
Boolean
true / false
ConsiderPmtDiscTol
Boolean
true / false
ForeignCurrencyFilter
Boolean
true / false
Events
OnBeforeOnPreReport
This event is triggered before the report is run. It allows customization or validation of the data before the actual report is executed.
[IntegrationEvent(false, false)]
local procedure OnBeforeOnPreReportEvent(Customer: Record Customer; CustLedgerEntry: Record "Cust. Ledger Entry")
begin
end;
Type
Name
Description
Record Customer
Customer
The customer that is used to create the payment suggestion.
Record "Cust. Ledger Entry"
CustLedgerEntry
The customer ledger entry that is used to create the payment suggestion.
OnAfterIncludeCustomer
This event is triggered after the customer is included in the payment suggestion. It allows customization or validation of the data after the customer and its balance are considered.
[IntegrationEvent(false, false)]
local procedure OnAfterIncludeCustomer(Customer: Record Customer; CustomerBalance: Decimal; var Result: Boolean)
begin
end;
Type
Name
Description
Record Customer
Customer
The customer that is used to create the payment suggestion.
Decimal
CustomerBalance
The balance of the customer that is used to create the payment suggestion.
Boolean
Result
[Pass by Reference] The result of the function that determines if the customer is included in the payment suggestion.
OnGetCustLedgEntriesOnBeforeLoop
This event is triggered before the loop to process the customer ledger entries begins. It allows customization or validation of the data before the actual processing of the entries starts.
[IntegrationEvent(false, false)]
local procedure OnGetCustLedgEntriesOnBeforeLoop(var CustLedgerEntry: Record "Cust. Ledger Entry"; PostingDate: Date; LastDueDateToPayReq: Date; Future: Boolean; var IsHandled: Boolean)
begin
end;
Type
Name
Description
Record "Cust. Ledger Entry"
CustLedgerEntry
The customer ledger entry that is used to create the payment suggestion.
Date
PostingDate
The posting date that is used to create the payment suggestion.
Date
LastDueDateToPayReq
The last due date that is used to create the payment suggestion.
Boolean
Future
Indicates if the customer ledger entry is in the future.
Boolean
IsHandled
[Pass by Reference] Indicates if the customer ledger entry is handled by custom code. The standard behavior will be skipped.
OnAfterGetCustLedgEntries
This event is triggered after the customer ledger entries are processed. It allows customization or validation of the data after the actual processing of the entries is completed.
[IntegrationEvent(false, false)]
local procedure OnAfterGetCustLedgEntries(var CustLedgerEntry: Record "Cust. Ledger Entry";
                                            Customer: Record Customer;
                                            PostingDate: Date;
                                            LastDueDateToPayReq: Date;
                                            UsePriority: Boolean;
                                            UseDueDateAsPostingDate: Boolean;
                                            DueDateOffset: DateFormula;
                                            Positive: Boolean;
                                            Future: Boolean;
                                            PayableCustLedgerEntry: Record "NCPE Payable Cust. Ledg. Entry";
                                            NextEntryNo: Integer)
begin
end;
Type
Name
Description
Record "Cust. Ledger Entry"
CustLedgerEntry
The customer ledger entry that is used to create the payment suggestion.
Record Customer
Customer
The customer that is used to create the payment suggestion.
Date
PostingDate
The posting date that is used to create the payment suggestion.
Date
LastDueDateToPayReq
The last due date that is used to create the payment suggestion.
Boolean
UsePriority
Indicates if the priority is used to create the payment suggestion.
Boolean
UseDueDateAsPostingDate
Indicates if the due date is used as the posting date to create the payment suggestion.
DateFormula
DueDateOffset
The due date offset that is used to create the payment suggestion.
Boolean
Positive
Indicates if the customer ledger entry is positive.
Boolean
Future
Indicates if the customer ledger entry is in the future.
Record "NCPE Payable Cust. Ledg. Entry"
PayableCustLedgerEntry
The payable customer ledger entry that is used to create the payment suggestion.
Integer
NextEntryNo
The next entry number that is used to create the payment suggestion.
OnBeforePayableCustomerLedgerEntryLoop
This event is triggered before the loop to process the payable customer ledger entries begins. It allows customization or validation of the data before the actual processing of the entries starts.
[IntegrationEvent(false, false)]
local procedure OnBeforePayableCustomerLedgerEntryLoop(var NCPEPayableCustLedgEntry: Record "NCPE Payable Cust. Ledg. Entry";
                                                        var OriginalAmountAvailable: Decimal;
                                                        var AmountAvailable: Decimal;
                                                        var StopPayments: Boolean;
                                                        Future: Boolean;
                                                        Customer: Record Customer;
                                                        SummarizePerCust: Boolean;
                                                        var IsHandled: Boolean)
begin
end;
Type
Name
Description
Record "NCPE Payable Cust. Ledg. Entry"
NCPEPayableCustLedgEntry
The payable customer ledger entry that is used to create the payment suggestion.
Decimal
OriginalAmountAvailable
[Pass by Reference] The original amount that is available for payment.
Decimal
AmountAvailable
[Pass by Reference] The amount that is available for payment.
Boolean
StopPayments
[Pass by Reference] Indicates if the payments are stopped.
Boolean
Future
Indicates if the customer ledger entry is in the future.
Record Customer
Customer
The customer that is used to create the payment suggestion.
Boolean
SummarizePerCust
Indicates if the customer ledger entries are summarized per customer.
Boolean
IsHandled
[Pass by Reference] Indicates if the customer ledger entry is handled by custom code. The standard behavior will be skipped.
OnCopyPayableCustLedgerEntryFromCustLedgerEntry
This event is triggered when the payable customer ledger entry is copied from the customer ledger entry. It allows customization or validation of the data before the actual copying takes place.
[IntegrationEvent(false, false)]
procedure OnCopyPayableCustLedgerEntryFromCustLedgerEntry(var NCPEPayableCustLedgEntry: Record "NCPE Payable Cust. Ledg. Entry"; CustLedgerEntry: Record "Cust. Ledger Entry");
begin
end;
Type
Name
Description
Record "NCPE Payable Cust. Ledg. Entry"
NCPEPayableCustLedgEntry
The payable customer ledger entry that is used to create the payment suggestion.
Record "Cust. Ledger Entry"
CustLedgerEntry
The customer ledger entry that is used to create the payment suggestion.
OnBeforeCheckBalance
This event is triggered before the balance is checked. It allows customization or validation of the balance before the actual check takes place.
[IntegrationEvent(false, false)]
local procedure OnBeforeCheckBalance(Customer: Record Customer; Result: Boolean; IsHandled: Boolean)
begin
end;
Type
Name
Description
Record Customer
Customer
The customer that is used to create the payment suggestion.
Boolean
Result
[Pass by Reference] The result of the function that determines if the balance is checked.
Boolean
IsHandled
[Pass by Reference] Indicates if the balance is handled by custom code. The standard behavior will be skipped.
This event is triggered before the general journal line dimensions are updated from the temporary NCPE payment buffer. It allows customization or validation of the dimensions before the actual update takes place.
[IntegrationEvent(false, false)]
local procedure OnBeforeUpdateGnlJnlLineDimensionsFromTempNCPEPaymentBuffer(var GenJournalLine: Record "Gen. Journal Line"; NCPEPaymentBuffer: Record "NCPE Payment Buffer" temporary; SummarizePerCust: Boolean)
begin
end;
Type
Name
Description
Record "Gen. Journal Line"
GenJournalLine
The general journal line that is used to create the payment suggestion.
Record "NCPE Payment Buffer" temporary
NCPEPaymentBuffer
[Temporary] The temporary buffer that is used to create the payment suggestion.
Boolean
SummarizePerCust
Indicates if the customer ledger entries are summarized per customer.
This event is triggered when the temporary buffer is updated from the customer ledger entry. It allows customization or validation of the data before the actual update takes place.
[IntegrationEvent(false, false)]
local procedure OnUpdateTempNCPEPaymentBufferFromCustomerLedgerEntry(var NCPEPaymentBuffer: Record "NCPE Payment Buffer" temporary; CustLedgerEntry: Record "Cust. Ledger Entry")
begin
end;
Type
Name
Description
Record "NCPE Payment Buffer" temporary
NCPEPaymentBuffer
[Temporary] The temporary buffer that is used to create the payment suggestion.
Record "Cust. Ledger Entry"
CustLedgerEntry
The customer ledger entry that is used to create the payment suggestion.
OnBeforeRunIncrementDocumentNo
This event is triggered before the document number is incremented. It allows customization or validation of the document number before the actual increment takes place.
[IntegrationEvent(false, false)]
local procedure OnBeforeRunIncrementDocumentNo(var GenJnlLine: Record "Gen. Journal Line"; GenJnlBatch: Record "Gen. Journal Batch"; PrepareBuffer: Boolean; DocNoPerLine: Boolean; BalAccNo: Code[20]; var IsHandled: Boolean)
begin
end;
Type
Name
Description
Record "Gen. Journal Line"
GenJnlLine
The general journal line that is used to create the payment suggestion.
Record "Gen. Journal Batch"
GenJnlBatch
The general journal batch that is used to create the payment suggestion.
Boolean
PrepareBuffer
Indicates if the buffer is prepared to create the payment suggestion.
Boolean
DocNoPerLine
Indicates if the document number is per line to create the payment suggestion.
Code[20]
BalAccNo
The general journal account number that is used to create the payment suggestion.
Boolean
IsHandled
[Pass by Reference] Indicates if the document number increment is handled by custom code. The standard behavior will be skipped.
Report - NCPE Suggest Employee Payments
The report is used to suggest employee payments based on the customer ledger entries. The report is used to create payment suggestions for employees.
Protected Variables
Variable Name
Datatype
Values
BGenJournalLine
Record "Gen. Journal Line"
-
AmountAvailable
Decimal
e.g. 1234.56
NextDocNo
Code[20]
e.g. "DOC0001"
SummarizePerDimText
Text[250]
e.g. "Sum by Dimension"
CheckOtherJournalBatches
Boolean
true / false
SummarizePerEmpl
Boolean
true / false
WithoutReduction
Boolean
true / false
ForeignCurrencyFilter
Boolean
true / false
DocNoPerLine
Boolean
true / false
PostingDate
Date
e.g. 2024-06-01
NCPEPmtType
Option
" ", "Direct Debit Suggestion", "Credit Transfer Suggestion", "Non-SEPA Credit Transfer", "", "SEPA Credit Transfer", "SEPA Direct Debit"
This event is triggered when the payable employee ledger entry is copied from the employee ledger entry. It allows customization or validation of the data before the actual copying takes place.
[IntegrationEvent(false, false)]
procedure OnCopyPayableEmployeeLedgerEntryFromEmployeeLedgerEntry(var PayableEmployeeLedgerEntry: Record "Payable Employee Ledger Entry"; EmployeeLedgerEntry: Record "Employee Ledger Entry");
begin
end;
Type
Name
Description
Record "Payable Employee Ledger Entry"
PayableEmployeeLedgerEntry
The payable employee ledger entry that is used to create the payment suggestion.
Record "Employee Ledger Entry"
EmployeeLedgerEntry
The employee ledger entry that is used to create the payment suggestion.
OnBeforeRunIncrementDocumentNo
This event is triggered before the document number is incremented. It allows customization or validation of the document number before the actual increment takes place.
[IntegrationEvent(false, false)]
local procedure OnBeforeRunIncrementDocumentNo(var GenJnlLine: Record "Gen. Journal Line"; GenJnlBatch: Record "Gen. Journal Batch"; PrepareBuffer: Boolean; DocNoPerLine: Boolean; BalAccNo: Code[20]; var IsHandled: Boolean)
begin
end;
Type
Name
Description
Record "Gen. Journal Line"
GenJnlLine
The general journal line that is used to create the payment suggestion.
Record "Gen. Journal Batch"
GenJnlBatch
The general journal batch that is used to create the payment suggestion.
Boolean
PrepareBuffer
Indicates if the buffer is prepared to create the payment suggestion.
Boolean
DocNoPerLine
Indicates if the document number is per line to create the payment suggestion.
Code[20]
BalAccNo
The general journal account number that is used to create the payment suggestion.
Boolean
IsHandled
[Pass by Reference] Indicates if the document number increment is handled by custom code. The standard behavior will be skipped.
Report - NCPE Create Payment File
The report is used to create a payment file based on the payment suggestion. The report is used to create payment files for vendors, customers, and employees.
OnBeforeVendorRemittanceInfoInsert
This event is triggered before the vendor remittance information is inserted. It allows customization or validation of the data before the actual insertion takes place.
[IntegrationEvent(false, false)]
local procedure OnBeforeVendorRemittanceInfoInsert(var NCPPaymentRemittanceEntry: Record "NCP Payment Remittance Entry"; OldVendorLedgerEntry: Record "Vendor Ledger Entry")
begin
end;
Type
Name
Description
Record "NCP Payment Remittance Entry"
NCPPaymentRemittanceEntry
The NCPE payment remittance entry that is used to create the payment suggestion.
Record "Vendor Ledger Entry"
OldVendorLedgerEntry
The old vendor ledger entry that is used to create the payment suggestion.
OnBeforeCustomerRemittanceInfoInsert
This event is triggered before the customer remittance information is inserted. It allows customization or validation of the data before the actual insertion takes place.
[IntegrationEvent(false, false)]
local procedure OnBeforeCustomerRemittanceInfoInsert(var NCPPaymentRemittanceEntry: Record "NCP Payment Remittance Entry"; OldCustLedgerEntry: Record "Cust. Ledger Entry")
begin
end;
Type
Name
Description
Record "NCP Payment Remittance Entry"
NCPPaymentRemittanceEntry
The NCPE payment remittance entry that is used to create the payment suggestion.
Record "Cust. Ledger Entry"
OldCustLedgerEntry
The old customer ledger entry that is used to create the payment suggestion.
OnAfterCreateVendorRemittanceInfo
This event is triggered after the vendor remittance information is created. It allows customization or validation of the data after the actual creation takes place.
[IntegrationEvent(false, false)]
local procedure OnAfterCreateVendorRemittanceInfo(GenJournalLine: Record "Gen. Journal Line"; var NCPPaymentRemittanceEntry: Record "NCP Payment Remittance Entry"; OldVendorLedgerEntry: Record "Vendor Ledger Entry"; NoOfRmtInfoTextLines: Integer; RmtInfLength: Integer)
begin
end;
Type
Name
Description
Record "Gen. Journal Line"
GenJournalLine
The general journal line that is used to create the payment suggestion.
Record "NCP Payment Remittance Entry"
NCPPaymentRemittanceEntry
The NCPE payment remittance entry that is used to create the payment suggestion.
Record "Vendor Ledger Entry"
OldVendorLedgerEntry
The old vendor ledger entry that is used to create the payment suggestion.
Integer
NoOfRmtInfoTextLines
The number of remittance information text lines that are used to create the payment suggestion.
Integer
RmtInfLength
The length of the remittance information that is used to create the payment suggestion.
OnAfterCreateCustomerRemittanceInfo
This event is triggered after the customer remittance information is created. It allows customization or validation of the data after the actual creation takes place.
[IntegrationEvent(false, false)]
local procedure OnAfterCreateCustomerRemittanceInfo(GenJournalLine: Record "Gen. Journal Line"; var NCPPaymentRemittanceEntry: Record "NCP Payment Remittance Entry"; OldCustLedgerEntry: Record "Cust. Ledger Entry")
begin
end;
Type
Name
Description
Record "Gen. Journal Line"
GenJournalLine
The general journal line that is used to create the payment suggestion.
Record "NCP Payment Remittance Entry"
NCPPaymentRemittanceEntry
The NCPE payment remittance entry that is used to create the payment suggestion.
Record "Cust. Ledger Entry"
OldCustLedgerEntry
The old customer ledger entry that is used to create the payment suggestion.
OnGenJournalLineCheck
This event is triggered before the check of the general journal line. It allows customization or validation of the general journal line before the actual check takes place.
[IntegrationEvent(false, false)]
local procedure OnGenJournalLineCheck(GenJournalLine: Record "Gen. Journal Line")
begin
end;
Type
Name
Description
Record "Gen. Journal Line"
GenJournalLine
The general journal line that is used to create the payment suggestion.
OnBeforeLoopWriteXMLLine
This event is triggered before the loop to write the XML line begins. It allows customization or validation of the data before the actual writing of the line starts.
[IntegrationEvent(false, false)]
local procedure OnBeforeLoopWriteXMLLine(var TempNCPEXmlSchemaLine: Record "NCPE XML Schema Line" temporary; var GenJournalLine: Record "Gen. Journal Line"; Type: Option Header,OrderHeader,Line,OrderFooter,Footer; var IsHandled: Boolean)
begin
end;
Type
Name
Description
Record "NCPE XML Schema Line" temporary
TempNCPEXmlSchemaLine
[Temporary] The temporary XML schema line that is used to create the payment suggestion.
Record "Gen. Journal Line"
GenJournalLine
The general journal line that is used to create the payment suggestion.
Option
Type
The type of the XML schema line that is used to create the payment suggestion.
Boolean
IsHandled
[Pass by Reference] Indicates if the XML schema line is handled by custom code. The standard behavior will be skipped.
OnBeforeWriteXMLLineToOutStream
This event is triggered before the XML line is written to the output stream. It allows customization or validation of the data before the actual writing of the line takes place.
[IntegrationEvent(false, false)]
local procedure OnBeforeWriteXMLLineToOutStream(var TempNCPEXMLSchemaLine: Record "NCPE XML Schema Line" temporary; var GenJournalLine: Record "Gen. Journal Line"; TXT: Text)
begin
end;
Type
Name
Description
Record "NCPE XML Schema Line" temporary
TempNCPEXMLSchemaLine
[Temporary] The temporary XML schema line that is used to create the payment suggestion.
Record "Gen. Journal Line"
GenJournalLine
The general journal line that is used to create the payment suggestion.
Text
TXT
The text that is used to create the payment suggestion.
OnAfterPaymentFileCreatedOnBeforeShowSummary
This event is triggered after the payment file is created and before the summary is shown. It allows customization or validation of the data after the actual creation of the file and before the summary is displayed.
[IntegrationEvent(false, false)]
local procedure OnAfterPaymentFileCreatedOnBeforeShowSummary(var SendingGenJournalLine: Record "Gen. Journal Line"; var NCPClearingEntry: Record "NCP Clearing Entry"; var AutoSend: Boolean; var ProgressDialog: Dialog)
begin
end;
Type
Name
Description
Record "Gen. Journal Line"
SendingGenJournalLine
The sending general journal line that is used to create the payment suggestion.
Record "NCP Clearing Entry"
NCPClearingEntry
The NCPE clearing entry that is used to create the payment suggestion.
Boolean
AutoSend
[Pass by Reference] Indicates if the payment file is sent automatically.
Dialog
ProgressDialog
The progress dialog that is used to create the payment suggestion.
OnAfterSetNotificationText
This event is triggered after the notification text is set. It allows customization or validation of the data after the actual setting of the text takes place.
[IntegrationEvent(false, false)]
local procedure OnAfterSetNotificationText(var NotificationText: Text[50]; NCPLanguageSetup: Record "NCP Language Setup")
begin
end;
Type
Name
Description
Text[50]
NotificationText
The notification text that is used to create the payment suggestion.
Record "NCP Language Setup"
NCPLanguageSetup
The NCPE language setup that is used to create the payment suggestion.
OnAddRmtInfOnBeforeSetRemittanceInfo
This event is triggered before the remittance information is set. It allows customization or validation of the data before the actual setting of the information takes place.
[IntegrationEvent(false, false)]
local procedure OnAddRmtInfOnBeforeSetRemittanceInfo(var NotificationText: Text[50]; var RmtInf: array[20] of Text[1024]; PmtNotificationNo: Code[20]; NCPEPaymentFileSetup: Record "NCPE Payment File Setup"; NCPLanguageSetup: Record "NCP Language Setup")
begin
end;
Type
Name
Description
Text[50]
NotificationText
[Pass by Reference] The notification text that is used to create the payment suggestion.
array[20] of Text[1024]
RmtInf
[Pass by Reference] The remittance information that is used to create the payment suggestion.
Code[20]
PmtNotificationNo
The payment notification number that is used to create the payment suggestion.
Record "NCPE Payment File Setup"
NCPEPaymentFileSetup
The NCPE payment file setup that is used to create the payment suggestion.
Record "NCP Language Setup"
NCPLanguageSetup
The NCPE language setup that is used to create the payment suggestion.
OnBeforeEmployeeRemittanceInfoInsert
This event is triggered before the employee remittance information is inserted. It allows customization or validation of the data before the actual insertion takes place.
[IntegrationEvent(false, false)]
local procedure OnBeforeEmployeeRemittanceInfoInsert(var NCPPaymentRemittanceEntry: Record "NCP Payment Remittance Entry"; OldEmployeeLedgerEntry: Record "Employee Ledger Entry")
begin
end;
Type
Name
Description
Record "NCP Payment Remittance Entry"
NCPPaymentRemittanceEntry
[Pass by Reference] The NCP payment remittance entry that is being inserted.
Record "Employee Ledger Entry"
OldEmployeeLedgerEntry
The old employee ledger entry that is being updated.
OnAfterCreateEmployeeRemittanceInfo
This event is triggered after the employee remittance information is created. It allows customization or validation of the data after the actual creation takes place.
[IntegrationEvent(false, false)]
local procedure OnAfterCreateEmployeeRemittanceInfo(GenJournalLine: Record "Gen. Journal Line"; var NCPPaymentRemittanceEntry: Record "NCP Payment Remittance Entry")
begin
end;
Type
Name
Description
Record "Gen. Journal Line"
GenJournalLine
The general journal line that is being processed.
Record "NCP Payment Remittance Entry"
NCPPaymentRemittanceEntry
[Pass by Reference] The NCP payment remittance entry that is being created.
OnBeforeGetRecipient
This event is triggered before the recipient is determined. It allows customization or validation of the recipient data before it is used.
[IntegrationEvent(false, false)]
local procedure OnBeforeGetRecipient(var Recipient: array[20] of Text[250]; GenJournalLine: Record "Gen. Journal Line"; RecipientFromOneTimeTransfer: Boolean; var IsHandled: Boolean)
begin
end;
Type
Name
Description
array[20] of Text[250]
Recipient
[Pass by Reference] The recipient information that is being determined.
Record "Gen. Journal Line"
GenJournalLine
The general journal line that is being processed.
Boolean
RecipientFromOneTimeTransfer
Indicates if the recipient is from a one-time transfer.
Boolean
IsHandled
[Pass by Reference] Indicates if the event has been handled.
OnAfterGetRecipientByAccountType
This event is triggered after the recipient is determined by account type. It allows customization or validation of the recipient data after it has been determined.
[IntegrationEvent(false, false)]
local procedure OnAfterGetRecipientByAccountType(var Recipient: array[20] of Text[250]; GenJournalLine: Record "Gen. Journal Line"; var LanguageCode: Code[10])
begin
end;
Type
Name
Description
array[20] of Text[250]
Recipient
[Pass by Reference] The recipient information that has been determined.
Record "Gen. Journal Line"
GenJournalLine
The general journal line that is being processed.
Code[10]
LanguageCode
[Pass by Reference] The language code that is being used.
OnAfterGetRecipientBeforeCreateAddresses
This event is triggered after the recipient is determined and before the addresses are created. It allows customization or validation of the recipient data before the addresses are created.
[IntegrationEvent(false, false)]
local procedure OnAfterGetRecipientBeforeCreateAddresses(var Recipient: array[20] of Text[250]; GenJournalLine: Record "Gen. Journal Line"; RecipientFromOneTimeTransfer: Boolean)
begin
end;
Type
Name
Description
array[20] of Text[250]
Recipient
[Pass by Reference] The recipient information that is being determined.
Record "Gen. Journal Line"
GenJournalLine
The general journal line that is being processed.
Boolean
RecipientFromOneTimeTransfer
Indicates if the recipient is from a one-time transfer.
OnAfterGetRecipientAddress
This event is triggered after the recipient address is determined. It allows customization or validation of the recipient address data after it has been determined.
[IntegrationEvent(false, false)]
local procedure OnAfterGetRecipientAddress(var Recipient: array[20] of Text[250]; var RAddress: array[4] of Text[250]; GenJournalLine: Record "Gen. Journal Line"; RecipientFromOneTimeTransfer: Boolean)
begin
end;
Type
Name
Description
array[20] of Text[250]
Recipient
[Pass by Reference] The recipient information that has been determined.
array[4] of Text[250]
RAddress
[Pass by Reference] The recipient address information that has been determined.
Record "Gen. Journal Line"
GenJournalLine
The general journal line that is being processed.
Boolean
RecipientFromOneTimeTransfer
Indicates if the recipient is from a one-time transfer.
Docs / App / NAVAX Payment / Information for Developers Imports
The following page lists events that are intended to help you integrate with NAVAX Payment Payment Imports.
Codeunit - NCPI Import
OnBeforeFindAndOpenCustomFormatPage
The event is triggered before the custom format page is opened. The event is triggered in the function "FindAndOpenCustomFormatPage" in the codeunit "NCPI Import".
[IntegrationEvent(true, false)]
local procedure OnBeforeFindAndOpenCustomFormatPage(NCPIImportCustFormat: Record "NCPI Import Cust. Format"; var IsHandled: Boolean)
begin
end;
Type
Name
Description
Record "NCPI Import Cust. Format"
NCPIImportCustFormat
The custom format record.
Boolean
IsHandled
[Pass by Reference] Indicates if the vendor ledger entry is handled by custom code. The standard behavior will be skipped.
OnBeforeImportFile
The event is triggered before the file is imported. The event is triggered in the function "ImportFile" in the codeunit "NCPI Import".
[IntegrationEvent(true, false)]
local procedure OnBeforeImportFile(GlobTempBlob: Codeunit "Temp Blob"; DefaultFileName: Text; WindowTitle: Text[250]; FilterString: Text[250]; var IsHandled: Boolean)
begin
end;
Type
Name
Description
Codeunit "Temp Blob"
GlobTempBlob
The temporary blob that holds the data.
Text
DefaultFileName
The default file name.
Text[250]
WindowTitle
The window title.
Text[250]
FilterString
The filter string.
Boolean
IsHandled
[Pass by Reference] Indicates if the vendor ledger entry is handled by custom code. The standard behavior will be skipped.
OnAfterImportFile
The event is triggered after the file is imported. The event is triggered in the function "ImportFile" in the codeunit "NCPI Import".
[IntegrationEvent(true, false)]
local procedure OnAfterImportFile(GlobTempBlob: Codeunit "Temp Blob"; DefaultFileName: Text)
begin
end;
Type
Name
Description
Codeunit "Temp Blob"
GlobTempBlob
The temporary blob that holds the data.
Text
DefaultFileName
The default file name.
OnBeforeInsertImport
The event is triggered before the import is inserted. The event is triggered in the function "InsertImport" in the codeunit "NCPI Import".
[IntegrationEvent(true, false)]
local procedure OnBeforeInsertImport(NCPIImport: Record "NCPI Import")
begin
end;
Type
Name
Description
Record "NCPI Import"
NCPIImport
The import record.
OnAfterInsertImport
The event is triggered after the import is inserted. The event is triggered in the function "InsertImport" in the codeunit "NCPI Import".
[IntegrationEvent(true, false)]
local procedure OnAfterInsertImport(NCPIImport: Record "NCPI Import")
begin
end;
Type
Name
Description
Record "NCPI Import"
NCPIImport
The import record.
OnBeforeImportDataSuggestBankAccount
The event is triggered before the bank account is suggested. The event is triggered in the function "ImportDataSuggestBankAccount" in the codeunit "NCPI Import".
[IntegrationEvent(true, false)]
local procedure OnBeforeImportDataSuggestBankAccount(NCPIImportData: Record "NCPI Import Data"; var IsHandled: Boolean)
begin
end;
Type
Name
Description
Record "NCPI Import Data"
NCPIImportData
The import data record.
Boolean
IsHandled
[Pass by Reference] Indicates if the vendor ledger entry is handled by custom code. The standard behavior will be skipped.
Codeunit - NCPI Import Delete Data
OnBeforeDeleteData
The event is triggered before the data is deleted. The event is triggered in the function "DeleteData" in the codeunit "NCPI Import Delete Data".
[IntegrationEvent(true, false)]
procedure OnBeforeDeleteData(var SetDeleteArchivedFiles: Boolean; var SuppressError: Boolean; var SuppressConfirm: Boolean)
begin
end;
Type
Name
Description
Boolean
SetDeleteArchivedFiles
[Pass by Reference] Indicates if the archived files are deleted.
Boolean
SuppressError
[Pass by Reference] Indicates if the error is suppressed.
Boolean
SuppressConfirm
[Pass by Reference] Indicates if the confirmation is suppressed.
OnAfterGetEntriesToDeleteCounters
The event is triggered after the entries to delete counters are retrieved. The event is triggered in the function "GetEntriesToDeleteCounters" in the codeunit "NCPI Import Delete Data".
[IntegrationEvent(true, false)]
procedure OnAfterGetEntriesToDeleteCounters(var ProgressDialog: Dialog; var TotalWindowCounter: Integer; var WindowCounter: Integer; var FromDate: Date; ToDate: Date)
begin
end;
Type
Name
Description
Dialog
ProgressDialog
The progress dialog.
Integer
TotalWindowCounter
[Pass by Reference] The total window counter.
Integer
WindowCounter
[Pass by Reference] The window counter.
Date
FromDate
The from date.
Date
ToDate
The to date.
OnAfterDeleteArchivedFilesOnBeforeUpdateNCPISetup
The event is triggered after the archived files are deleted and before the NCPI setup is updated. The event is triggered in the function "DeleteArchivedFilesOnBeforeUpdateNCPISetup" in the codeunit "NCPI Import Delete Data".
[IntegrationEvent(true, false)]
procedure OnAfterDeleteArchivedFilesOnBeforeUpdateNCPISetup(var WindowCounter: Integer; TotalWindowCounter: Integer; var ProgressDialog: Dialog; var UpdateSetup: Boolean)
begin
end;
Type
Name
Description
Integer
WindowCounter
[Pass by Reference] The window counter.
Integer
TotalWindowCounter
The total window counter.
Dialog
ProgressDialog
The progress dialog.
Boolean
UpdateSetup
[Pass by Reference] Indicates if the setup is updated.
The event is triggered before the journal is matched automatically for customer account type. The event is triggered in the function "JnlMatchAutomaticallyHandleImportAllocBufferAccountTypeCustomer" in the codeunit "NCPI Import Functions".
[IntegrationEvent(false, false)]
local procedure OnBeforeJnlMatchAutomaticallyHandleImportAllocBufferAccountTypeCustomer(CustLedgerEntry: Record "Cust. Ledger Entry"; TempNCPIImportAllocBuffer: Record "NCPI Import Alloc. Buffer" temporary; var GenJournalLine: Record "Gen. Journal Line"; var IsHandled: Boolean);
begin
end;
Type
Name
Description
Record "Cust. Ledger Entry"
CustLedgerEntry
The customer ledger entry record.
Record "NCPI Import Alloc. Buffer" temporary
TempNCPIImportAllocBuffer
The temporary import allocation buffer record.
Record "Gen. Journal Line"
GenJournalLine
The general journal line record.
Boolean
IsHandled
[Pass by Reference] Indicates if the vendor ledger entry is handled by custom code. The standard behavior will be skipped.
The event is triggered before the journal is matched automatically for vendor account type. The event is triggered in the function "JnlMatchAutomaticallyHandleImportAllocBufferAccountTypeVendor" in the codeunit "NCPI Import Functions".
[IntegrationEvent(false, false)]
local procedure OnBeforeJnlMatchAutomaticallyHandleImportAllocBufferAccountTypeVendor(VendorLedgerEntry: Record "Vendor Ledger Entry"; TempNCPIImportAllocBuffer: Record "NCPI Import Alloc. Buffer" temporary; var GenJournalLine: Record "Gen. Journal Line"; var IsHandled: Boolean);
begin
end;
Type
Name
Description
Record "Vendor Ledger Entry"
VendorLedgerEntry
The vendor ledger entry record.
Record "NCPI Import Alloc. Buffer" temporary
TempNCPIImportAllocBuffer
The temporary import allocation buffer record.
Record "Gen. Journal Line"
GenJournalLine
The general journal line record.
Boolean
IsHandled
[Pass by Reference] Indicates if the vendor ledger entry is handled by custom code. The standard behavior will be skipped.
The event is triggered before the journal is matched automatically for employee account type. The event is triggered in the function "JnlMatchAutomaticallyHandleImportAllocBufferAccountTypeEmployee" in the codeunit "NCPI Import Functions".
[IntegrationEvent(false, false)]
local procedure OnAfterCheckOtherRelationsCustLedgerEntry(var TempRelationsNCPIImportAllocBuffer: Record "NCPI Import Alloc. Buffer" temporary; var TempCustNCPIImportRemittanceInfo: Record "NCPI Import Remittance Info." temporary; var Rating: Integer)
begin
end;
Type
Name
Description
Record "NCPI Import Alloc. Buffer" temporary
TempRelationsNCPIImportAllocBuffer
The temporary import allocation buffer record.
Record "NCPI Import Remittance Info." temporary
TempCustNCPIImportRemittanceInfo
The temporary import remittance info record.
Integer
Rating
The rating.
OnAfterCheckOtherRelationsVendorLedgerEntry
The event is triggered after the other relations are checked for vendor ledger entry. The event is triggered in the function "CheckOtherRelationsVendorLedgerEntry" in the codeunit "NCPI Import Functions".
[IntegrationEvent(false, false)]
local procedure OnAfterCheckOtherRelationsVendorLedgerEntry(var TempRelationsNCPIImportAllocBuffer: Record "NCPI Import Alloc. Buffer" temporary; var TempVendorNCPIImportRemittanceInfo: Record "NCPI Import Remittance Info." temporary; var Rating: Integer)
begin
end;
Type
Name
Description
Record "NCPI Import Alloc. Buffer" temporary
TempRelationsNCPIImportAllocBuffer
The temporary import allocation buffer record.
Record "NCPI Import Remittance Info." temporary
TempVendorNCPIImportRemittanceInfo
The temporary import remittance info record.
Integer
Rating
The rating.
OnAfterCheckOtherRelationsEmployeeLedgerEntry
The event is triggered after the other relations are checked for employee ledger entry. The event is triggered in the function "CheckOtherRelationsEmployeeLedgerEntry" in the codeunit "NCPI Import Functions".
[IntegrationEvent(false, false)]
local procedure OnAfterCheckOtherRelationsEmployeeLedgerEntry(var TempRelationsNCPIImportAllocBuffer: Record "NCPI Import Alloc. Buffer" temporary; var TempEmployeeNCPIImportRemittanceInfo: Record "NCPI Import Remittance Info." temporary; var Rating: Integer)
begin
end;
Type
Name
Description
Record "NCPI Import Alloc. Buffer" temporary
TempRelationsNCPIImportAllocBuffer
The temporary import allocation buffer record.
Record "NCPI Import Remittance Info." temporary
TempEmployeeNCPIImportRemittanceInfo
The temporary import remittance info record.
Integer
Rating
The rating.
OnCheckStrongRelationsCustLedgEntryNotFound
The event is triggered when the strong relation check for customer ledger entry does not find any entry. The event is triggered in the function "CheckStrongRelationsCustLedgEntryNotFound" in the codeunit "NCPI Import Functions".
[IntegrationEvent(false, false)]
local procedure OnCheckStrongRelationsCustLedgEntryNotFound(var SourceNCPIImportAllocBuffer: Record "NCPI Import Alloc. Buffer" temporary; var TempEntriesNCPIImportAllocBuffer: Record "NCPI Import Alloc. Buffer" temporary; var CustLedgerEntry: Record "Cust. Ledger Entry"; var PaymentRefFound: Boolean)
begin
end;
Type
Name
Description
Record "NCPI Import Alloc. Buffer" temporary
SourceNCPIImportAllocBuffer
The source temporary import allocation buffer record.
Record "NCPI Import Alloc. Buffer" temporary
TempEntriesNCPIImportAllocBuffer
The temporary import allocation buffer record that holds the entries to check.
Record "Cust. Ledger Entry"
CustLedgerEntry
The customer ledger entry record.
Boolean
PaymentRefFound
[Pass by Reference] Indicates if the payment reference is found.
OnCheckStrongRelationsVendorLedgEntryNotFound
The event is triggered when the strong relation check for vendor ledger entry does not find any entry. The event is triggered in the function "CheckStrongRelationsVendorLedgEntryNotFound" in the codeunit "NCPI Import Functions".
[IntegrationEvent(false, false)]
local procedure OnCheckStrongRelationsVendorLedgEntryNotFound(var SourceNCPIImportAllocBuffer: Record "NCPI Import Alloc. Buffer" temporary; var TempEntriesNCPIImportAllocBuffer: Record "NCPI Import Alloc. Buffer" temporary; var VendorLedgerEntry: Record "Vendor Ledger Entry"; var PaymentRefFound: Boolean)
begin
end;
Type
Name
Description
Record "NCPI Import Alloc. Buffer" temporary
SourceNCPIImportAllocBuffer
The source temporary import allocation buffer record.
Record "NCPI Import Alloc. Buffer" temporary
TempEntriesNCPIImportAllocBuffer
The temporary import allocation buffer record that holds the entries to check.
Record "Vendor Ledger Entry"
VendorLedgerEntry
The vendor ledger entry record.
Boolean
PaymentRefFound
[Pass by Reference] Indicates if the payment reference is found.
OnCheckStrongRelationsEmployeeLedgEntryNotFound
The event is triggered when the strong relation check for employee ledger entry does not find any entry. The event is triggered in the function "CheckStrongRelationsEmployeeLedgEntryNotFound" in the codeunit "NCPI Import Functions".
[IntegrationEvent(false, false)]
local procedure OnCheckStrongRelationsEmployeeLedgEntryNotFound(var SourceNCPIImportAllocBuffer: Record "NCPI Import Alloc. Buffer" temporary; var TempEntriesNCPIImportAllocBuffer: Record "NCPI Import Alloc. Buffer" temporary; var EmployeeLedgerEntry: Record "Employee Ledger Entry"; var PaymentRefFound: Boolean)
begin
end;
Type
Name
Description
Record "NCPI Import Alloc. Buffer" temporary
SourceNCPIImportAllocBuffer
The source temporary import allocation buffer record.
Record "NCPI Import Alloc. Buffer" temporary
TempEntriesNCPIImportAllocBuffer
The temporary import allocation buffer record that holds the entries to check.
Record "Employee Ledger Entry"
EmployeeLedgerEntry
The employee ledger entry record.
Boolean
PaymentRefFound
[Pass by Reference] Indicates if the payment reference is found.
Codeunit - NCPI Online
OnDownloadContentUnknownAddressIndex
The event is triggered when the content is downloaded for an unknown address index. The event is triggered in the function "DownloadContentUnknownAddressIndex" in the codeunit "NCPI Online".
[IntegrationEvent(false, false)]
local procedure OnDownloadContentUnknownAddressIndex(var TempBlob: Codeunit "Temp Blob"; AddressIndex: Integer)
begin
end;
Type
Name
Description
Codeunit "Temp Blob"
TempBlob
The temporary blob that holds the data.
Integer
AddressIndex
The address index.
Docs / App / NAVAX Payment / Information for Developers konfipay
Error messages occasionally occur due to a faulty file structure or more often due to missing bank authorizations. More rarely, connection interruptions or general transmission errors to the bank server are the cause. konfipay contains a sophisticated warning and notification system for this purpose.
How errors are identified
konfipay has an error detection function that checks the submitted payment file for formal errors and thus ensures that this file does not reach the bank in the first place. A finely tuned duplicate check by konfipay also avoids potential duplicate submissions.
Below you will find a list of error codes that can occur during synchronization with the konfipay Online Payment Services API. Errors can be read via the konfipay Service Log.
Structure of the error codes
ERR-{Category}-{Number}ERR - Festes Präfix für alle Fehlercodes
{Category} - Kategorie des Fehlers
{Number} - Nummer des Fehlers. Die Nummer ist innerhalb ihrer Kategorie eindeutig.
List of all error codes and error messages with explanation
ERR-01-XXXX - Category: Invalid string parameter
ERR-01-0001
RIdNotFound
There is no resource for the given RId.
ERR-01-0002
MsgIdNotFound
There is no resource for the given message identification.
ERR-01-0003
AmbiguousMsgId
The given message identification is ambiguous.
ERR-01-0004
InvalidStartDate
The start date was not recognized as valid date.
ERR-01-0005
InvalidEndDate
The end date was not recognized as valid date.
ERR-01-0006
InvalidPeriod
The given period is not valid (the start date and end date have to be chronological).
ERR-01-0007
InvalidDate
The date was not recognized as valid date.
ERR-01-0008
TransactionIdNotFound
There is no resource for the given transaction id.
ERR-01-0009
InvalidTransactionId
The given transaction id is invalid (empty or mor than 19 characters).
ERR-01-0010
AmbiguousTransactionId
The given transaction id is ambiguous.
ERR-01-0011
EMailAddressOrMerchantIdNotFound
There is no resource for the given email or merchant id.
ERR-01-0012
MissingParameter
A required parameter is not set.
ERR-01-0013
BankNotFound
The requested bank was not found.
ERR-01-0014
InvalidGateway
The requested gateway is not supported. Only "SRZ", "EBICS" or a valid rId are allowed.
ERR-01-0015
UnsupportedApiVersion
The API version is not supported for the requested resource.
ERR-01-0016
InvalidQueryStringValue
The query string parameter contains an invalid value.
ERR-02-XXXX - Category: Content validation failed
ERR-02-0000
ontentValidationFailed
The validation of the content failed. More information about the exact reason can be found in the error details.
ERR-02-0001
InvalidRId
The given RId is invalid (empty or not 36 characters long).
ERR-02-0002
InvalidXmlCharacter
The file contains invalid characters according to the DFÜ agreement.
ERR-02-0003
MissingXmlNamespace
The XML document does not contain a valid XML namespace
ERR-02-0004
InvalidXmlNamespacePrefix
The XML namespace prefix is invalid.
ERR-02-0005
PainVersionNotSupported
The specified pain version is not supported by konfipay.
ERR-02-0006
PainVersionReleaseDateNotReached
The pain version specified in the XML document is not (yet) valid.
ERR-02-0007
SchemaValidationError
The validation of the XML document against the XML schema failed.
ERR-02-0008
InitPartyIbanChecksumValidationFailed
The IBAN checksum of the ordering party account is invalid.
ERR-02-0009
OtherPartyIbanChecksumValidationFailed
The IBAN checksum of a beneficiary/payee account is invalid.
ERR-02-0010
InvalidIbanIsoCountryCode
The ISO country code contained in the IBAN is invalid or not supported.
ERR-02-0011
TransactionLimitExceeded
The maximum number of transactions allowed per payment order was exceeded.
ERR-02-0012
LocalInstrumentMashup
The document contains more than one payment method.
ERR-02-0013
InvalidServiceLevel
The specified service level is invalid (urgent payments are not allowed).
ERR-02-0014
InvalidExecutionDate
The execution date is too far in the future/past.
ERR-02-0015
InvalidInitiatingPartyIban
The bank account is not assigned to the user account or is inactive.
ERR-02-0016
IbanBicMismatch
The bank code of the IBAN does not match the BIC of the financial institution.
ERR-02-0017
ControlSumMismatch
The specified checksum in the header or a payment does not match the content.
ERR-02-0018
NumberOfTransactionsMismatch
The specified number of transactions in the header or a payment does not match the content.
ERR-02-0019
InvalidOtherPartyCountry
The beneficiary/payer bank account is not located in a SEPA participating country.
ERR-02-0020
InvalidBankAccountIban
The checksum of the IBAN of the bank account is invalid.
ERR-02-0021
InvalidBankAccountAdditionalInformation
The content exceeds the maximum length of 500 characters.
ERR-02-0022
InvalidCreditorId
The structure of the creditor identification is invalid.
ERR-02-0023
MissingRefundIdentifier
No identifier was specified for the transaction (transaction id or RId).
ERR-02-0024
InvalidRefundMemo
The memo specified for the refund is invalid (max. 255 characters).
ERR-02-0025
InvalidRefundType
The specified refund type is invalid. Possible refund types: Full
Partial
td>
ERR-02-0026
MissingRefundAmount
The amount to be refunded is required but not specified. The amount is required if refundType specified with Partial.
ERR-02-0027
InvalidRefundAmountValue
The value of the amount to be refunded is invalid.
ERR-02-0028
InvalidRefundAmountCurrency
The currency of the amount to be refunded is invalid.
ERR-02-0029
DtazvValidationFailed
The validation of the DTAZV file has failed.
ERR-02-0030
IbanValidationFailed
The validation of the IBAN has failed.
ERR-02-0031
InvalidBlz
The bank code is invalid.
ERR-02-0032
ContainerVersionNotSupported
The container version specified in the XML document is not supported.
ERR-02-0033
CamtVersionNotSupported
The camt version specified in the XML document is not supported.
ERR-02-0034
InvalidValue
A field in the transferred Json or XML document has an invalid value.
ERR-02-0035
OtherPartyAddressRequired
For payment orders whose counter account is not located in an EU participating country and with an amount > 1000€, it is mandatory to provide the address.
ERR-02-0036
DeprecatedLocalInstrument
The file contains the unsupported direct debit type "COR1". Only "CORE" and "B2B" are supported. "COR1" can be automatically converted to "CORE" using the API settings.
ERR-02-0037
InvalidLocalInstrument
The file contains an invalid value for this payment type in the 'LocalInstrument' field.
ERR-02-0038
PaymentMessageIsNotUnique
The Message ID of the payment file needs to be unique. This is an optional check that can be deactivated in the API settings.
ERR-03-XXXX - Category: Content not readable
ERR-03-0001
NoContentReceived
No content was transferred.
ERR-03-0002
InvalidContentType
The specified content type of the transferred content is invalid.
ERR-03-0003
InvalidFileStructure
The structure of the transferred file is syntactically invalid.
ERR-03-0004
InvalidXmlDocument
The transferred content does not correspond to a well-formed XML document.
ERR-03-0005
InvalidLoginCredentials
The syntactical structure of the login information is invalid.
ERR-03-0006
InvalidBankAccount
The syntactical structure of the bank account information is invalid.
ERR-03-0007
InvalidRefund
The syntactical structure of the refund information is invalid.
ERR-03-0008
ContentNotReadable
The transferred Text, Json or XML file does not have the expected structure.
ERR-04-XXXX - Category: Prerequisites not met
ERR-04-0001
MissingScope
The API key used for authentication does not have the necessary permissions to access the requested resource.
ERR-04-0002
SrzMappingFailed
The determination of the service data center for submitting the payment file failed.
ERR-04-0003
EbicsContactMappingFailed
No completely initialized EBICS contact for the transmission of the payment file was found.
ERR-04-0004
MissingEbicsOrderType
The EBICS contact does not have the required order type for the payment type.
ERR-04-0005
InvalidEbicsContact
The EBICS contact for the transmission of the payment file is not completely initialized or not configured to send payments.
ERR-04-0006
InvalidPaymentStatus
The status of the payment is already set to "executed". A new execution is only possible if the parameter force set to true
ERR-04-0007
BankAccountIbanAlreadyExists
A bank account with the specified IBAN already exists.
ERR-04-0008
InactiveBankAccount
The bank account is deactivated in konfipay.
ERR-04-0009
UnknownBankAccount
No bank account was found for the given IBAN.
ERR-04-0010
AmbiguousRefundIdentifier
The identifier for the refund transaction is not ambiguous.
ERR-04-0011
DuplicateFound
The file was identified as a duplicate.
ERR-04-0012
IndividualRestriction
The payment file cannot be accepted due to an individual restriction of the financial institution.
ERR-04-0013
ClientBlocked
The client application was blocked by konfipay. More information about the exact reason can be found in the error details.
ERR-04-0014
InsufficientPermissions
The client is not authorized to perform the requested operation. More information about the exact reason can be found in the error details.
ERR-05-XXXX - Category: Processing error
ERR-05-0000
ProcessingError
An error has occurred while processing the request. More information about the exact reason can be found in the error details.
ERR-05-0001
EbicsError
An error has occurred while performing the EBICS action.
ERR-05-0002
PayPalError
An error has occurred while performing the PayPal action.
ERR-05-0003
PayPalUnspecifiedError
During the execution of the PayPal action an error occurred that was not specified by PayPal.
Docs / App / NAVAX Payment / Information for Developers Event Request
If you're building your own app and need something specific from us, like an event, you can help improve the general extensibility of our apps. We'll have a look at your request, and if we can we'll implement it asap. If we can't we'll let you know and briefly explain why not. When that happens, don't be discouraged. Go back to the drawing board, see if you can work it out, and then come back and submit another request.
Docs / App / NAVAX Payment / Appendix Comparison with BC Standard
Would you like to know what advantages the NAVAX Payment offers compared to the Business Central Standard?
In the following list you will find a comparison with the Business Central Standard Payment Processing import and export.
Function
NAVAX Payment Processing
Business Central Standard
Setup Wizards for Configuration
-
Payment Types
Credit Transfer, Direct Debit, International Payments, bank-specific formats
Credit Transfer, Direct Debit (SEPA)
Bank Connectivity
Direct bank connection via EBICS, using konfipay Connector
Fully automated incl. EBICS using konfipay Connector
Limited
Payment Formats
SEPA + bank-specific & international formats
Standard SEPA
Bank Statement Formats
CAMT + bank-specific variants
CAMT
Usability with Large Data Volumes
Optimized for high volumes
Limited
Extensibility / Customization
Extensible & integration-ready
Highly limited
Compliance & Traceability
Enhanced transparency & control
Basic
When is NAVAX Payment Processing particularly worthwhile?
Multiple Banks/Accounts
When you work with different banks and accounts
International Payments
For cross-border payments and multiple countries/currencies
Various Formats
When you need different payment formats (SEPA, DTAZV, MT940, custom)
Pre-configured Formats
When you want to use predefined payment formats
High Degree of Automation
When you want to largely automate payment processing
Bank Communication
For direct connection to banks via konfipay
Transparency & Control
When you need detailed logs and analyses for imports/exports
Special Requirements
When you have special payment processing requirements that go beyond the standard
Docs / App / NAVAX Payment / Appendix Data Structure
Exports
The action Create Payment File in the Payment Journals creates a NCP Clearing Entries with status Created, which contains information about the file.
Furthermore, a NCP Payment Entry is created for each individual transaction.
Structure:
Each line in the NCP Imports window can contain multiple Data lines, which in turn can contain multiple Transactions. The transactions in turn may contain multiple Remittance Info Lines and Charges.
During the transfer, a corresponding line is created in the journal or reconciliation for each NCPI payment import transaction.
If the Trans. Charges field in the NCP Imports Setup is set to Yes, an entry will also be created in the journal or bank reconciliation for the total charges per transaction.
You can either transfer the entire imported file, or individual NCP Imports Data, or just individual NCP Imports Transactions.
Note
As long as a entry has not yet been posted, you can delete it from the journal or reconciliation at any time. Click Transfer if you want to re-transfer the deleted line.
Docs / App / NAVAX Payment / Appendix konfipay Bank Account List
The konfipay Bank Account Overview page displays all bank accounts that are available for synchronization with konfipay - Online Payment Service. You can access this overview by selecting the Import Bank Accounts button on the Bank Account Setup page.
By clicking in the Bank Account exist field of an entry in the list, the Bank Account and the Bank Account Setup are created in Business Central. Alternatively, you can select one or more entries and confirm with OK. Existing bank accounts will then be updated with the data of the selected entries, and new bank accounts will be created automatically if they do not already exist.
konfipay supports almost all EBICS-enabled banks. Communication with bank data centers is based on the EBICS (Electronic Banking Internet Communication Standard) protocol, which allows you to synchronize and manage your bank accounts flexibly and easily.
Fields
The table contains the following fields and columns
Bank Account exist
Shows whether a bank account with the same data already exists in Business Central.
If you select one (or more) data record(s) and confirm with OK, an existing bank account will be updated with the data of the selected entry.
If the bank account does not yet exist, it will be newly created.
Name
Displays the name of the bank account. This name corresponds to the name used to create the bank account in konfipay.
IBAN
Shows the IBAN of the bank account.
SWIFT
Shows the Swift Code of the bank account.
Bank Account No.
Shows the Bank Account No. of the bank account.
Bank Branch No.
Shows the Bank Branch No. of the bank account.
Account Balance
Shows the account balance in konfipay.
The account balance is usually updated every 4 hours. konfipay offers you the opportunity to automate processes and procedures in bank communication.
Account Balance Date
Shows the account balance date from konfipay.
Active
Shows whether the bank account is active in konfipay or not.
Test
Shows whether the bank account is marked as a test bank account in konfipay or not.
Currency Code
Shows the currency code in which the bank account is managed in konfipay.
Note
By default, the field is hidden. To display it, click on Customize and add the field.
Agreement Document Link
Shows the link to the Agreement Document.
Note
By default, the field is hidden. To display it, click on Customize and add the field.
RID
Shows the RID. This RID is assigned by konfipay and is used to uniquely identify the bank accounts.
Note
By default, the field is hidden. To display it, click on Customize and add the field.
Actions
konfipay Portal Bank Account List
The action opens the konfipay Portal with the list of bank accounts. An appropriate permission is required to open this overview.
Docs / App / NAVAX Payment / Appendix Delete Data
Exports
By creating a payment file, an clearing entry is created. The created payment file is also saved there. If necessary, you can use this action to remove the archived payment files from the clearing entries.
Note
The files can no longer be exported after this action.
The period for deleting the data can be specified in the NCP Exports Setup in the field Delete Data Date Calculation.
Only data that is at least 6 months old can be deleted. If the field is empty, this minimum period is used.
Options
Delete Archived Files
Specifies whether the archived files should be deleted.
Imports
Importing a file creates an entry in the NAVAX Payment Imports. The imported file is also saved there. With this action, the archived import files can be removed from the NCP Imports if necessary.
Note
The period for deleting the data can be specified in the NCP Imports Setup in the field Delete Data Date Calculation.
Only data that is at least 6 months old can be deleted. If the field is empty, the minimum period is used.
Options
Delete Archived Files
Specifies, whether the archived data should be deleted.
Payments with QR Code generates a standardized QR Code, also called Girocode or EPC QR Code, this QR Code created by NCP Pay with Code can then be placed on your invoices.
On the NCP QR Code Document Data page, the history of all documents for which a Pay with Code QR code has been created (sales invoices, service invoices) is shown.
Fields
Document Type
Shows the Document Type of the Document for which the QR Code Document Data entry was created.
The following options are available:
Sales Invoice
Service Invoice
Document No.
Shows the Document No. of the document associated with this QR Code Document Data entry.
IBAN
Shows the IBAN of the recipient with which the QR Code Document Data entry was created.
SWIFT/BIC
Shows the SWIFT/BIC of the recipient used to create the QR Code Document Data entry (required in version 001; optional in version 002 within the EEA).
Receiver Name
Shows the receiver's name that was used when creating the QR Code Document Data entry.
Reference Text
Shows the Reference Text that was used when the QR Code Document Data entry was created.
Amount
Shows the Amount that was used to create the QR Code Document Data entry.
Currency Code
Shows the Currency that was used when creating the QR Code Document Data entry.
Purpose Code
Shows the Purpose Code that was used when creating the QR Code Document Data entry (max. four-digit code analogous to the text key according to DTA method, optional).
The purpose code corresponds to the text key known from the DTA procedure in order to be able to classify transfers and direct debits automatically. Payers and payees, as well as the payment service providers involved in payment processing, can use a purpose code to automatically identify payments (e.g., salary payments) and use the information, for example, for the automated calculation of account maintenance fees or the granting of overdraft facilities. Regular payments, such as salaries or capital-forming payments, should therefore always be made using a purpose code.
For more information, see Purpose-SEPA-Codes
QR-Code Id.
Shows the unique Id. that was generated when the QR Code Document Data entry was created.
QR-Code Size"
Shows the QR Code Size of the QR Code Document Data entry.
The following values are available for selection:
Small
Medium
Large
Version
Shows the Version of the QR Code Document Data entry.
If Version 001 is selected, the BIC must be specified. With Version 002 the BIC is optional to specify or to leave blank.
Function
Shows the Function that was used to create the QR Code Document Data entry.
The function is defined by the key value: SCT - SEPA Credit Transfer
Display
Shows the Display of the QR Code Document Data entry. This Introduction will be displayed to the user after the code has been captured and will provide a brief textual explanation of what they are about to initiate. This text is not reflected in the data transferred in the payment transaction.
Text
Shows the Message of the QR Code Document Data entry. This Message will be displayed to the user after the code has been captured and will provide a brief textual explanation of what they are about to initiate. This text is not reflected in the data transferred in the payment transaction.
Data
Displays the data used to generate the QR code. Click the field to display the formatted text in a new window.
QR-Code
Shows the generated QR Code of the QR Code Document Data Entry.
The NAVAX License Management page (in older versions "NAVAX License Overview" or "NCEX License Overview") displays the current license status of the NAVAX extensions.
Fields
Name
Specifies the name of the Extension.
License Status
Specifies the current license status of the Extension.
Serial No.
Specifies the serial number of the Extension.
Version
Specifies the currently installed version of the Extension.
Trial Version
A NAVAX extension can be tested or used free of charge for 30 days after installation. After that, the extension can only be used with a valid license.
Request License
The license can be requested or checked via the Current Status action. This opens a new page.
The following example shows the NAVAX extension Excel Report Builder.
Fill in the fields in the page and then click Send License Request. Please note that the licensing process may take some time. In the next few days you will receive an email with further information.
Note
For licensing, calling the online help and performing some actions, access to https://www.navax.app must be granted.
Public IP from www.navax.app for setting firewall access: 94.136.22.236, Port: TCP/443
Checking the connection to https://www.navax.app using PS: Test-NetConnection navax.app -port 443 (PS must be performed with the M-Tier service user)
CRL Servers In addition, the following CRL Servers must also be accessible for the certificate check: https://certificates.godaddy.com/* http://crl.godaddy.com/* or their IP: 192.124.249.36
Activate/Update License
As soon as the licensing has been completed, you will receive an email and the license can be activated via the Update License action. The license is company independent. So it does not matter in which company the action is called.
Note
The licence must be updated once a year via the Update License action.
The update is only possible or necessary within the last 30 days before the license expires, or afterwards. Within the last 30 days before the license expires, notes are displayed.
If the Automatic License Renewal is enabled, the Update License action is called automatically before the license expires. During this process, all licenses for which automatic license renewal is enabled are checked and updated if necessary. If automatic renewal is not successful, notifications will be displayed within the last 15 days before the license expires. Note that the setting is only active after the license has been activated.
This action can be used to open the Microsoft AppSource ratings page for the extension. We would be very happy if you submit your rating and let us know about your experience with the Extension.
For the use of konfipay Online Payment Services to communicate with the bank, access to https://portal.konfipay.de must be granted.
Public IP of portal.konfipay.de and dzbank.konfipay.de for firewall whitelisting:
Inbound: 20.61.2.93, Port: TCP/443
Outbound: 20.107.20.80, Port: TCP/443
Depending on the konfipay instance, the outgoing IP address for the connection to bank data centers may vary.
Public IP of portal.konfipay.ch for firewall whitelisting:
Inbound: 164.128.146.116, Port: TCP/443
Outbound: 164.128.146.116, Port: TCP/443
Depending on the konfipay instance, the outgoing IP address for the connection to bank data centers may vary.
Checking the connection to https://portal.konfipay.de, https://dzbank.konfipay.de or https://portal.konfipay.ch using PS:
Test-NetConnection [konfipay.de/konfipay.ch] -port 443
(PS must be performed with the M-Tier service user)
https://www.navax.app
For licensing, calling the online help and performing some actions, access to https://www.navax.app must be granted.
Public IP from www.navax.app for setting firewall access: 94.136.22.236, Port: TCP/443
Checking the connection to https://www.navax.app using PS: Test-NetConnection navax.app -port 443 (PS must be performed with the M-Tier service user)
CRL Servers In addition, the following CRL Servers must also be accessible for the certificate check: https://certificates.godaddy.com/* http://crl.godaddy.com/* or their IP: 192.124.249.36
https://qr01.navax.com:8080
To create the QR Codes via the CreateQRCodeRedSoft function, access to https://qr01.navax.com:8080 must be granted.
Checking the connection to https://qr01.navax.com:8080 using PS: Test-NetConnection qr01.navax.com -port 8080 (PS must be performed with the M-Tier service user)
Actions and fields of the standard payment functionality are no longer automatically disabled when the NAVAX Payments extension is installed and can be shown and used as needed.
Removed obsolete code parts.
Corrections
Fixed an issue in NCP bank code import: Entries were previously imported incorrectly when bank code fields were empty.
Fixed an issue in the reducing entries feature in payment suggestions: With the option Regardless of due date, not all relevant entries were suggested.
Version 26.2.5.0
as of Business Central 26 2026/02/02
Improvements
New feature: Filter option for reducing entries in payment suggestions. Reducing entries can now be filtered by due date, considered regardless of due date, or completely excluded.
For more information, see Tasks, Exports, Make Payment or Direct Debit Suggestions.
Improved display of actions when creating and displaying payment files.
Version 26.2.4.3
as of Business Central 26 2026/01/16
Modifications
Removed an unnecessary group in the NCP Exports Initial Setup Wizard.
Adjusted captions in some standard pages so that actions and fields related to NCP Payment Exports are clearly identifiable.
Restricted the display of created payment files so that only files with a status other than Canceled are shown.
Files are now consistently processed in UTF-8.
Corrections
Fixed an issue on the NCP Exports XML Schema page: The editor opened via the Allowed Character Set action always started in edit mode. As a result, changes were discarded on close when the NCP Exports XML Schema page was opened via View.
Corrected the initial value for the Advice Report ID field in the NCP Payment Exports Setup.
Version 26.2.4.2
as of Business Central 26 2025/11/18
Important
Due to changes in the Granules, the Business Central license needs to be updated for On-Premises installations.
Modifications
Update of the NAVAX Payments Base extension.
Bankcodes Download from SIX Interbanking to the current version updated via JSON download through API.
Download URL's for the Bank Codes have been updated.
The menu on the homepage was renamed from NAVAX Payments to NCP Payments.
New field Account Name added in the payment journal sheets.
Corrections
Missing layouts for Pay with QR-Code added.
When creating a service invoice from a service order, the QR-Code for Pay with QR-Code was not generated.
When creating a payment file, the NCP Account Holder was not taken over from the vendor bank account.
In the payment journals, after executing a payment suggestion, the system now automatically checks whether a manually changed amount matches the originally suggested amount. If the entered amount is lower than the suggested amount, the previously set application IDs in the affected entries are removed to avoid incorrect assignments and restore data consistency.
Modifications
The verification of journals for existing payment suggestions has been improved. The system now more reliably detects duplicate entries and thus prevents unwanted multiple suggestions for the same entries.
Update of the NAVAX Payments Base extension.
Corrections
Fixed an error where expired SEPA mandates were not correctly identified and excluded during the execution of a payment suggestion for direct debits. This led to payments being suggested with invalid mandates, which would have caused errors during payment processing.
Version 26.2.4.0
as of Business Central 26 2025/10/09
Business Central Update
Improvements
New fields to configure the Account Holder added to vendor and customer bank accounts. This enhancement supports the implementation of the new EU directive for verification of payment beneficiaries and allows storing deviating account holder information for payments when the actual account holder differs from the vendor or customer.
For more information, see Setup, General, Vendor/Customer/Employee Bank Account.
The view of payment files in the clearing entries has been revised: Instead of the previous text editor, an integrated XML preview is now available, allowing payment files to be displayed in a structured way for easier reading and review.
The NCPE Payment File Status field has been revised and now shows the status ✗ Check if the XML schemas stored in the bank account setup do not match the country code of the bank account.
The automatic license renewal no longer tries to update the license directly, but instead automatically starts a job queue. During this process, all licenses for which automatic license renewal is enabled are checked and updated if necessary.
For more information, see Appendix, NAVAX License Management.
Modifications
Download URLs for the Bank Codes have been updated.
Fixed an error that occurred when processing a payment suggestions if the General Ledger Setup had the Pmt. Disc. Tolerance Warning option enabled.
Version 25.2.3.2
as of Business Central 25 2025/09/10
Improvements
Quality of Life improvements.
Modifications
Update of the NAVAX Payments Base extension.
Corrections
Fixed an error where the Payment Suggestion in a journal with a predefined number series did not correctly fill the Document No..
In the Payment Suggestions, a bug in the logic for determining already suggested journal lines has been fixed.
Version 25.2.3.1
as of Business Central 25 2025/06/27
Modifications
The setup wizard has been revised and the help texts updated.
Download URLs for the Bank Codes have been updated.
Update of the NAVAX Payments Base extension.
Update of the NAVAX Extension Base extension.
Version 21.2.3.0
as of Business Central 21 2025/05/27
Improvements
The functionality for processing employee payments has been added. Payments to employees can now be created directly via the NAVAX Payment Exports extension.
The status messages in the NCP Payment File Status field have been revised. More detailed and clearer messages are now displayed, specifically indicating missing or incorrect information in the journal lines.
The texts in the setup wizard have been revised and made more understandable.
Modifications
The name of the action to Payment Exports Setup in the role center has been changed.
When creating a new Direct Debit Mandate, the Payment Type field is now automatically preset to Recurring to facilitate the creation of recurring mandates.
The NCP Collective Transaction Not Allowed field on the vendor card has been moved to the Payments tab to simplify operation.
An error has been fixed where the NCP Payment Type field was not correctly or not at all filled when executing a payment suggestion.
The calculation and display of the NCP Payment File Status field has been revised. The status determination now checks all relevant fields and constellations more precisely, so that errors and incorrect displays in the payment status are minimized.
Fixed an error in the setup wizard that created a record in the NAVAX Payment Exports Setup after canceling the wizard.
Version 21.2.2.9
as of Business Central 21 2025/04/07
Modifications
Update of the NAVAX Payments Base extension.
The role centers relevant for NAVAX Payments have been revised and expanded.
For more information, see General, Role Center Integration.
Corrections
A bug that prevented creating payment files for customer credit transfers has been fixed.
Version 21.2.2.8
as of Business Central 21 2025/03/11
Modifications
Update of the NAVAX Payments Base extension.
Corrections
Fixed an error where balances and credits were not correctly taken into account in the payment suggestions.
Version 21.2.2.7
as of Business Central 21 2025/02/14
Modifications
Removal of obsolete code parts.
Update of the NAVAX Payments Base extension.
Corrections
Fixed an issue where purchase invoices with a payment method code that uses a bank account or G/L account as the balancing account were posted without correctly closing the associated vendor ledger entries.
Version 21.2.2.6
as of Business Central 21 2025/01/28
Improvements
Improvement for developers: new events added in Codeunit 70322082 NCPE Create Payment File.
For more information, see Information for Developers, Exports.
Modifications
Value restriction in the field NCP Payment Type in the Payment Journal and Cash Receipt Journal removed.
Removal of obsolete code parts.
Corrections
Error in determining the recipient bank account when executing a payment suggestion corrected.
Version 21.2.2.5
as of Business Central 21 2025/01/14
Improvements
The field NCP Payment File Status in the journal lines no longer shows Check when Collective Transaction is enabled in the Payment File Setup.
Modifications
Download URLs for the Bank Codes have been updated.
New NON-SEPA transfer schema for Austria (AT_001.001.09.006.N) added.
Update of the NAVAX Payments Base extension.
Corrections
Text in the download dialogs of the NCP Bank Codes corrected.
If the option Summarize per Customer/Vendor was activated in the payment suggestion and open entries of type Payment were present, an additional line for this payment was incorrectly created.
Version 21.2.2.4
as of Business Central 21 2024/12/12
Modifications
The resourceExposurePolicy settings of the extension have been changed.
The SWIFT Code and IBAN fields on the pages Vendor/Customer Bank Account List and Vendor/Customer Bank Account Card have been moved to the NAVAX Payment Base.
Update of the NAVAX Payments Base extension.
Corrections
Fixed an error that considered payment discount tolerance in posting, but not in the payment suggestion list and the payment file.
In the payment suggestion list, the totals did not show the respective bank account, instead they showed Other.
The formatting of the cash discount amount in the payment suggestion list has also been corrected.
Version 21.2.2.3
as of Business Central 21 2024/10/28
Modifications
Order of the fields SWIFT Code and IBAN changed on the Vendor/Customer Bank Account List and Vendor/Customer Bank Account Card pages.
Corrections
When using the Business Central standard functionality Apply Entries with NAVAX Payment Exports installed, a permission error occurred if the user was not assigned the NCPE permission.
Fixed an error in the calculation of the discount tolerance.
If the discount tolerance was not activated in the General Ledger Setup (no discount tolerance period specified or 0D set) and the following constellations occurred:
Discount date and discount tolerance date are the same both discount and discount tolerance were posted, leaving the payment entry with an open balance.
Discount tolerance date is after the discount date discount date has passed and discount tolerance date applies - the discount tolerance was posted with the amount of the discount, even though the discount tolerance amount = 0 was entered in the entry.
In the vendor payment suggestion, the bank accounts were not filled if the Preferred Bank Account field was filled in the entry.
In the vendor payment suggestion, entries were not suggested because the filter on the Exported to Payment File field or the value was set incorrectly.
After executing a payment suggestion, an incorrect message was displayed at the end. The message was confusing as it stated that there could still be suggestions with other currencies.
When applying vendor/customer ledger entries, an error message occurred due to missing permissions if the user was not assigned the permission set NCPE, NAVAX Payment Exports.
Version 21.2.2.1
as of Business Central 22 2024/10/01
Improvements
The action Show Payment File has been added to the page NCP Exports Payment File - Summary.
Modifications
When using direct debit mandates for multiple bank accounts, it is now ensured that the specific values of the respective mandate are used in the payment suggestion instead of adopting the values of the master mandate.
Version 21.2.2.0
as of Business Central 21 2024/09/27
Improvements
The setup of the placeholder character for the SEPA Direct Debit Mandate ID Separator has been added to the NCP Exports setup.
For more information, see Setup, Exports, SEPA-Direct Debit-Mandates.
When using master mandates, the values of the master mandate are now entered or exported in the payment suggestion and in the create payment file function.
Actions for creating and canceling payment files as well as displaying the payment statistics have been added to the three-dot menus in the journal lines.
XML Schema SDD - AT - Rulebook 2023 - Version 4 has been added to the download.
Modifications
Removal of obsolete code parts.
Corrections
When using the function Renumber Document Numbers, it could happen that numbers were assigned twice if lines with the status Payment File Status Created were already present in the journal lines.
Correction in the XML Schema SDD - AT - Rulebook 2023 - Version 2 of the node <ReqdColltnDt>.
If the main bank account of a customer/vendor was changed via the journal lines, the field Preferred Bank Account Code on the customer/vendor was not updated. This led to incorrectly filled bank accounts and payment methods in the Payment Suggestion.
When exporting payment files, the field Exported in Payment File in the journal lines and the customer/vendor entries was not set correctly. An entry was marked as exported even though there was still an open balance.
Version 21.2.1.1
as of Business Central 21 2024/09/13
Modifications
The functionality for employee payments has been removed from NCP Payment Exports.
When creating a payment file, only the part of the direct debit mandate ID that is before the underscore (“_”) is now exported. This additional functionality allows the same direct debit mandate ID to be used for multiple customers.
Corrections
The journal line check in the payment suggestions has been revised. Now, all journals are automatically checked, and already suggested or balanced entries are listed in an overview. The option Check Other Journal Batches has been removed.
The document type in the payment suggestion list was not translated into the respective user language for lines of a overpayment.
In the payment suggestion list, the incorrect amount was printed in case of overpayment.
Version 21.2.1.0
as of Business Central 21 2024/08/22
New Product Name
The NCPE Payments Export extension has been renamed to NAVAX Payment Exports.
Improvements
Menu structure in the accountant role center tidied up.
Modifications
The logo of the extension has been changed.
Corrections
The payment suggestions ignored entries with document type Refund when the option Check Other Journal Batches was activated.
In the Payment Suggestion List, a line of type Payment was printed if a suggested document was within the Discount Tolerance.
If a bank account was specified in the NCP Preferred Bank Account Code field on a purchase invoice, it was not included in the entries when posting.
Correction of the text af the error message that occurred when checking the payment status in a ledger entry line that had already been exported or sent.
Version 21.2.0.4
as of Business Central 21 2024/08/01
Improvements
Redesign of the menu structure in the payment journal pages and cash receipt journal pages.
Modifications
If a value was entered in the Creditor/Customer Entry in the Recipient Bank Account field, it was previously ignored in the payment suggestion. The logic of bank account determination in the payment suggestion has now been revised: If a value is present in the Recipient Bank Account field, it will be used. Additionally, the bank account determination for debtor entries has been expanded to consider a direct debit mandate ID selected in the documents, which overrides everything else. If neither applies, the bank account will be searched based on the External Bank Account Search option in the NCPE Payments Export Setup.
Removal of obsolete code parts.
User experience improvements.
Corrections
After creating a payment file, before the NCPE Payment File - Summary page was opened, a message with an additional placeholder appeared.
If the option Check Other Ledger Sheet Names was activated during the payment proposal, it led to an error message if the Payment File Status for an entry in another ledger sheet was already set to File Created
Version 21.2.0.3
as of Business Central 21 2024/07/23
Corrections
During the installation of NCP Payment Base, an entry was mistakenly created in the license management. This error has been fixed, and an update routine has been created to delete the entry.
Version 21.2.0.2
as of Business Central 21 2024/07/05
Modifications
The customer and vendor bank account cards have been revised so that the fields IBAN and SWIFT Code are no longer displayed as mandatory.
The check in the payment and cash receipt journal has been revised. For non-SEPA transfers, the fields IBAN and SWIFT Code are no longer required, which correctly reflects the status.
Corrections
Under certain constellations, there were data locks in the Payment Journal page, which prevented further work.
Version 21.2.0.1
as of Business Central 21 2024/07/03
Corrections
The option Check Other Journal Batches in the NCPE Suggest Customer Payments or NCPE Suggest Vendor Payments was not taken into account.
When creating a direct debit or payment suggestion with the option Incl. Debtors with Credit Balance - Total or Incl. Creditors with Credit Balance - Total, some creditors/debtors were not taken into account even though they did not have a credit balance.
Version 21.2.0.0
as of Business Central 21 2024/06/21
Important
For On-Premises an update of the License or the following granules is required:
1001710 NCPE Payments Export by NAVAX
Improvements
Preparation for integration of konfipay Connector
Change in the payment method field in the ledger entries. Now only the available payment methods are displayed in the respective ledger entry.
The download of bank codes has been improved. Previously, it was necessary to maintain the URLs for downloading the bank codes before the download could be initiated.
This has been simplified by automatically starting the download as soon as the bank code download is triggered.
The download of bank codes now occurs in JSON format to improve download performance.
New option "Summary after creation" added to the NCPE setup.
For more information, see Setup, Exports, Exports Setup.
For creditor/customer bank accounts, the SWIFT code field has been expanded with a lookup to the SWIFT Codes table.
New option "Yes - Structured" added to recipient address in the XML schemas. This is required to comply with the new specification of the SEPA schemas implementing the ISO20022 standard.
Functionality to display the payment file in the clearing entries added.
The customer payment suggestion in the payment journal page has been renamed to Customer Direct Debit suggestion.
The payment file status field in the ledger entry lines is no longer displayed in bold and red as it caused confusion, if a line needs to be checked, it is now displayed in yellow.
Corrections
When downloading bank codes from multiple sources, the source was not indicated in the notifications or error messages. This has now been corrected as it is very helpful for analysis to know which source caused an event.
Some tooltips have been corrected.
Filters have been applied to the debtor payment suggestion for creditor entries.
Revision of the update or display of the payment status in the payment ledger entries.
There was an error during posting or preview posting in the Cash Receipt Journals when a Refund was present in the lines.
Version 21.1.7.2
as of Business Central 21 2024/04/11
Modifications
Download URLs for the Bank Codes have been updated.
Corrections
In the payment and cash receipt journals, the field Payment File Status showed Check if no SWIFT Code was specified on the customer/vendor bank account, even though the XML schema used, which was specified on the bank account, had Dom. IBAN Only enabled.
In the SEPA region, specifying the SWIFT Code is generally not necessary.
Version 21.1.7.1
as of Business Central 21 2024/02/19
Corrections
The function Consider Payment Discount Tolerance considered the discount tolerance date but did not reduce the amount in the ledger entry by the discount.
Version 21.1.7.0
as of Business Central 21 2024/02/12
Important
For On-Premises an update of the License or the following granules is required:
1001710 NCPE Payments Export by NAVAX
Improvements
The logic behind the Payment File Status field has been improved in the Gen. Journal Line table. The settings and parameters of the bank account are now also taken into account.
On the pages Payment Journal and Cash Receipt Journals the info box Payment File Error has been added. This info box shows the errors per journal line that would prevent the payment file from being exported.
In the NCPE Payments XML Schemas the Extended Character Sets have been extended for all XML schemas, the characters äüöÄÜÖß have been added since most banks accept these characters in the payment files.
In NCPE Suggest Vendor Payments and NCPE Suggest Customer Payments, the options Consider Payment Discount Tolerance have been added. Previously, the value of the Pmt. Discount Date field from the entry was taken into account.
For more information, see Tasks, Exports, Make Payment or Direct Debit Suggestions.
New option Without Reductions added to the reports NCPE Suggest Vendor Payments and NCPE Suggest Customer Payments. The indicator is used to ensure that entries that would reduce the amount (credit memos, reductions) are not included in the payment suggestion.
For more information, see Tasks, Exports, Make Payment or Direct Debit Suggestions.
Modifications
Calling up the pages Bank Account Setup and Pay with QR-Code from the role center has been changed. Previously, the pages were opened in view mode, so editing had to be activated on the pages before settings or changes could be applied.
In the payment suggestions, refunds were suggested although the option Summarize per Vendor/Customer was activated, so an error occurred when creating the payment file.
After calculating the payment suggestion, vendors/customers which had a credit balance in total (e.g. an invoice has already been posted but not yet due in this payment suggestion) were incorrectly included in the suggestion and written as refunds in the journal, which blocked the creation of a payment file.
In the NCPE Payments Export Setup an incorrect report was specified as Pmt. Notification Report ID, this has been corrected and an upgrade routine has been created to correct the report ID. The initial value has also been corrected.
Error in the creation of the QR code when the function Pay with QR-Code was activated. If no default bank account was set up for payments with QR code, the process was canceled after selecting the bank account to be used for QR code creation.
Due to the installation of the extension, the totals were not always printed on the A4 documents when using the RDLC report layouts.
If the option Summarize Per Vendor/Customer has been selected in the payment suggestion, the dimensions have not been transferred consistently to the journal lines.
In the assisted setup, the name of the field Creditor Identifier (CI) was previously County.
Version 21.1.6.5
as of Business Central 21 2023/11/17
Improvements
Improvement of user experience - actions in the Payment- and Cash Receipt Journal pages have been reorganized.
Improvement for developers: The propagateDependencies option is now set.
Modifications
Update of the NCP Payments Base extension.
Version 21.1.6.4
as of Business Central 21 2023/09/25
Corrections
When creating a Purchase Invoice with a Payment Method linked to a G/L account to automatically apply the invoice immediately with a payment during the posting process, the vendor ledger entries of the invoice have been posted with balance 0 but are incorrectly posted with Open=YES.
Version 21.1.6.3
as of Business Central 21Important Update 2023/08/07
Improvements
It is now possible to block collective transactions at vendor level. If the Collective Transaction Not Allowed option is activated for a vendor, no collective transactions will be created for the vendor in the Payment Journal.
Corrections
Error correction of the collective transactions functionality. In report 70322082 NCPE Create Payment File, the variable AllowCollectiveTransactions could be changed via an event. Setting it to false had an impact on Collective Transactions in conjunction with Payment Reference or One-Time Transfers.
Version 21.1.6.2
as of Business Central 21Important Update 2023/06/26
Corrections
In the report Payment Suggestion List, the payment discount is shown twice because the payment discount tolerance was calculated incorrectly although a payment discount was already granted.
Obsolete events have been revised. The OnUpdateTempPaymentBufferFromCustomerLedgerEntry and OnBeforeUpdateGnlJnlLineDimensionsFromTempPaymentBuffer events in the NCPE Suggest Customer Payments report are available again.
When importing data (SEPA schemes, bank codes), the number of overwritten data records was not displayed correctly.
Version 21.1.6.1
as of Business Central 21Important Update 2023/06/15
Corrections
Payment discount tolerance was drawn incorrectly although a discount was to be granted if the Block Payment Tolerance value was changed on the customer/vendor.
GUI improvements in Cash Receipt and Payment Journals concerning the Payment File Status.
The import function Initialize SEPA Countries has been redesigned. Previously, there was a query for changes to the NCP SEPA field. This is not necessary as it is a field of the NCP Payments app and can therefore be overwritten.
The value of the field Payment File Status was determined incorrectly when the function Summarize per Customer/Vendor was selected in the payment suggestion.
Version 21.1.6.0
as of Business Central 21 2023/06/07
Important
For On-Premises an update of the License or the following granules is required:
1001710 NCPE Payments Export by NAVAX
Improvements
On the NCPE Payments XML Schema or NCPE Payments XML Schemas page a new action Allowed Character Set has been added. With this action you can configure the allowed characters which are valid for the purpose in the payment file. This is necessary if your bank allows a different character set than the standard of the SEPA scheme.
A new field Umlaut Conversion has been added to the NCPE Payments XML Schema table. This can be used to control whether or not umlauts should be converted for usage purposes. The conversion converts e.g.: an Ä to an Ae.
New field Pmt. Notification Report ID added in the NCPE Export Setup. With this, a possibility was created to define own report layouts for the payment notifications.
New fields Payment Notification Report ID, Clearing List Report ID, SEPA Mandate Report ID, Zlg. Default List Report ID and their captions have been added to the NCPE Export Setup. Herewith a possibility was created to deposit own report layouts for the printouts.
.
When updating and reinstalling, the NCP SEPA indicator in the Countries/Regions table were updated each time, this has now been disabled - so installation should be faster.
Modifications
Some actions have been renamed and rearranged in the payment journals.
The action Initialize NCP SEPA Countries on the page Countries/Regions has been redesigned. The function now creates a record if it does not exist. If an entry exists, the record will be updated.
Corrections
Actions and fields of NCPE Payments Export and NCPI Payments Import have been moved. Before it was not possible to use Business Central standard for e.g.: Payment File Export if NCPI Payment Import was installed. The same applies to NCPE Payments Export.
The payment file status field was not updated after creating a payment file. The error has been fixed.
Actions in the payment journals were cleaned up.
The captions in the NCPE Initial Setup Wizard were not translated into German.
In the NCPE Initial Setup Wizard, the link to the NCP Payment Language Setup was incorrect, the Languages page was opened instead of this page.
The action Initialize NCP SEPA Countries on the page Countries/Regions has been renamed to Initialize SEPA Countries.
Version 21.1.5.0
as of Business Central 21 2023/03/27
Improvements
The Check Other Journal Batches option has been added to the payment suggestions. If this option is enabled, entries that are already in other journals will not be taken into account and will be skipped. This prevents the journal lines from being edited more than once.
Payment and cash receipt journals have been improved. It is now easier to see if journal lines are ready to be exported to a payment file or if values are still missing. With the newly added Payment File Status field, you can see at first glance whether a line is ready for payment file export. If one or more errors occur in the line, an overview with the errors can be opened using DrillDown.
The Preferred Bank Account Code field on Accounts Payable or Accounts Receivable is now filled with the bank account that is marked as Main Bank Account. If you change the value for Preferred Bank Account Code, the Main Bank Account flag on the bank account will be automatically adjusted.
When creating a purchase document, the Preferred Bank Account Code field will be prefilled if a bank account code has been specified on the vendor. The bank account that is stored on the purchase document will then be taken into account in the payment suggestion and written in the journal line.
The External Bank Account Code field has been removed from the accounts payable, accounts receivable and journal. entries. Instead of the External Bank Account Code, the Recipient Bank Account field from standard is now used. An upgrade routine to convert to the new field is run during installation to prevent data loss.
The field Mandat ID was removed from the journal lines because there is the field Direct Debit Mandate ID in the standard and this can also be used. An upgrade routine has also been created to upgrade the field during installation.
Bankcodes Download URL's updated and provided as download.
Corrections
Layout der Zahlungsvorschlagsliste korrigiert. Es wurde eine zusätzliche Seite ausgegeben da die Seitenränder nicht korrekt waren.
Version 21.1.4.0
as of Business Central 21 2022/11/30
Business Central Update
Improvements
Tooltips on the XML Schema Lines page have been improved so that the description of the columns is now more understandable. This should make editing the schemas easier.
Actions structure has been improved. The new action groups introduced with Business Central have been integrated into the current version of NCPE Payments Export and the menu structure has been improved.
Corrections
The Incl. Vendors with Credit or Incl. Customers with Credit functions in the payment suggestion reports did not work properly.
When opening the NCPE Initial Setup Wizard for the first time, an error occurred stating that the record does not exist.
The NCPE Initial Setup Wizard was created several times in the GuidedExperience, which caused the NCPE Payment Setup and the Setup Wizard are shown more than once.
An error in the NCPE Mail Management codeunit has been fixed. This prevented the automatic update of Business Central when NCPE Payments Export was installed.
Version 20.1.3.2
as of Business Central 20Important Update 2022/09/06
Corrections
Error in payment suggestions, creditor and debtor payment suggestion created wrong applications and entries.
The calculation of the payment tolerance when executing the payment suggestion incorrectly calculated the discount, which caused the wrong suggestion to be written in the journal.
Missing options in the payment suggestion reports have been readded.
Version 20.1.3.1
as of Business Central 20Important Update 2022/08/25
Corrections
When posting Sales Documents, a message appears that a customer entry could not be found if there is no NCP Pay with QR Code setup.
Version 20.1.3.0
as of Business Central 20 2022/08/12
Business Central Update
Corrections
The table relation of the External bank Account Code field in the Vendor Ledger Entry table has been corrected.
Improvements
The possibility to select a layout has been added to the report NCPE Payment Suggestion List. It is now possible to decide via the Report Layout Selection page whether the payment suggestion list should be printed in portrait or landscape format.
The Execution Date used in the payment proposals can now be pre-configured in the NCPE setup as Date Formula.
For Non SEPA transfers, address data for the receiving bank is also required in many countries, this has now been added to the XML Schemas so that it can be included in the schemas.
For OnPrem installations, events have been created, providing a way when creating SEPA XML files to allow a default location without download with query.
The Payment Notification Texts have been extended by a text editor, so now texts copied from e.g. Word can be pasted into the text editor.
On the page Countries/Regions the action NCP Initialize SEPA countries was added to enable the subsequent automatic setup of the SEPA countries. Use this action if the SEPA column has no values. Normally all SEPA countries are set up automatically during the installation of NCPE Payments Export, but in some constellations it is still necessary to set them up again automatically.
A new function has been integrated in NCP, this allows to add a QR Code to invoices for the functionality Pay with QR-Code.
In NCPE Setup an action has been added which allows to update the bank code URL's. The action starts the download of the URL's from www.navax.app, the data is continuously updated so that the latest URL's can always be fetched.
Progress indicators built into all relevant functions. These include the payment suggestions and the payment file creation.
The fields, Incl. Customers with neg. Balance and Incl. Vendors with pos. Balance, in the NCPE Setup, have been renamed to Incl. Customers with Credit and Incl. Vendors with Credit, for better understanding.
.
Necessary code updates for the new Business Central release.
Version 19.1.2.0
as of Business Central 19Important Update 2022/03/31
Improvements
New fields, Incl. Customers with neg. Balance and Incl. Vendors with pos. Balance, added in the NCPE setup. These are used to exclude debtors/creditors with credit balance in the payment suggestion.
The recipient of the e-mail is now entered in the payment entry after sending a payment notification. This is possible since an update from Microsoft.
Payment Notification layout improved.
Corrections
In the payment suggestion for certain constellations there was still an error message: "Currency" does not exist. Identified fields and values: Code = ''. This has been fixed.
Translation of the Document Type column in the Payment Suggestion List report has been corrected and layout has been changed for a better overview.
Error message during payment suggestion: Too many key fields were specified, therefore "SEPA Direct Debit Mandate" could not be retrieved. The number of fields in the primary key is 1. The function call has been changed.
Error in function call of the payment notification report corrected. It happened that the payment notification numbers are different than the ones in the e-mails to the customers..
Version 19.1.1.0
as of Business Central 19 2022/02/25
Business Central Update
Improvements
NCP bank codes are also inserted on the employee page.
Deprecated email features (SMTP Mail) are removed from NCPE Payments Export as they will soon be unavailable in Business Central, instead the advanced email features are used.
Modifications
Bank Codes Download URL's updated.
Actions and fields related to licensing have been removed from NCPE Payments Export as they have all been added centrally in the NCEX Extension Base extension.
Corrections
When updating the exchange rate, an error occurred regarding the currency with code '', this was fixed and an upgrade routine was created. Added the new field ISO LCY Code in the NCPE Payments Export Setup, this field is now used instead of the record in the currency table and should be filled before use, this does not apply to new installations. For new installations the field will be automatically filled with EUR if in the General Ledger Setup in the LCY Code field the value EUR or EURO has been specified.
For more information, see Setup, Payments Export Setup.
When creating payment advices for customers who had not specified a language code, the error message "Invalid language code specified: 0." appeared.
The error in the payment suggestion has been corrected, it prevented the external bank account code from being correctly assigned in the journal.
The Payment Suggestion List has been edited to show longer descriptions, previously the lines were truncated.
Version 18.1.0.0
as of Business Central 18 2021/08/10
Corrections
Fixed an error when sending notification emails via the new email features.
Introduced the new onboarding feature of Dynamics 365 Business Central to all pages where it makes sense.
Some Events added for extensibility.
The new Email feature from Dynamics 365 Business Central is now used to send the Payment Notification emails.
Modifications
Code requirements for Dynamics 365 Business Central version 18 implemented.
Permission sets converted to the new permission objects.
Bank Codes Download URL's updated.
Changed UI of the Assisted Setup.
Changed the behavior how the UI shows messages to the user - we now showing Notifications instead of message boxes to the user.
Corrections
The menus in the Payment and the Cash Receipt Journals was broken and now these are fixed.
The Payment Type field in Payment and Cash Receipt Journal was not filled correctly. Now the field will be filled as expected.
Keys renamed in several tables.
The address checks in the One Time Transfer page now working correct.
Version 17.0.0.0
as of Business Central 17 2020/12/01
Business Central Update
Improvements
Installation routine (new installation) now creates the required standard entries in the tables: Languages, Countries/Regions, SEPA Mandate Text Lines and Payment File Setup.
For more information, see Export Einrichtung, Zahlungsverkehr Export Einrichtungsassistent.
Modifications
Captions of some fields corrected.
Code requirements for Dynamics 365 Business Central version 17 implemented.
Functions that are no longer needed are marked as obsolete - they will be deleted in a future release.
Bank Codes Download URL's updated.
In the Assisted Setup on the SMTP Mail Setup page a button has been added to access the standard SMTP settings. Now you can change the email settings without leaving the wizard.
The Overview of Available XML Schemas in the NCPE Payments Bank Account Setup now only views the relevant schemas according to the country code assigned to the bank account.
Text of the AssisstEdit message boxes for the fields "File name" and "Remittance" has been made more readable.
Error in the XML Schema card where the fields IBAN Only possible, IBAN or Account Number possible, Address possible, Charges possible and Urgent Payment possible were not filled correctly (the options were filled incorrectly according to the available schema).
For more information, see Export Einrichtung, Zahlungsverkehr XML Schemata.
Display error when AssisstEdit the "File Name" field in the "Payment File" section of the NCPE Export Setup page.
Due to changes in the Granules, the Business Central license needs to be updated for On-Premises installations.
Improvements
Layout of the Import Deviation list has been improved.
On the Customer Bank Account and Vendor Bank Account pages, the SWIFT code and bank code can now be selected and validated using NCP Bank Code.
Quality of life improvements and user interface enhancements.
Added the new Bank Account Posting Group field to the NCP Bank Account Setup page.
Actions and fields of the standard Business Central payment functionality are no longer disabled, so they can be used if one of the NAVAX payment modules is not in use.
The export, import, and download functions have been revised and modernized.
Modifications
Update of the NAVAX Payments Base extension.
Bank Codes Download from SIX Interbanking has been updated to the current version.
Download URLs for the Bank Codes have been updated.
The menu on the homepage was renamed from NAVAX Payments to NCP Payments.
Removed obsolete code parts.
Added the missing MT940 - Split XML Identifiers field to the NCP Payment Imports Setup.
Corrections
The Import action on the NCP Imports page had no function.
When transferring imported transactions to a general journal, the balancing account could not be selected if the account type was set to G/L Account.
Fixed an issue in automatic application where applications were set even though the amount deviated from the remaining amount.
Version 25.2.3.6
Improvements
Quality of Life improvements.
Modifications
Update of the NAVAX Payments Base extension.
Corrections
Field Bal. Account No. added on the NCP Imports - Transfer to Gen. Journal page.
Version 25.2.3.5
as of Business Central 25 2025/06/26
Modifications
The setup wizard has been revised and the help texts updated.
The page for selecting options for transfer to the journal has been revised.
Download URLs for the Bank Codes have been updated.
Update of the NAVAX Payments Base extension.
Update of the NAVAX Extension Base extension.
Corrections
Fixed an error where the automatic application was aborted if a record with identical assignment already existed in the NCP Imports Alloc. Buffer table.
Fixed an error that occurred when both a payment reference and a purpose were present in the import file. In this case, there could be problems with assignment or automatic application.
Version 21.2.3.4
as of Business Central 21 2025/04/30
Improvements
A new option Excluded Characters Doc. No. Search has been added, allowing certain characters to be ignored when searching for document numbers during automatic application.
For more information, see Setup, Imports, Imports Setup.
The value "NOTPROVIDED" in the originator reference is now ignored and no longer considered a valid reference.
Modifications
Update of the NAVAX Payments Base extension.
The role centers relevant for NAVAX Payments have been revised or extended.
For more information, see General, Role Center Integration.
Group Bank Acc. Reconciliation/General Journal removed from the NCP Imports Setup.
Corrections
Fixed an error when performing the action Imports Suggest Application if multiple payments for the same entry were present in the bank file.
During automatic application, the amount is no longer considered in the rating if the option Check Application Amount in the NCP Imports Setup has been disabled.
Version 21.2.3.3
as of Business Central 21 2025/03/06
Improvements
Sorting in the NCP Imports Alloc. Analysis changed.
In the NCP Imports Alloc. Analysis, suggestions found due to the Ext. Bank Account No. or the Ext. Bank Account Holder are marked as such.
Tooltip for the field Ext. Account Info found improved.
Modifications
Download URLs for the Bank Codes have been updated.
Update of the NAVAX Payments Base extension.
Corrections
Fixed an error when using the action Import Suggest Application if multiple payments for the same entry were present in the bank file.
The order of the pages in the NCP Imports Assisted Setup has been changed, bank account codes now come before the bank account setup.
Version 21.2.3.1
as of Business Central 21 2024/12/09
Modifications
The resourceExposurePolicy settings of the extension have been changed.
Update of the NAVAX Payments Base extension.
Corrections
The following error occurred during the automatic application: 'Applies-to ID' must not be '' in '** ledger entry': 'Entry No.=***'. The current value is '***'.
Version 21.2.3.0
as of Business Central 21 2024/12/03
Improvements
Improvement of the application suggestion logic in the Cash Receipt and Payment Journal pages.
For more information, see Tasks, Imports, Applying Open Entries.
Performance of the application suggestion in the Payment Receipt and Payment Journal pages improved.
On the NCP Imports Matching Analysis page, the column fixation has been adjusted to make the view and analysis easier.
The Account Name field has also been added to the NCP Imports Alloc. Analysis page.
The field Line Information in the NCP Imports Alloc. Analysis page now shows the origin of the application suggestion, making it easier to analyze the suggestions.
Modifications
Update of the NAVAX Payments Base extension.
New option Payment Reference added to the fields Trans. Description and Trans. External Document No. in the NAVAX Payment Imports Setup. Additionally, the option Payment Reference/Purpose has been added to the Trans. Description field.
On the Import Data and Import Transactions pages, the action Transfer has been renamed to Transfer or Transfer Line.
Visibility of some import fields in the Cash Receipt and Payment Journal pages changed to improve the overview.
Corrections
A bug related to Fixed Account Allocations and Dimensions has been fixed. It could happen that the dimensions were not correctly adopted.
Setup, Imports, Fixed Account Allocations
The warning message after the application suggestion, that journal lines already exist in another journal, has been revised.
The calculation of the rating of the suggestion has been adjusted to recognize slightly different entries by the payers.
Version 21.2.1.0
as of Business Central 21 2024/09/05
New Product Name
The NCPI Payments Import extension has been renamed to NAVAX Payment Imports.
Improvements
Menu structure in the accountant role center tidied up.
A new feature has been added that displays a message and overview when the automatic application skips entries because they already exist in other journal pages. This helps users avoid duplicate entries and maintain an overview of their transactions.
In the Payment Journal and Cash Receipt Journal pages, the Apply Suggested Application - line action has been integrated in the "Show more options" (three dots ⋮) menu.
In the Apply Vendor Entries and Apply Customer Entries pages, the fields NCP Imports Payment Reference, NCP Imports Remittance Info., and NCP Imports Additional Information have been added. Additionally, the Import Transaction Card action has been added. This facilitates manual follow-up of reconciliation suggestions.
Modifications
The logo of the extension has been changed.
Version 21.2.0.2
as of Business Central 21 2024/08/01
Improvements
Redesign of the menu structure in the payment journal pages and cash receipt journal pages.
Version 21.2.0.1
as of Business Central 21 2024/07/23
Corrections
During the installation of NCP Payment Base, an entry was mistakenly created in the license management. This error has been fixed, and an update routine has been created to delete the entry.
Version 21.2.0.0
as of Business Central 21 2024/06/21
Important
For On-Premises an update of the License or the following granules is required:
1001730 NCPI Payments Import by NAVAX
Improvements
Preparation for integration of konfipay Connector.
The download of bank codes now occurs in JSON format to improve download performance.
For creditor/customer bank accounts, the SWIFT code field has been expanded with a lookup to the SWIFT Codes table.
When downloading bank codes from multiple sources, the source was not indicated in the notifications or error messages. This has now been corrected as it is very helpful for analysis to know which source caused an event.
Some tooltips have been corrected.
Version 21.1.7.4
as of Business Central 21Important Update 2024/06/06
Corrections
Error message when executing the Application Suggestion, "The Length of the string is 23 but it must be less than or equal to 20 characters. Value: @**********" the error has been fixed.
Version 21.1.7.3
as of Business Central 21Important Update 2024/05/24
Corrections
Error message when performing the Application Suggestion if a corresponding entry was searched for using the payment reference in the Creditor/Debtor No.
Version 21.1.7.2
as of Business Central 21 2024/05/06
Corrections
A correction has been made to the automatic application logic. Entries or accounts were not suggested correctly.
The Import Suggest Application in the journal entries previously had problems with applying entries that included payment discounts. As a result, these items were not applied correctly or could not be found properly. To be able to reconcile the entries, it was necessary to set up the application tolerance amount in the NCPI Payments Import Setup to be higher than the payment discount.
Version 21.1.7.1
as of Business Central 21 2024/04/17
Corrections
Error message when performing the Application Suggestion if a corresponding entry was found for an entry due to the payment reference.
Obsolete actions on the NCPI Payments Import Details page have been hidden.
Version 21.1.7.0
as of Business Central 21 2024/03/12
Improvements
The automatic application can now be set up so that separators in the External Document No. field are taken into account. Previously, the automatic application was not possible if the structure of the External Document No. contained a special character (separator).
Example:
External Document No: 123456_DIVISION, but the purpose of the payment only imported 123456.
The matching logic has been improved and now provides even more results.
The Bank Account Setup menu has been added to the setup wizard.
On the NCPI Import page, the Open Reconciliations and Posted Statements actions have been removed from the Data menu. This only applies if the import option in the NCPI Setup has been set to Bank Account Reconciliation.
The function Keep Account Allocations did not work in certain constellations, the error has been fixed.
The setup wizard has not set the status correctly in the Assisted Setup overview page.
In the setup wizard, the values of the fields Source Code from Import, Source Code from Bank Acc. Reconciliation and Fixed Account Allocations Exist were not shown correctly or were not calculated if they were already configured.
In the Cash Receipt Journals, a 0 was shown in the Direct Debit Type field if the line was not of type direct debit.
Version 21.1.6.2
as of Business Central 21 2023/11/17
Improvements
Improvement of user experience - actions in the Payment and Cash Receipt Journal pages have been reorganized.
Improvement for developers: The propagateDependencies option is now set.
Modifications
Update of the NCP Payments Base extension.
Version 21.1.6.1
as of Business Central 21 2023/11/07
Improvements
Added new option Keep Account Allocations in the NCPI Payments Import Setup. If the option is enabled, account numbers will be suggested during application suggestion even if no matching documents are found to application.
Version 21.1.6.0
as of Business Central 21 2023/06/07
Important
For On-Premises an update of the License or the following granules is required:
1001730 NCPI Payments Import by NAVAX
Business Central Update
Modifications
Some actions have been renamed and rearranged in the payment journals.
Corrections
Fixed error in automatic application with payment discount and/or payment discount tolerance.
Actions and fields of NCPE Payments Export and NCPI Payments Import have been moved. Before it was not possible to use Business Central standard for e.g.: Payment File Export if NCPI Payment Import was installed. The same applies to NCPE Payments Export.
Version 21.1.5.0
as of Business Central 21 2023/04/06
Improvements
The NCPI Import Fixed Account Allocations page can now be accessed via Tell me what you want to do?
In the Fixed Account Allocations it is now possible to assign Dimensions, these are automatically carried along when posting and written to the entries.
On the NCPI Import Data and NCPI Import Data Card pages 3 new fields have been added. Closing Booked last Statement, Transaction Amounts and Closing Booked. These fields are for better overview of account balances.
The application suggestion of customer payments now also searches for the External Document No. in the entries.
Modifications
The NCPI Import Data and NCPI Transactions pages have been redesigned to make it easier to work with NCPI Import. They now provide all the functions of a list page.
Navigate function implemented on the NCPI Import Transactions and NCPI Import Charges pages. This can be used to search for related entries, as in Business Central Standard.
On the NCPI Import Data Card page, the Bank Account field has been set to editable, if this could not be assigned automatically it is now also possible to change the bank account in the card.
Corrections
On the NCPI Import page the name of the action Transfer was corrected, here the translation into German was missing.
Tooltips and captions on some pages corrected and improved.
Version 21.1.4.0
as of Business Central 21 2022/12/21
Business Central Update
Improvements
Actions structure has been improved. The new action groups introduced with Business Central have been integrated into the current version of NCPI Payments Import and the menu structure has been improved.
A drop zone has been added to the NCPI Import page. Via the drop zone, single or multiple files can be uploaded via drag & drop.
Modifications
In the NCPI Payments Import Setup table, the field "Document No. Alloc. Accuracy" field has been replaced by the "Doc. No. Alloc. Accuracy". The object name was too long and might cause errors in future Business Central versions. When upgrading NCPI Payment Import to version 21.1.4.0, the change is performed automatically so no breaking change can happen.
Corrections
The fields SEPA Credit Transfer Scheme, NON-SEPA Credit Transfer Scheme, SEPA Direct Debit Scheme, Originator ID and Originator ID Issuer have been removed from the Bank Account Setup table. The fields will be used only in NCPE Payments Export and will be moved there.
The NCPI Initial Setup Wizard was created several times in the GuidedExperience, which caused the NCPI Payment Setup and the Setup Wizard to be shown several times.
Version 20.1.3.2
as of Business Central 20Important Update 2022/09/09
Corrections
Fixed an error in the automatic application suggestion, no automatic application suggestion was possible because it was interrupted with an error.
Version 20.1.3.1
as of Business Central 20Important Update 2022/08/25
Corrections
When posting Sales Documents, a message appears that a customer entry could not be found if there is no NCP Pay with QR Code setup.
Version 20.1.3.0
as of Business Central 20 2022/08/12
Business Central Update
Improvements
The bank statement import now automatically detects which file is being imported, the selection window by which the file type was to be selected is not necessary and is no longer displayed.
In the Import Suggest Application in the journals already correctly found customers or vendors were skipped although such were found based on the external bank account number. During the application search, a complex logic of priorities is used, where the item has the highest priority. This logic has now been improved in that debtors but also creditors are no longer skipped as soon as the external account number was found and also the search of information in purpose and the payment reference has been improved so that now an improved result comes out in the application suggestion.
A new function has been integrated in NCP, this allows to add a QR code to the invoice for the functionality Numbers with code.
Progress indicators built into all relevant functions. These include the import of files and the transfer of files.
The result of the automatic adjustment suggestion has been improved so that the automation level has been increased.
Corrections
Code corrections.
Version 19.1.2.0
as of Business Central 19Important Update 2022/03/31
Corrections
An error when importing a CAMT file if it contains reversal postings has been corrected.
Version 19.1.1.0
as of Business Central 19 2022/02/25
Business Central Update
Improvements
The MT940 import format has been added to NCPI Payments Import.
Modifications
Actions and fields related to licensing have been removed from NCPE Payments Export as they have all been added centrally in the NCEX Extension Base extension.
Corrections
When updating the exchange rate, an error occurred regarding the currency with code '', this was fixed and an upgrade routine was created.
Would you like to know what has changed in the extension? Below you'll find an overview of the new features and changes made in the updates.
Version 26.2.3.2
as of Business Central 26 2026/03/02
Note
This version is also available as a downgrade version for Business Central 25 and 22.
Modifications
NAVAX konfipay Connector Base extension update.
Version 26.2.3.1
as of Business Central 26 2025/11/10
Modifications
The status check when resetting Payment Status Entries has been adjusted. This prevents payments from being blocked when the status in konfipay does not change automatically. Payments can now be further processed even if the status in konfipay remains unchanged.
Version 26.2.3.0
as of Business Central 26 2025/10/30
Business Central Update
Improvements
Quality of Life improvements.
Revised status logic: Payments that are not immediately processed by the bank no longer block the payment journals. The user can now decide at which status posting should be allowed.
Correction of the license check in all relevant functions.
Version 22.2.2.0
as of Business Central 22 2024/09/27
Modifications
NAVAX Payment Exports extension update.
Removal of obsolete code parts.
Version 22.1.1.0
as of Business Central 22 2024/08/23
Modifications
NAVAX Payment Exports extension update.
Version 22.1.0.2
as of Business Central 22 2024/08/01
Improvements
Redesign of the menu structure in the payment journal pages and cash receipt journal pages.
Version 22.1.0.1
as of Business Central 22 2024/07/23
Corrections
An entry in the license management was mistakenly created during the installation of NCPK konfipay Connector Base. This issue has been resolved and an update routine has been created to delete the entry.
An entry in the license management was mistakenly created during the installation of NCPK konfipay Connector Base. This issue has been resolved and an update routine has been created to delete the entry.


 NAVAX Payment consists of several actions that are grouped under NAVAX Payment:


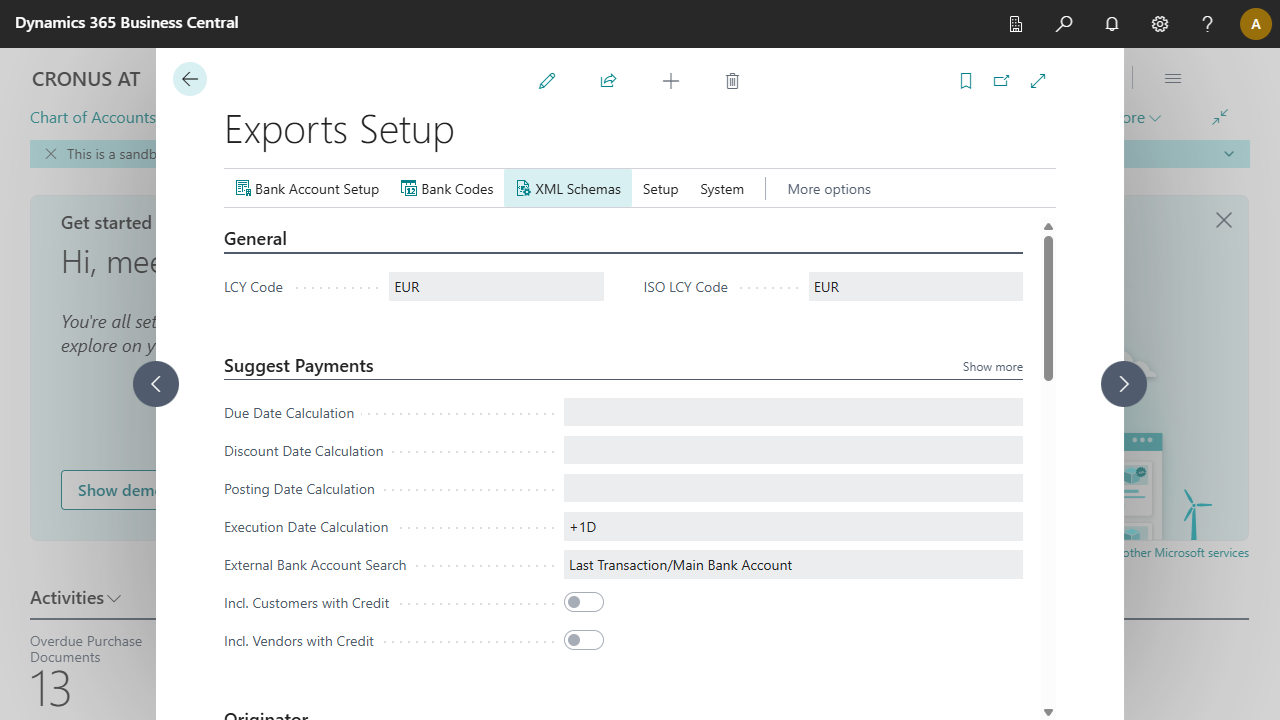
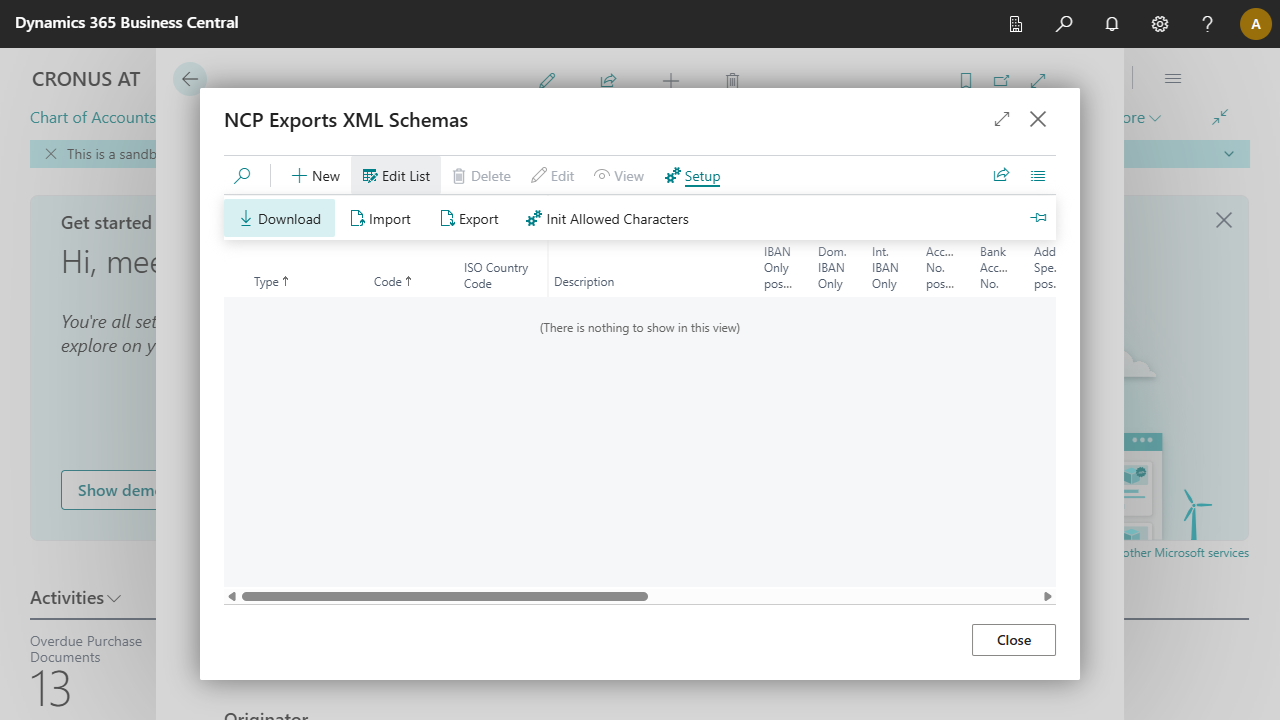
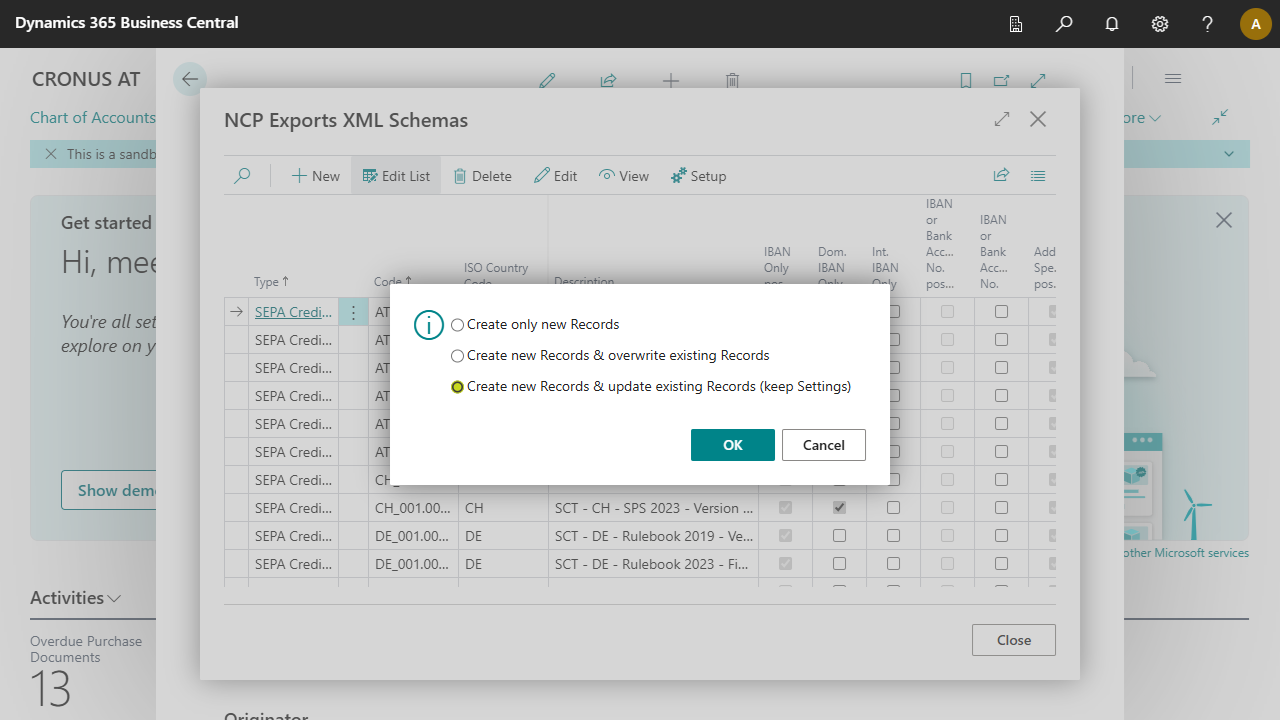
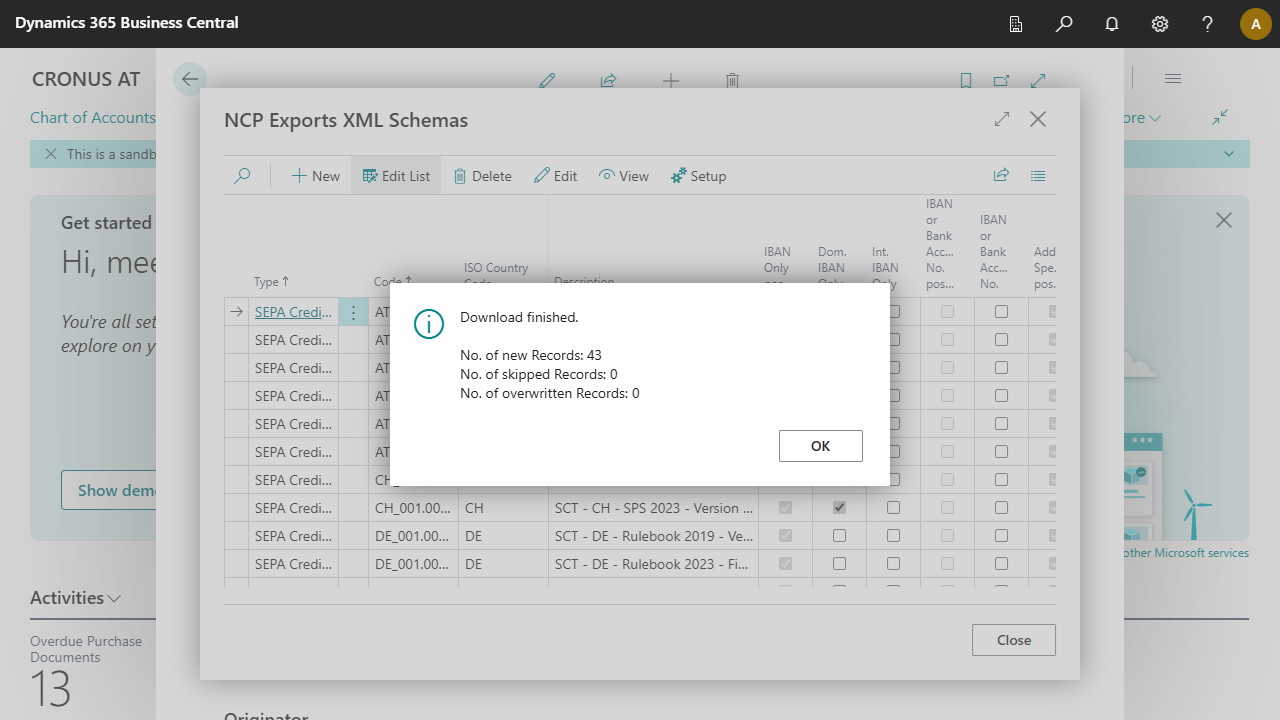
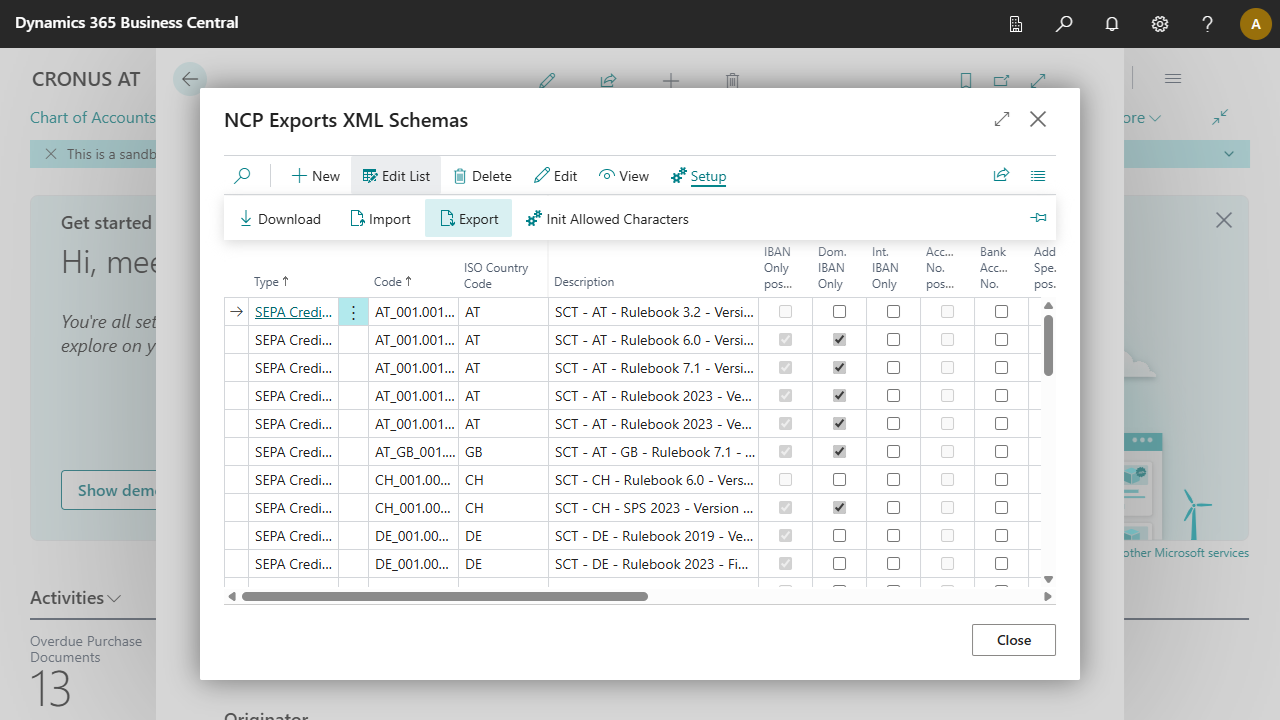


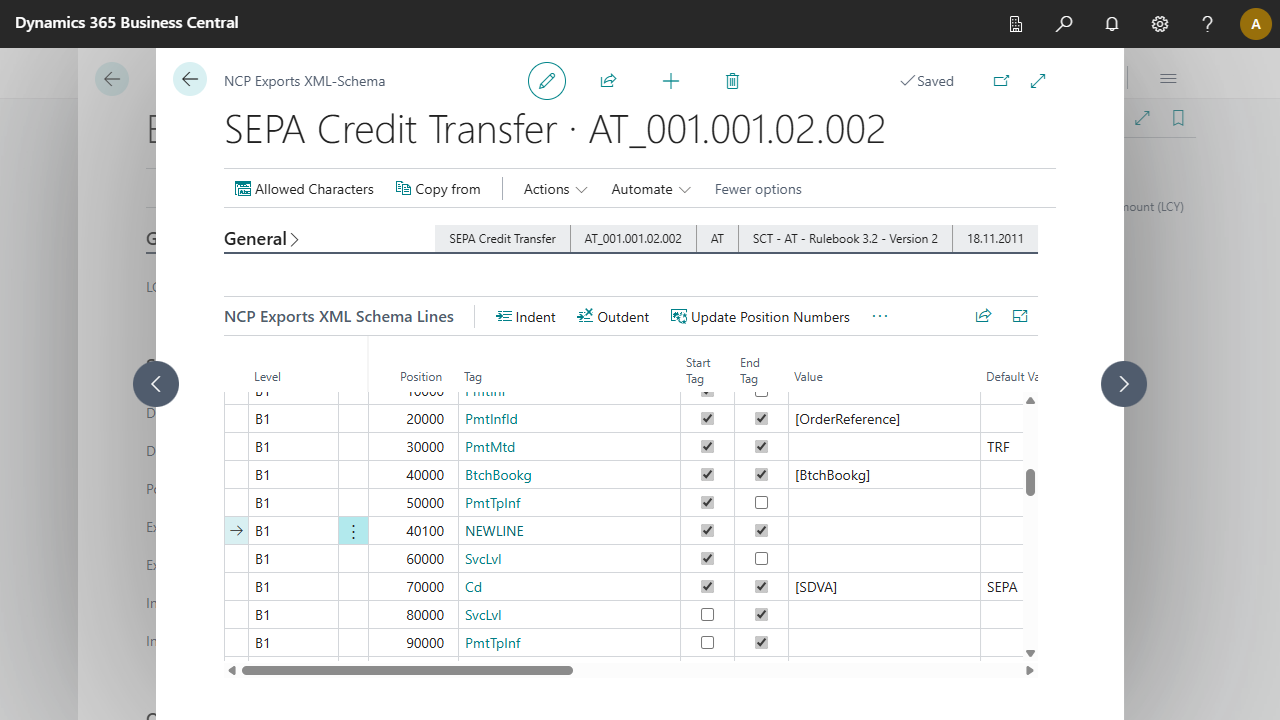
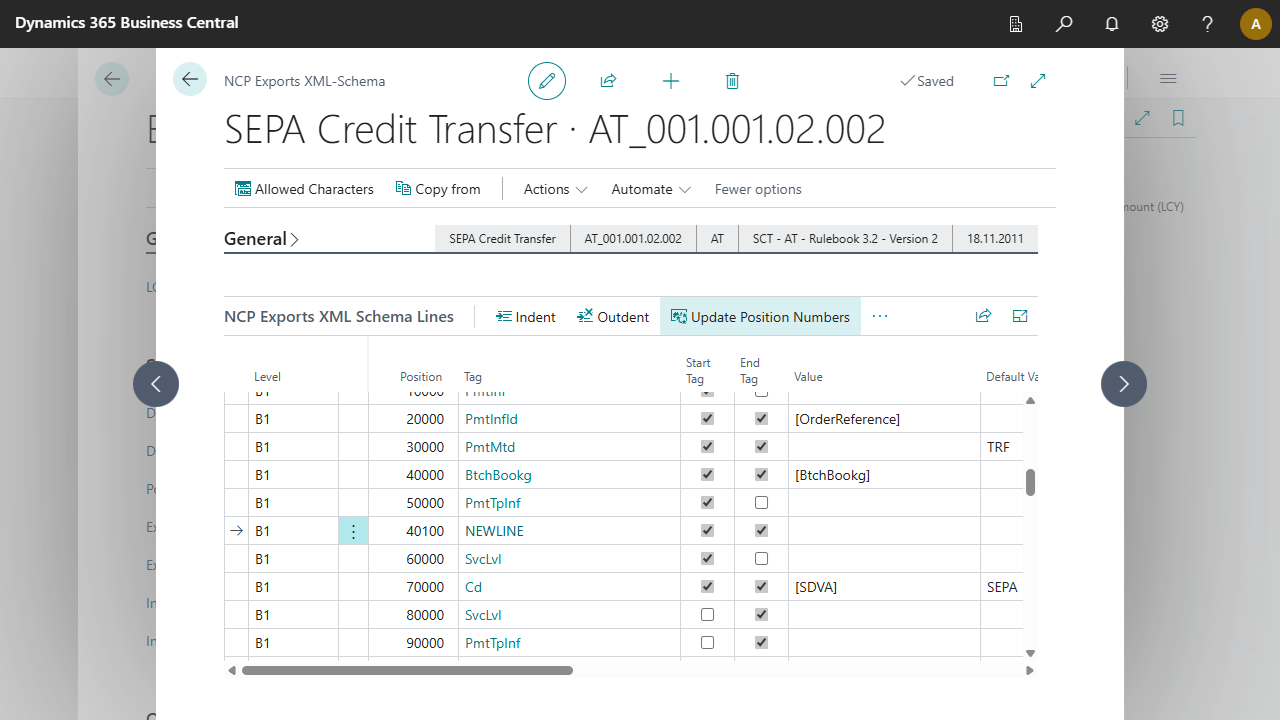


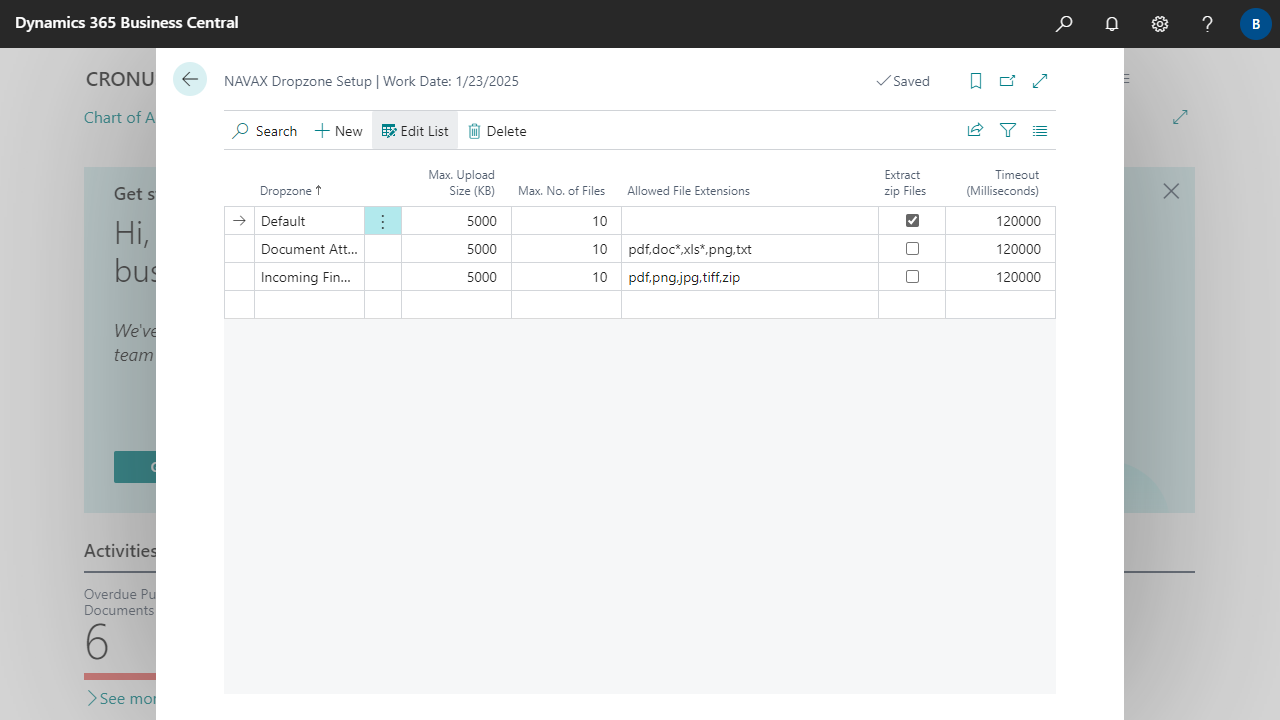


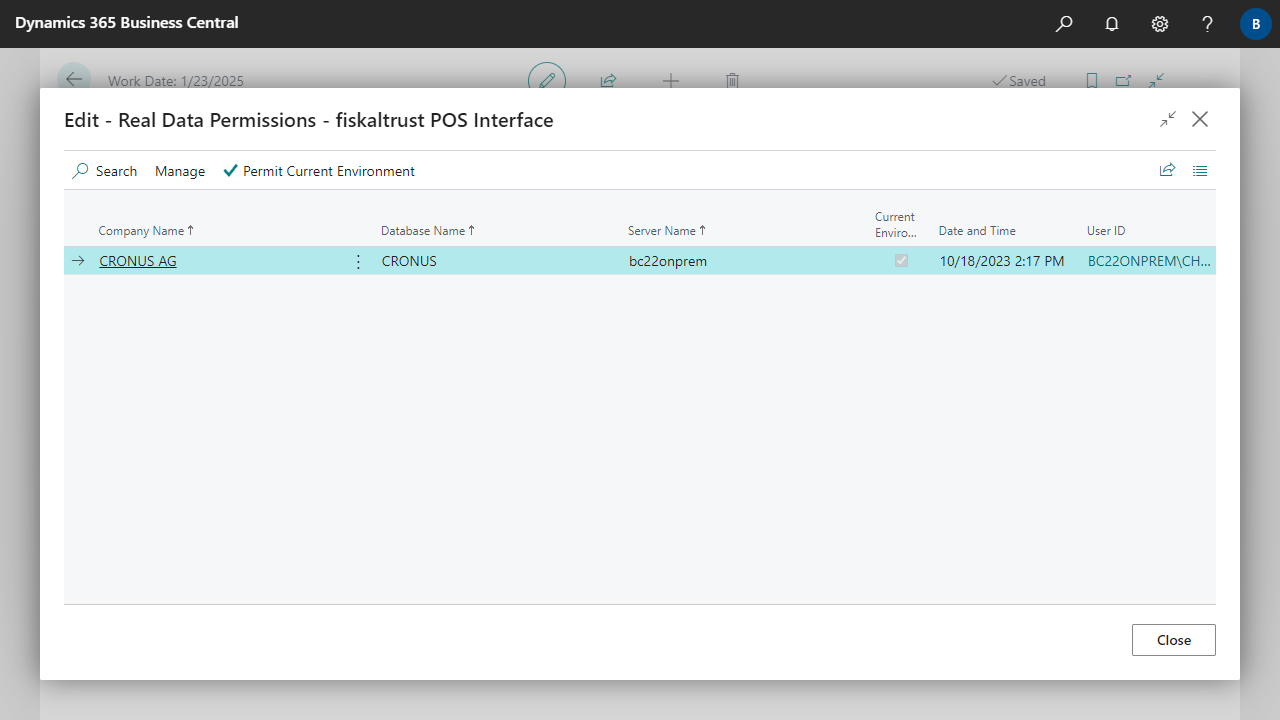


 You can adjust the following data, among others:


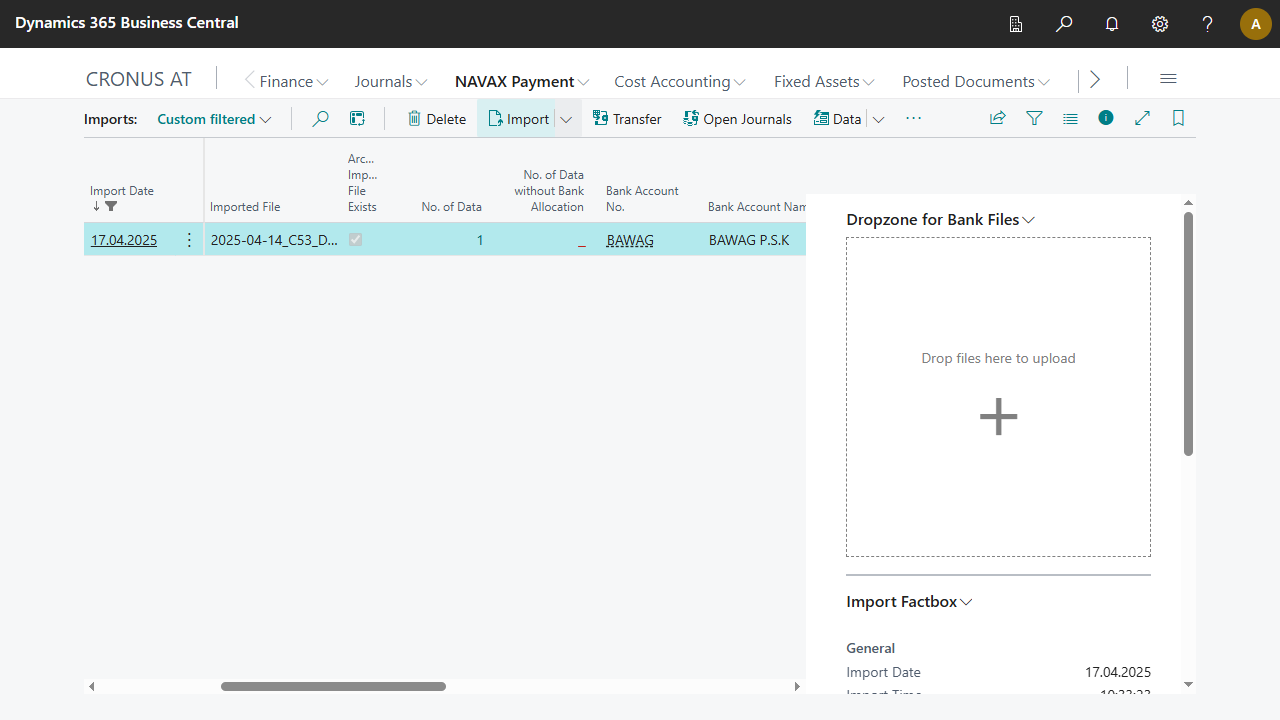
 Files can be imported over the Dropzone for Bank Files by Drag & Drop. NCP Imports checks the imported file whether it is a bank file (camt.052, camt.053, camt.054, mt940, etc.). This happens independently of which file type (xml, txt, etc.) is imported.

 The added files will then appear on the left side in the NCP Imports page, as a new record:


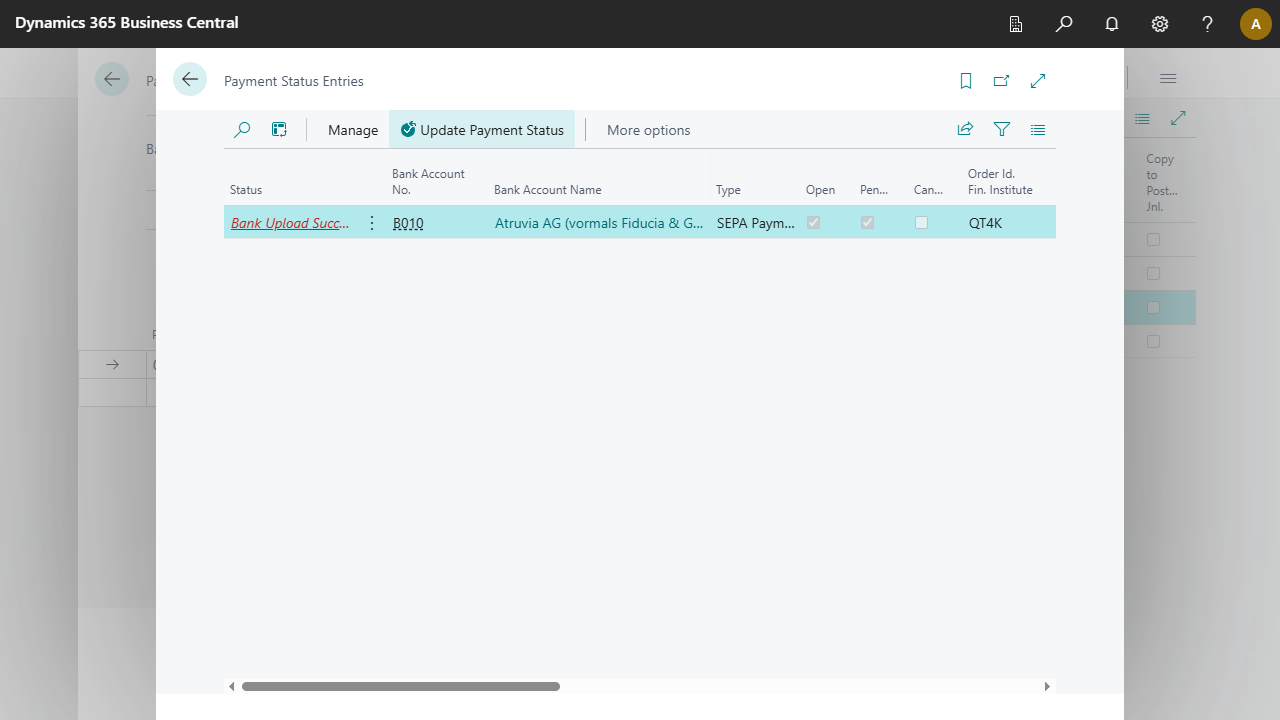
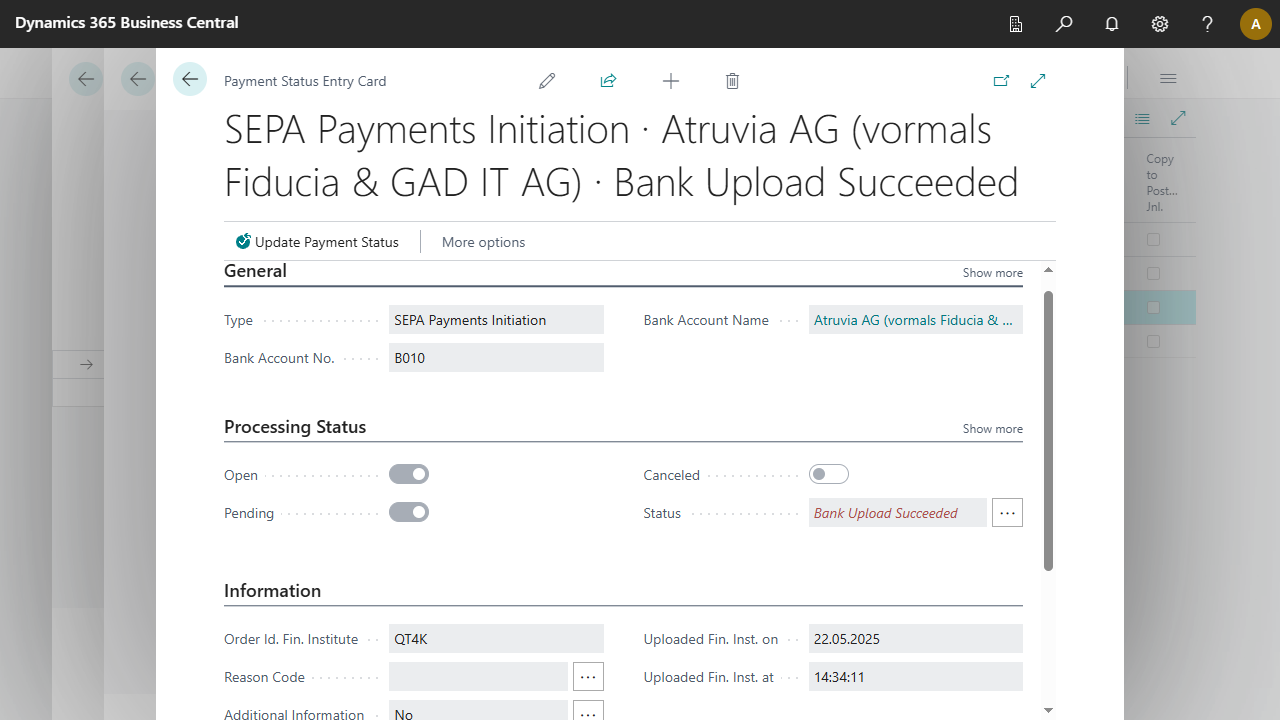
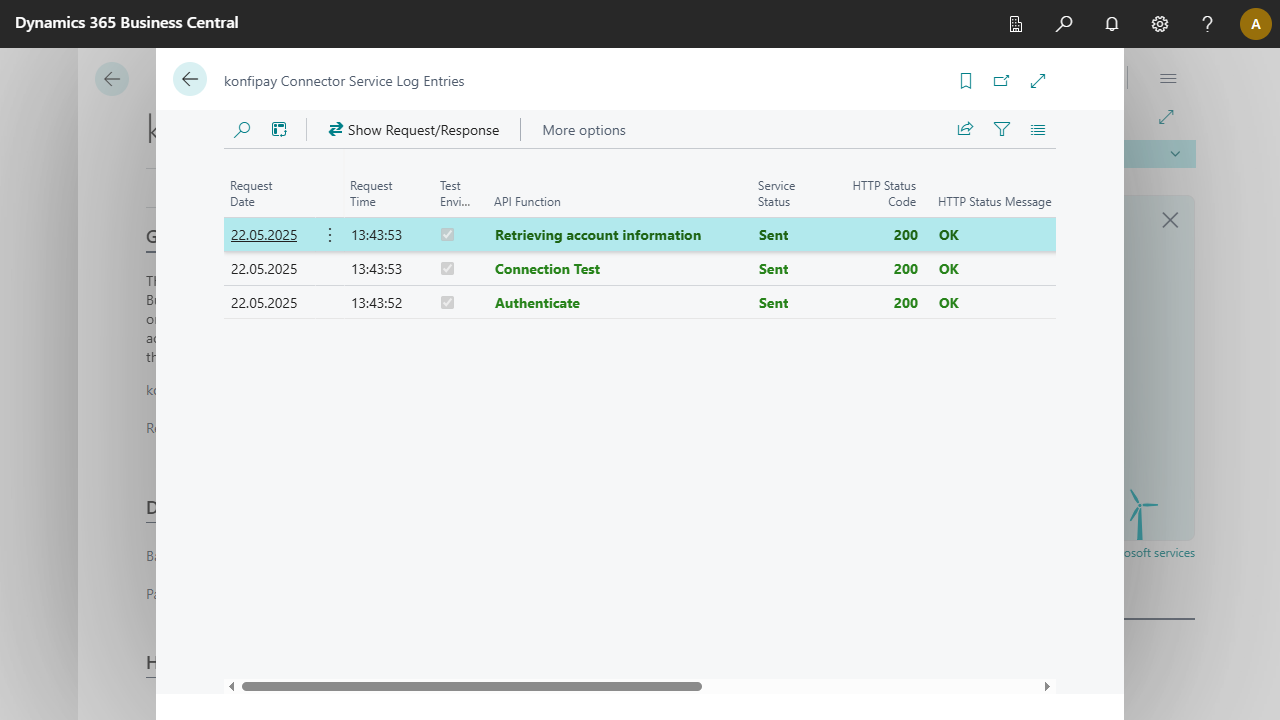
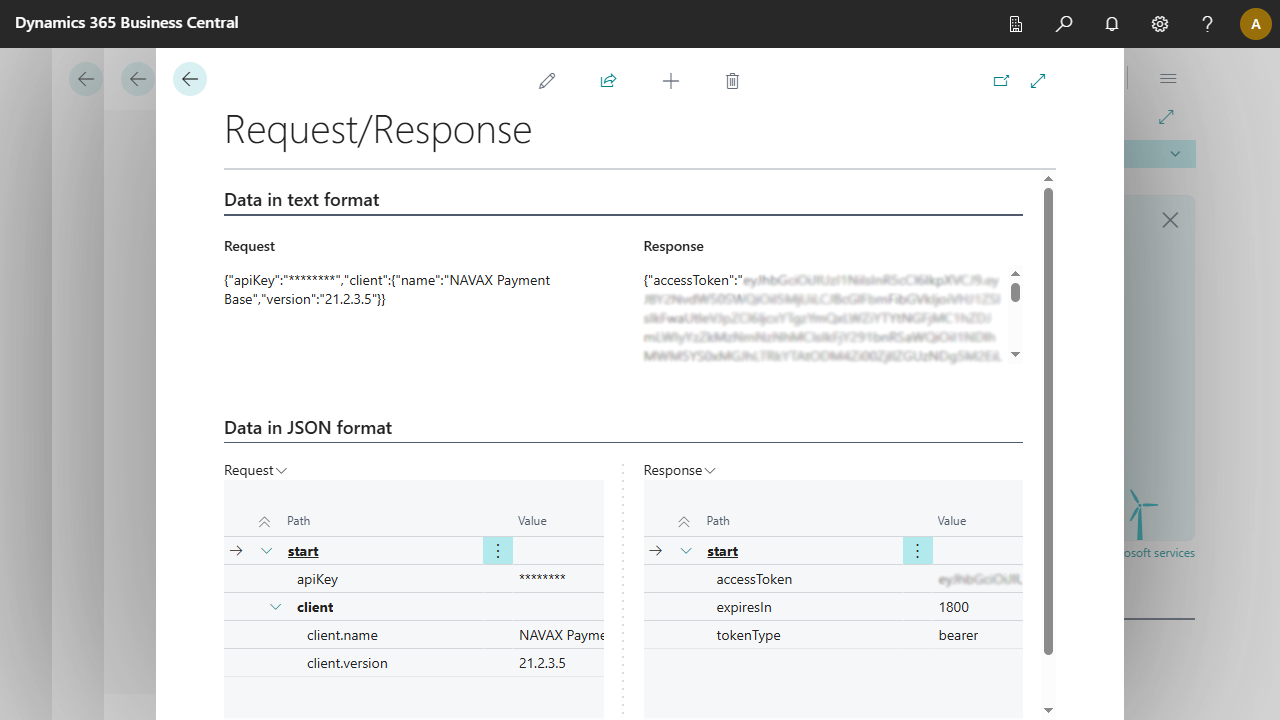


 Fill in the fields in the page and then click Send License Request. Please note that the licensing process may take some time. In the next few days you will receive an email with further information.

